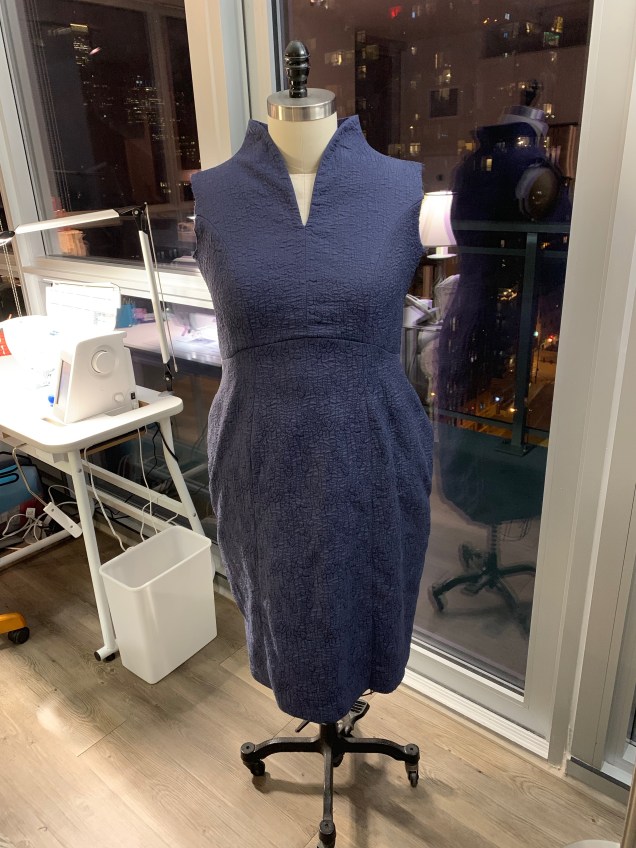
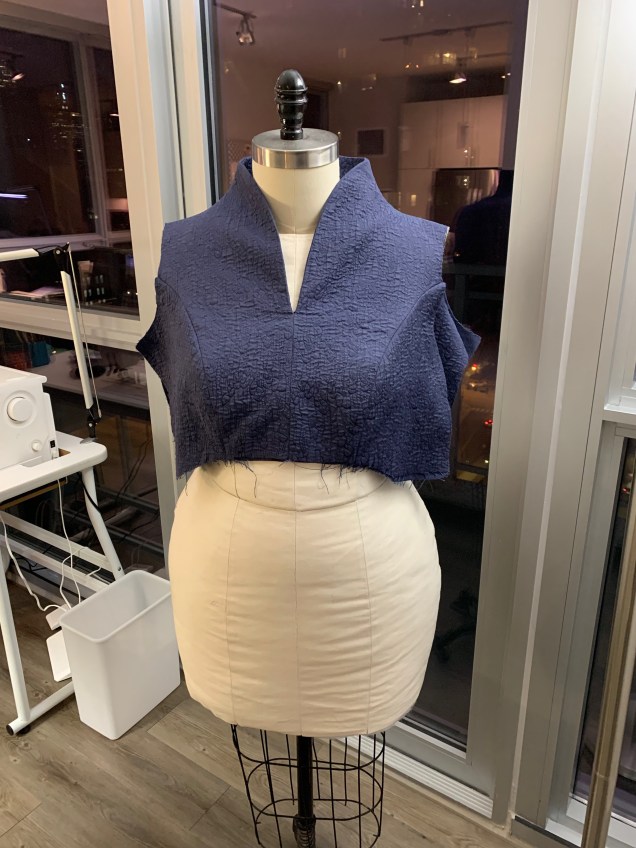
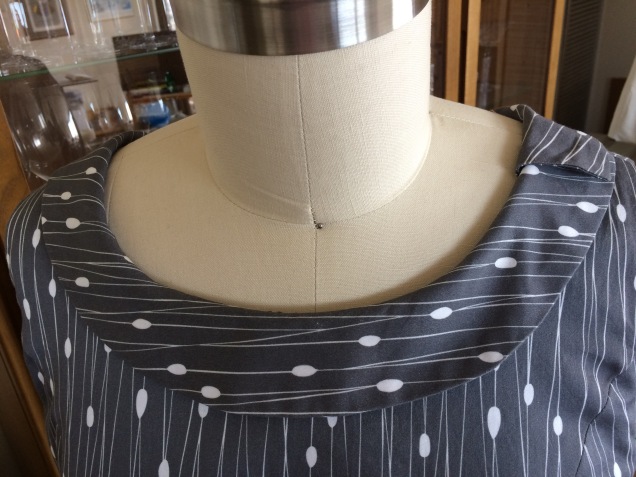
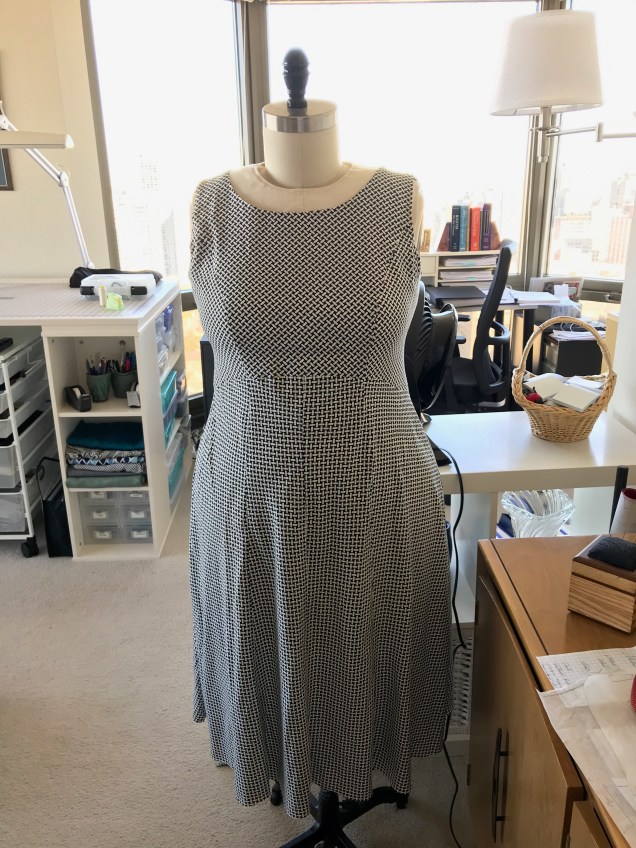
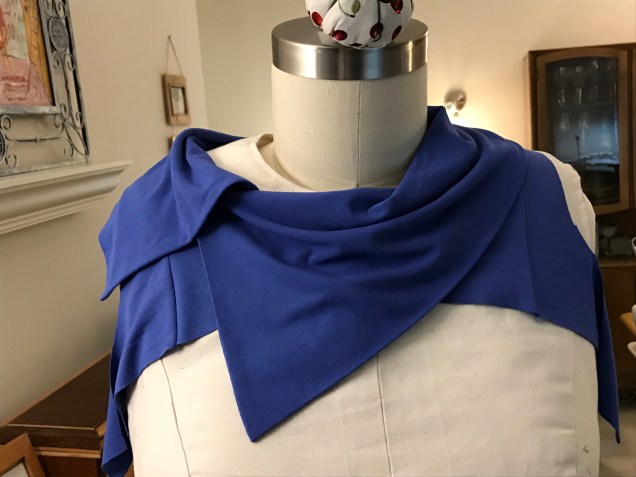
Let’s not dwell on how long it’s been since I’ve completed a project or how long since I’ve blogged. Instead, I’d like to celebrate the latest addition to my handmade wardrobe. It’s a dress that incorporates the raise V neckline I adore and fabulous crinkly rayon in an intriguing shade I’m calling Storm Cloud Blue. This fabric has been aging in my fiber collection for a long time. I’ve lost track of how long ago I bought it at EmmaOneSock. It’s actually a double cloth and the texture is achieved with stitching.
My original vision was to make this into a dress using this particular neckline, and then I veered off into other directions before coming back to this. I’m glad it took me a long time to start this project because I’ve refined the neckline pattern and found the perfect interfacing to make it work and because I decided to make the body of the dress the same as my LBD. I also decided to echo the tulip-like shape of the neckline with a curved faced hem on the sleeves. I think the combination is just right.
The neckline has been through a couple of revisions since I put it in a lightweight silk blouse that never stayed put and ultimately had to be cut down and then used successfully in my linen Tulip Dress, which is two pieces.
For the white double gauze cotton top I cut the back a bit and discovered that Shirtmaker’s Choice from Islander Sewing Systems (now called Shirtmaker’s Choice Medium) is the perfect interfacing for this design. It gives the neckline enough body to hold its shape without turning it into a stiff board.
The additional refinement I made to the pattern for this iteration was to do a better job of squaring it off at Center Back so it doesn’t dip at the Center Back seam. The next step was to graft the neck and shoulder onto my bodice master pattern and then to incorporate the curved Empire seam of the Little Black Dress. I also took my master pattern for 2-piece sleeves and incorporated a curved hem and made two hem facing pattern pieces.
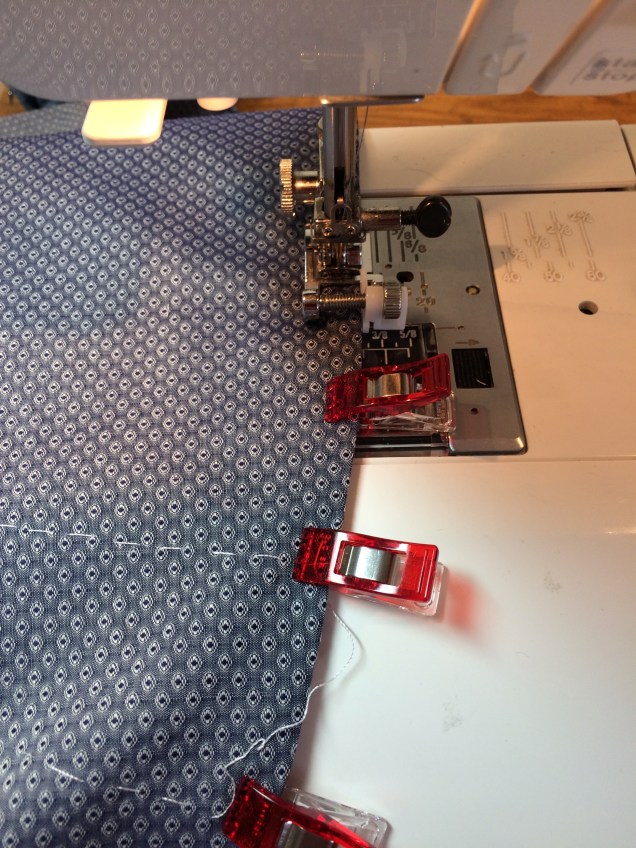
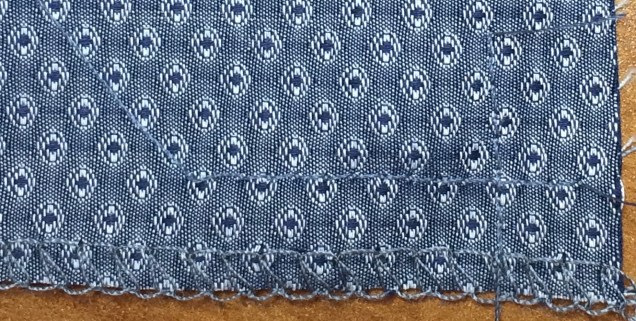
With the pattern work done, construction was relatively straightforward after making one more decision. I didn’t line this dress so the question for the bodice was do I make neck facings or simply self-face the entire bodice. I was concerned about the bulk of the fabric, but I tested and decided it was okay to mak a full self-facing so there are no worries about slippage. With this neckline it’s only possible to understitch part of the way because the stitching would be visible about half-way up. The fabric sewed and pressed beautifully. I finished the seam allowances with 3-thread serging.
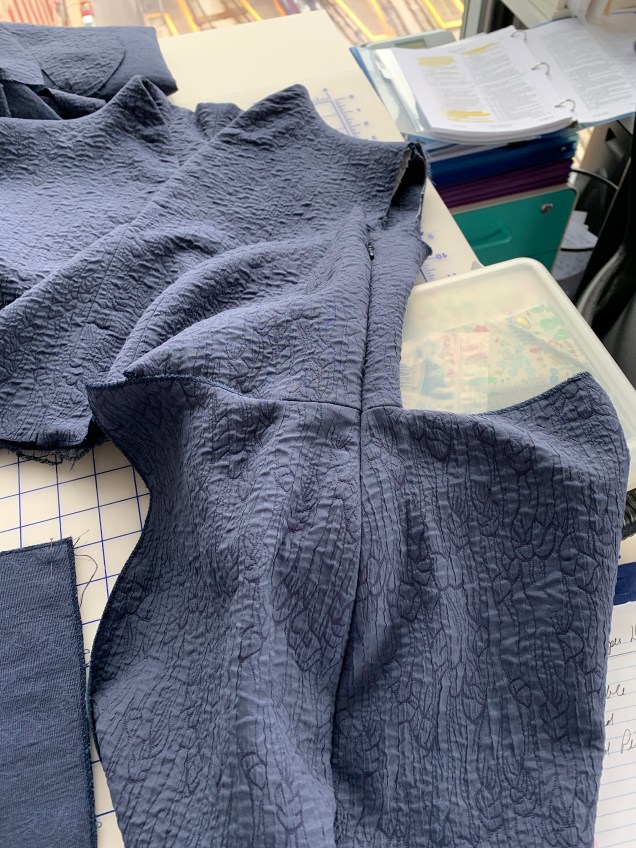
When it came to installing the invisible zipper in a side seam, I stitched the first side by machine, hand basted the second side to be sure I got the Empire seam to line up and everything was even at the top and then sewed over it by machine.
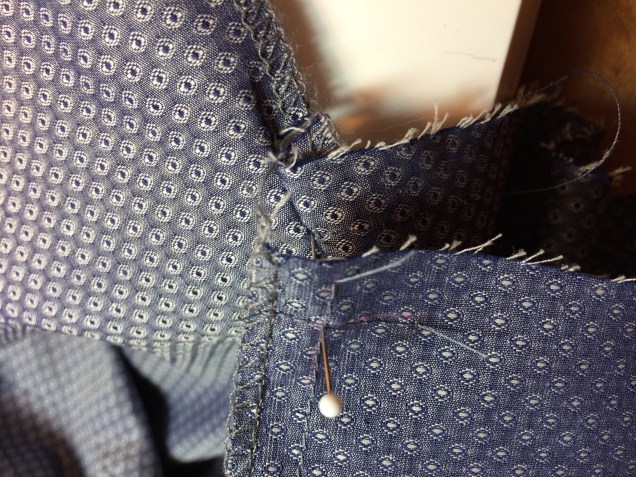
Getting the seam in the two-piece sleeves to line up with the shoulder seam was a bit fussier, so after one attempt to sew it all in by machine failed I sewed in the lower part of the sleeves (princess seam to princess seam) by machine, then pinned the sleeve cap on over a pressing ham for the right shape and attached the caps by hand using a fell stitch.
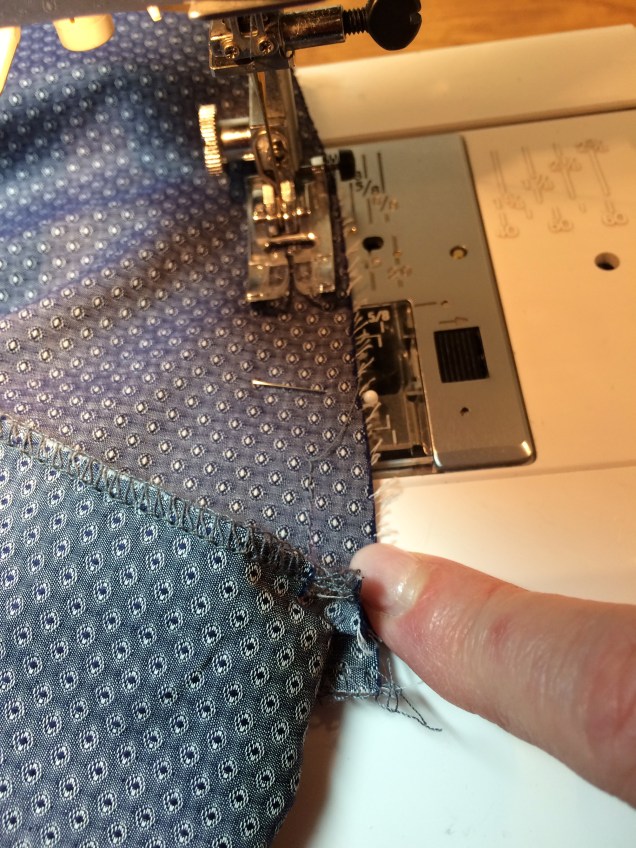
After attaching the sleeve hem facings (and finding I’d cut two the same and needed to recut the second one), pressing and pinning, I got to work with the hand sewn finishes at the sleeve hem facings and skirt hem.
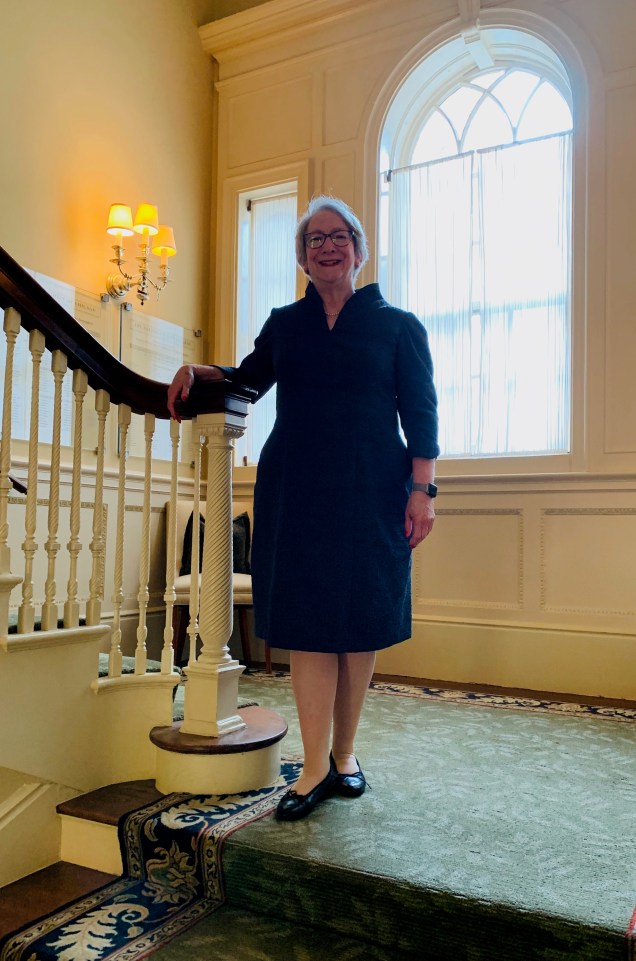
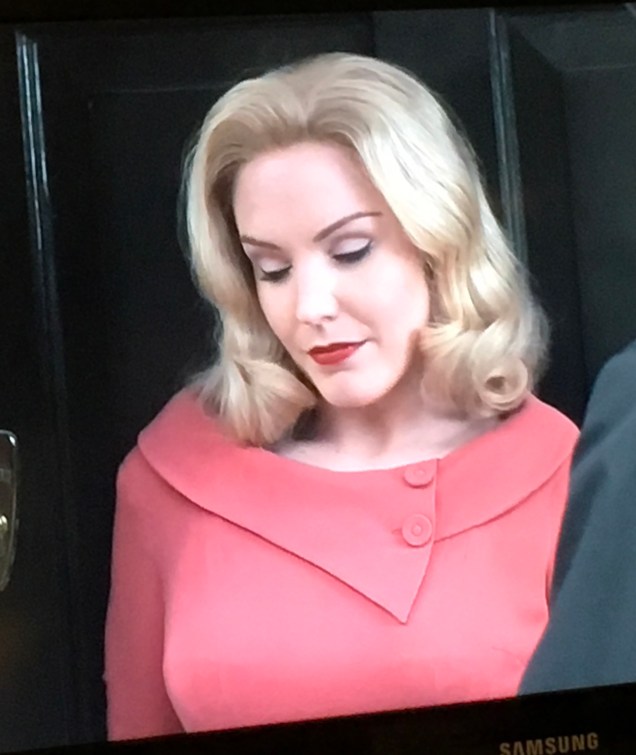
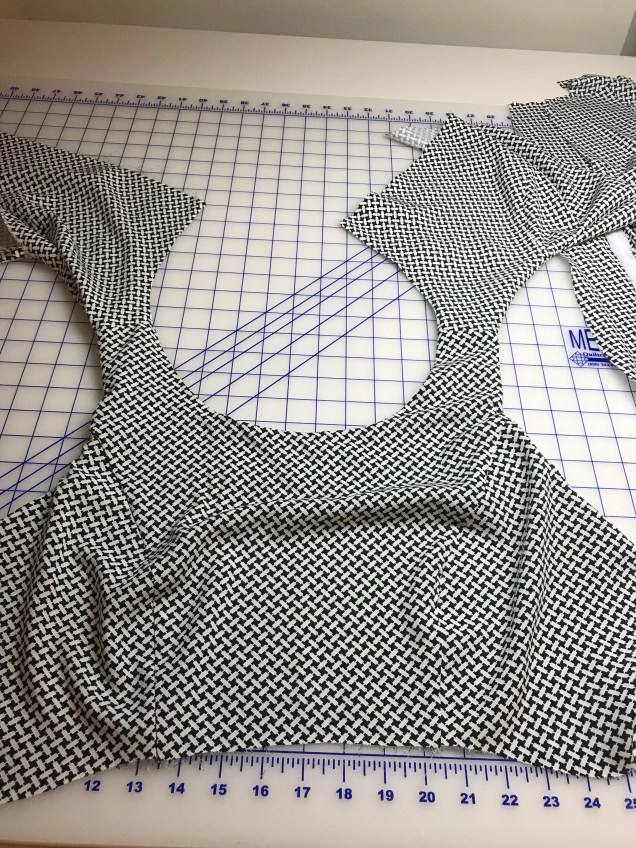
You know how one detail can make an outfit? My latest completed project isn’t something that required great leaps from what I’ve done before. It started with a collar I saw on a red dress worn by a minor character in an episode of Father Brown Murder Mysteries. I love the 1950s fashions in that show and I often rewind to take a picture or sketch something one of the characters is wearing.
I filed this image in my inspiration album and forgot about it until one day last spring when I was looking through my fabric collection for something else entirely and I came across this fabulous wool and linen blend that I had bought from A Fabric Place in Baltimore. The next thing that occurred to me is that I could make this as a two-piece dress, using my master patterns for bodice and skirt. Suddenly, I could see myself in this dress at court, at a luncheon, at anything that calls for business dress.
I found the absolutely perfect buttons in my button collection, but I only had the size that was right for the sleeves. I was really bummed, but the buttons were a recent purchase from my favorite source, Soutache Buttons & Trims here in Chicago, so I emailed the proprietor, Maili Powell, a picture of the buttons and asked whether she still had the larger ones. “How many do you need? I’ll set them said for you” was the prompt response. Yay! I mean, are these buttons not meant for this fabric?
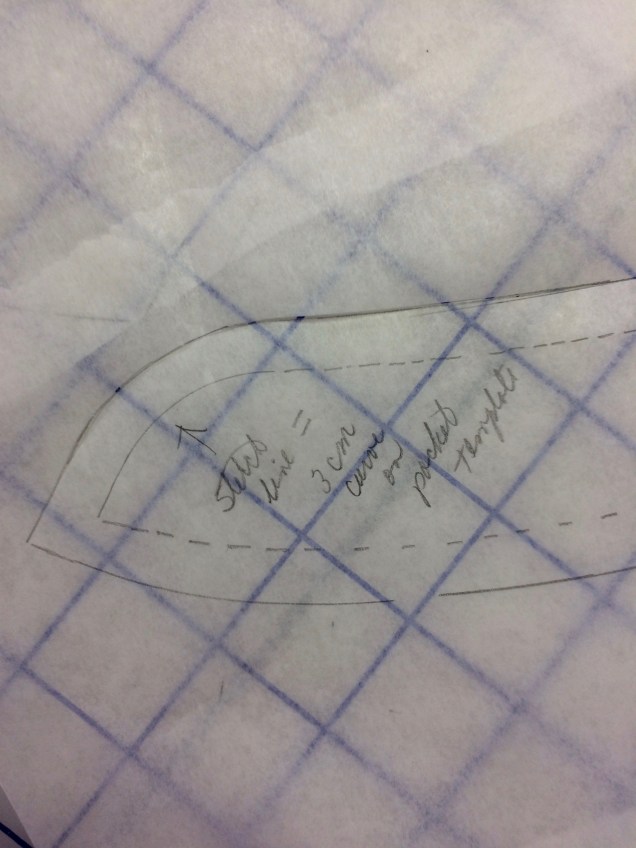
In thinking about the collar, I realized I could work from the collar on my Spoonflower dress pattern and use the neckline for that dress so there would be little or no futzing around to get the collar and neckline to work with one another. The collar I ended up with is narrower than the inspiration one, but I think it works.
The Spoonflower dress collar is a Peter Pan collar that overlaps and is shifted about a quarter turn around the body so the overlap happens at the shoulder.
Sarah Veblen walked me through the process of converting that collar pattern so I didn’t have to redraft the pattern from scratch.
I started out by tracing the Spoonflower collar pattern and marking Center Front, Center Back and the shoulder seams. Once it was cut out, I joined the ends, eliminating the overlap and underlap. Because the collar is drafted to have a slight lift (stand), it won’t lay flat when connected.
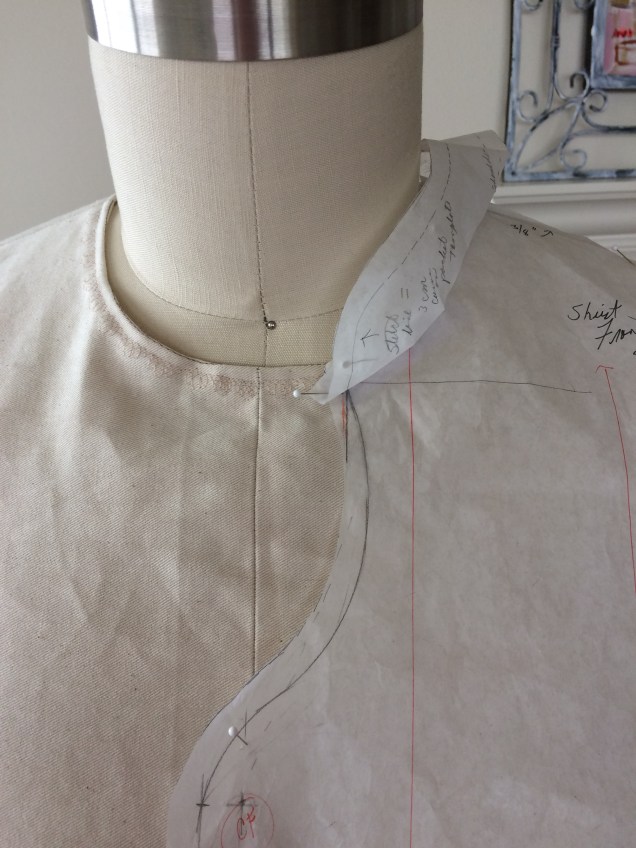
The next step was to cut the pattern where the overlap would happen and add the underlap and overlap. Then it was on to the dress form to refine the shape of the overlap and get that curve-into-a-point bit to look proportional and achieve the effect I was going for.
Once it looked right to me in paper on the dress form, I cleaned up the pattern, added seam allowances and was ready to cut it in fashion fabric. Whenever I make anything asymmetrical, I have to go to great lengths to make sure the finished product is going to be placed on the side I intended for it to end up on. Layer on top of that the fact that I tend to get lost when doing collars because they are sewn wrong side/undercollar to the right side of the bodice and I end up rechecking what I’m doing several times before fusing the interfacing.
I’ve started a notebook with machine settings and presser feet that I use for different tasks on my new machine. I had been experimenting with different approaches for understitching, and for this project the third presser foot I tried was the skinny zipper foot. Instead of sewing with the needle off to the side the way you do when you insert a zipper, I sewed with the needle in the center hole. Because my seam allowances are ⅜” it worked out very well.
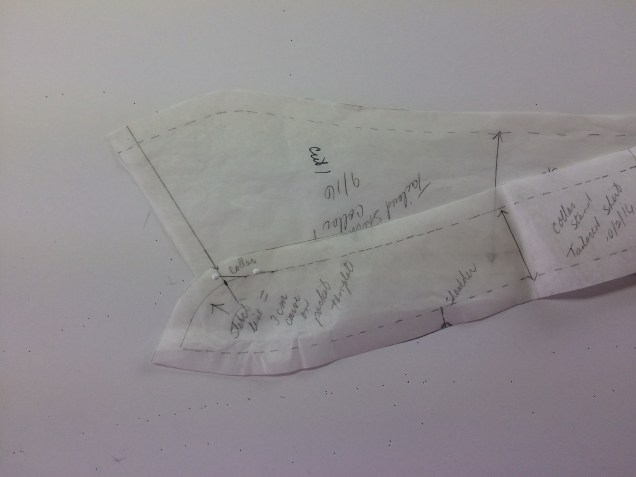
Once I got the collar attached, it occurred to me that it might be nice to have turned-back cuffs that echo the collar shape. So, I traced the turned-back cuff pattern from my shirtdress and to achieve the curved pointy detail I took a wild guess and made a photocopy of the overlap portion of the collar reduced to 70%. I had expected to need to try different percentages, but that guess was spot on.
My intention had been to try something new with the skirt, but I ran into an obstacle and so the skirt variation had to be put on hold. The skirt ended up being another pencil skirt from my master pattern. Both pieces are lined in China silk.
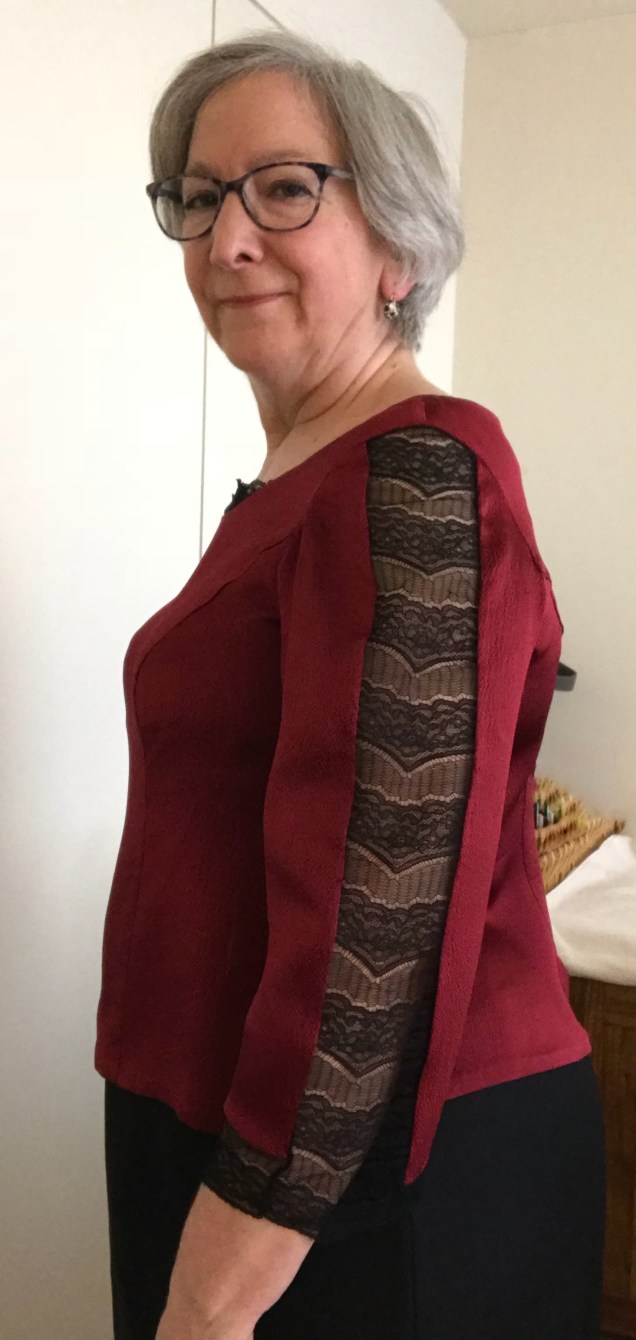
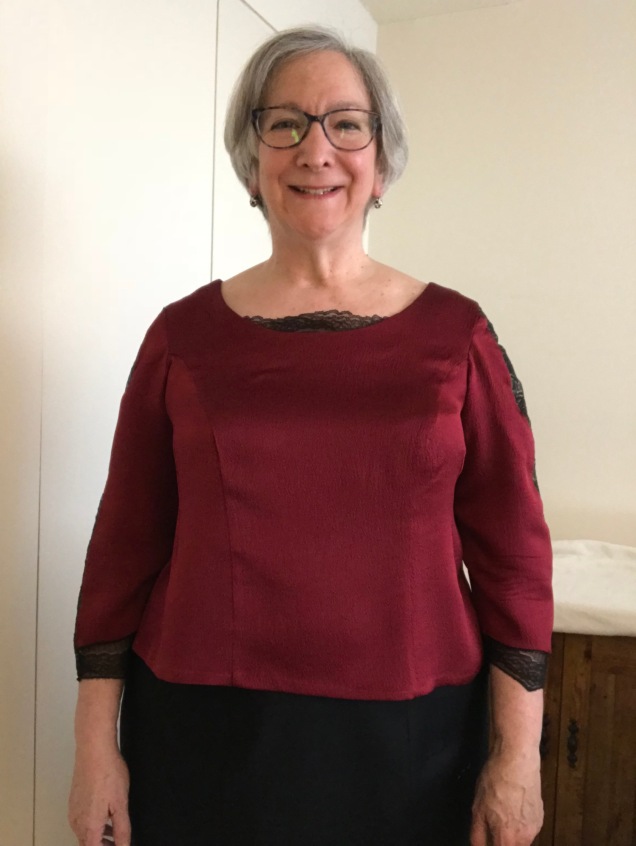
I had planned to complete three new garments by early this month, a black wool skirt and two festive silk blouses to wear to an annual luncheon and brunch with two different sewing organizations. I finished the skirt in time for the luncheon and never started the second blouse. The first blouse, which has lace insets, is one I designed, made the pattern for and cut out months ago. It was completed in time to wear to a Christmas Eve brunch.
When I was preparing for a presentation on using lace in garments for my ASG neighborhood group, Sew Chicago, I decided to try out an idea for a lace inset sleeve that I had seen in a catalogue.
My original idea was to use fabric for the full length of the outer panels and just have the one panel of lace. This required converting my master sleeve pattern, which is two pieces, into a three-piece pattern. The conversion wasn’t quite as straightforward as I had anticipated, but I started the process and Sarah Veblen got me the rest of the way there.
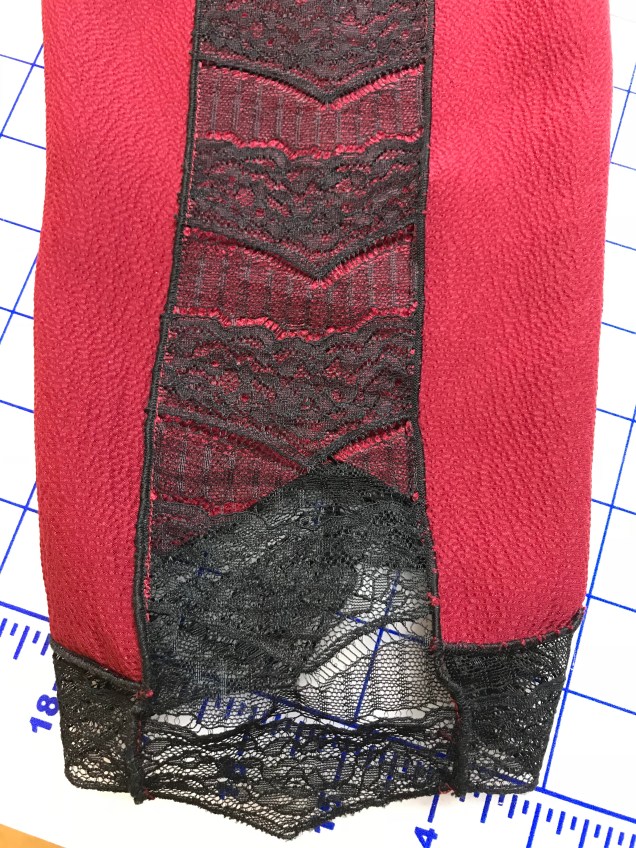
Unfortunately, I ran into a problem when I was cutting the fabric. I wanted to use this nice hammered silk that I had originally planned to make into a sleeveless shell to wear under a suit jacket. It was the end of the bolt, but enough for that project. When I got the idea to use the silk on this project, I laid out my patten and had just enough to make the blouse according to my original design. But, when I refolded the fabric to cut out the very last pattern piece, the second outer panel of the sleeves, I didn’t realize that the fabric under the fold had a piece missing from it. Of course I didn’t discover the problem until after I cut out the pattern piece, and I didn’t have a large enough piece of fabric left to cut out a new panel. The solution I came up with was to cut the other panel pieces shorter than I had intended and fill in with lace going all the way around.
I used a narrow rolled hem on my serger to finish the seams attaching lace to lace and silk to lace.
I also wanted to have a little bit of lace set into the neckline.
I had it in my head that I could sandwich the lace in between the fashion fabric and the facing, attaching it the way a collar would be attached. I was wrong. It took me several failed attempts and a quick muslin mock-up to figure that out. In the end, I attached the lace to the facing by hand.
I was concerned about over-pressing the hammered silk, so just about all the pressing was done by hovering the iron over the fabric and using lots of steam.
I decided to hem by attaching ⅜” fusible web at the cut edge, pressing it up before removing the paper, then fusing it and folding it again for a total hem of ¾” with the raw edge concealed. After pinning the second fold in place, I steamed the hem by hovering the iron and using a press cloth, a process I repeated after sewing in the hem. The great thing about the texture of the fabric is that the pick stitches are almost undetectable.
This blouse is a joy to wear and a nice addition to my wardrobe.
For this year’s ASG Chicago Chapter fashion show, my neighborhood group, Sew Chicago, challenged ourselves to create a garment that has at least 50% of the visible area sewn on the bias.
Four members of Sew Chicago met the challenge to “Show Your Bias” on the runway
Before embarking on this challenge, my experience with bias had been limited to bias bindings for necklines and armholes and using a single bias panel in the Decades of Style Stardust Skirt. So, of course I did a ton of research on the subject and shared what I had learned with the Sew Chicago Neighborhood Group.
My plan for the challenge project had been simple, or so I thought. I copied my master skirt pattern, which is for a slightly pegged pencil skirt with princess seams. I used the slash and spread method to swing out the seams at the side, side front and side back, kept the center back seam as it was in the original and added a center front seam. I then converted the grainline on each piece to bias.
I decided to test first with a wearable muslin, which turned out to be a very good call. I was planning to make the skirt in rayon challis so I tested in a less expensive rayon challis I had bought on sale. The skirt sewed like a dream and I was very excited about having a wearable muslin I actually wanted to wear. When I tried on the skirt I really liked the way it looked and moved. I then put the skirt on my dress form so the bias could relax overnight. When I put the skirt on to show Sarah Veblen in a mentoring session I discovered that the seams had developed waves just below the waistband and those wavy seams made the fabric in between pooch out. Sarah had me try various methods to address the problem, but it just got worse and later showed up at center back. I didn’t keep any of the pictures because I was so fed up with the whole project.
In thinking through what had happened, I came to the conclusion that the problem was showing up in the curved sections of the seams. My master pattern follows my curves and I had preserved those curves in the bias pattern, whereas most bias skirt patterns only have side seams and they tend to be straight. The message I thought the fabric might be sending me was “I like to curve when I’m on the bias, but I want to do it on my own terms, not in a way that’s dictated by a pattern.” It’s not any different from the messages my cat gives me, which is that whatever she does, she wants it to be her idea, not mine. I know I overthink everything, but this made sense to me. Cats and bias are both pretty finicky.
Having identified what I thought might be the problem, the next thought that popped into my head was a possible solution. The dress I had developed for the Sew Chicago Spoonflower Fabric Challenge has a fitted bodice, a curved Empire seam and a skirt portion with a relaxed fit. What if I took those skirt pattern pieces, eliminated all of the curves from the vertical seamlines and flared out the pieces straight from where they attach to the Empire seam?
I could cut the bodice on straight of grain and, for some extra insurance, place a zipper at center back but stop it at the Empire seam so there would be no zipper in any part of a bias seam. Sarah thought this might work, so that’s what I did.
I ordered 5 yards of rayon challis from Stone Mountain & Daughter so I would have plenty to work with for the bias pieces. As it turned out, I have 1¾ yards left over.
The print made me glad I’m not prone to vertigo!
Construction went smoothly and the method I used for setting the invisible zipper was so easy I worried that I had done something wrong. One fun thing I was able to do in constructing this dress was use the method of attaching the all-in-one facing that makes me feel like I’m doing a magic trick. I’ve gone through the details of the other cool method for attaching an all-in-one facing entirely by machine, which involves sewing in a tunnel. The method I used for this dress can only be used if you have an opening at center front or center back. I had planned to use a center back zipper for the bodice of this dress, so this was my chance to use the method in something other than a half-scale sample.
This has to be done before that center back (or center front) seam and side seams have been sewn.
After the bodice and the facing pieces are connected at the shoulders and the shoulder seams are pressed open, you attach the facing at the neck, press as sewn, clip the curves press the seam open and then turn the facing to the inside of the bodice and press the seam, favoring it so the seam is visible only from the inside of the bodice. The next step is to understitch, which goes very easily because the garment is still flat. I have a new machine and I found that using the stitch in the ditch foot with the needle position moved away from the seam worked very well.
The next step is to sew the armscye seams, following the same steps used for the neck seam. The only difference is that the understitching cannot be done all the way to the shoulder unless you do the tunnel stitching, but on this dress I got pretty close. The thing is, as long as you cut your facing pattern pieces ¼” shy of the fashion fabric pieces at the shoulder on the armscye side and taper out to the original bodice pattern piece about mid-way down, the seam will naturally roll toward the facing in the area that’s difficult to reach for understitching so you are okay.
Now we’ve come to the fun part. Other sewists have included videos in their tutorials and you might want to watch them if this sounds confusing. What I’ve found is that it sounds a lot more complicated than it actually is. Just follow the steps and once you’ve done it, you will be able to use the technique from memory.
What you want to do is reach into the space between the fashion fabric and the facing from the side that doesn’t have an opening with two fingers extending past the shoulder seam. In the case of this dress, I reached from the front toward the back.
You then use your other hand to pass one half of the back of the bodice and facing unit to those waiting fingers. Then you simply pull the fabric through until it is right side out.
Repeat on the other side and you’re done.
After construction was completed, I put the dress on Dottie (my dress form), marveled at the way the skirt seems to be in motion even when it’s perfectly still and hoped there would be none of those unpleasant surprises I encountered with the skirt.
When disaster didn’t strike after three days on Dottie (two would have been sufficient), I tried on the dress and the only issue that needed to be dealt with was the hem. The back was considerably shorter than the front. At first I thought this was due to the bias, but in taking the pictures of the pattern pieces I see it was a mistake in patternmaking. I don’t understand how that happened when I walked all the seamlines, but it did. With help from my dear friend Stephanie King I was able to sort out the hem length and finish the dress in time for the runway show.
One issue I noticed is some crumpling above the princess seams in the front. I thought it was a pressing issue, but pressing didn’t resolve it. And it’s not a question of posture.
I sent a picture and asked Sarah Veblen about it in a mentoring session. She thinks the bodice is too snug around the apex, at least for a fabric with the qualities of this rayon challis. That would explain why I haven’t encountered this problem when using my master pattern with more stable fabrics. I think this theory is probably correct. It doesn’t help that I’ve regained the weight I’ve lost repeatedly and regained again over the past couple of years. I’ll work on tweaking the fit before I try a version of this dress again.
Overall, I think this was a successful experiment. I’m happy that I found a solution to my bias problem in time to join in on the group challenge and I’m very happy that I have this dress.
I’ve really missed blogging, but I’ve learned I have to accept that there are just so many things I can stuff into a day and sometimes work and Life simply demand all of my time and energy. It’s not that I haven’t been sewing at all recently, but I have had some misadventures in sewing. More about that in a minute.
For now, I’d like to share my latest completed project.
It’s the tucked linen top that was inspired by the workshop with Mary Ray that I took through ASG Chicago in January. You may remember this fabric combination from my post about my complicated relationship with color.
This top is almost what I had planned.
The bodice came out just as I had envisioned. I put the top two ¼” tucks in my fabric before cutting out the center front panel. Here is a picture of how this was done when I was using the fabric that I encountered problems with:
I sprayed a bit of Mary Ellen’s Best Press on the linen and pressed in a crease, then stitched at ¼” using my blind hem foot.
It’s had to tell on from these pictures, but the tuck that goes all the way across the front panel just below the neckline is drawn in the pattern and trued at the princess seams.
I was all set to make a neck facing, but Sarah Veblen suggested I line the top in washed China silk, which I did. I also made faced hems for the bodice and sleeves, because I’ve had a problem with linen blouses “cracking” at the hem. It’s this curling thing that happens and no matter how many times you press the darn thing it rolls up again like a window shade. Very annoying! Faced hems are the way to avoid that problem.
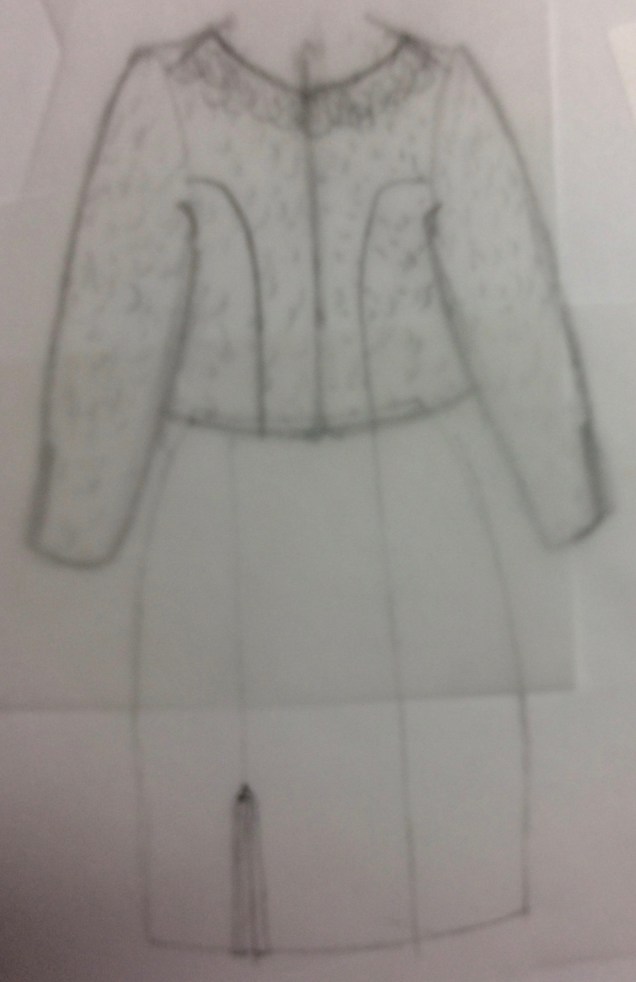
For the sleeves, I wanted to convert my usual two-piece sleeve to a one-piece sleeve so I could have a tuck that is not interrupted by a seam (and the problem of getting it to match). Here is the sketch of the design, which I posted several months ago.
On me, a one-piece sleeve that’s not a knit requires the tucks you see in the picture because of all the excess fabric in the sleeve cap.
I was in a tizzy when I got to the sleeves and didn’t pay attention to lining up the sleeve tucks with the blouse tucks, even though that’s the way Sarah draped the sleeve muslin on me. As you can see, I got one side right. Dumb luck!
In the course of this project, I tried to avoid this whole tucks in the sleeve cap issue by developing a sleeve with a crescent-shaped inset at the top, using Sarah’s instructions in Threads Magazine (Vo.192, Sep. 2017 pp.44-45). The mock-up showed me this is a design that does not work on me. Sigh.
But that’s not the only reason I was in a tizzy when I set in the sleeves. The other reason is that I completely forgot to put the tuck in the fabric before I cut out the sleeve. That’s why there is no tuck across the sleeve in the pictures. Another sigh. And a head shake.
After I finished the blouse, I got another idea for a sleeve that might work. Actually, two ideas. They’re variations on the second inset sleeve design in Sarah’s Threads article:
One of these just might work.
I’m crazy about the skirt. It’s rayon challis from Stone Mountain & Daughter Fabrics. I took my master pattern for a pencil skirt, which is a six-panel princess and extended each of the seams to make the skirt swishy.
Originally, this skirt was going to be cut on the bias. That was another misadventure I had this summer. The wearable mock-up I made out of another rayon challis was absolutely not wearable. It looked adorable when I tried it on right after I sewed it, but when I left it hanging on my dress form so I could let it relax before hemming, it developed some nasty waves and pouched out in all the wrong places. The lesson from this is that bias does not play well with seams shaped to fit my curves. So, I went back to the drawing board for bias. I have to come up with something for the ASG Chicago Chapter Fashion Show next month, because the Sew Chicago Neighborhood Group Challenge is “Show Your Bias.” I’m working on Plan B this week.
Meanwhile, I have a fun new swishy skirt on the straight of grain and at least another week of warm weather to wear it with my linen top.
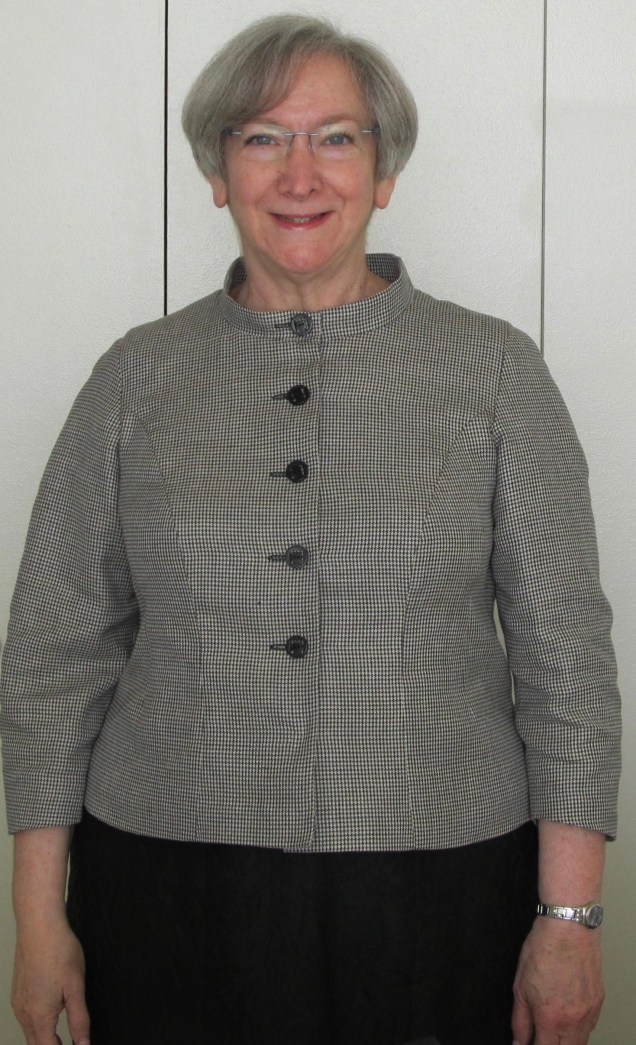
It’s been way too long since I’ve posted on this blog and it seems like forever since I’ve finished a garment to blog about. So, let’s get down to business with the jacket that I was going to wear on a trip to Brazil that has since been cancelled.
Except for the wrinkles, you would never know that this is linen. It has the look and texture of wool. The fabric is Armani (it says so in the selvage), which I bought from Marcy Titlon’s web site possibly two years ago. The pattern is one of those things that’s hard for cameras to capture accurately. It’s tiny houndstooth checks in black, taupe and beige. The buttons are from Soutache Ribbons and Trim and it is lined in Bemberg Ambiance.
I started with my basic armscye princess bodice and ¾ length two-piece sleeves. I knew I wanted to do a Mandarin collar and at first I thought I might want the jacket to be asymmetrical, similar to this sketch I had made earlier (the one on the left).
After looking at circles of paper the size of my buttons arranged on my dress form, I decided to drop the idea of asymmetry. Having the buttons at center front looked just fine. I also decided I didn’t need the curve in the front overlap/underlap and cuffs or buttons on the sleeves could be eliminated as well. Work had been getting increasingly busy and I needed to get this project done.
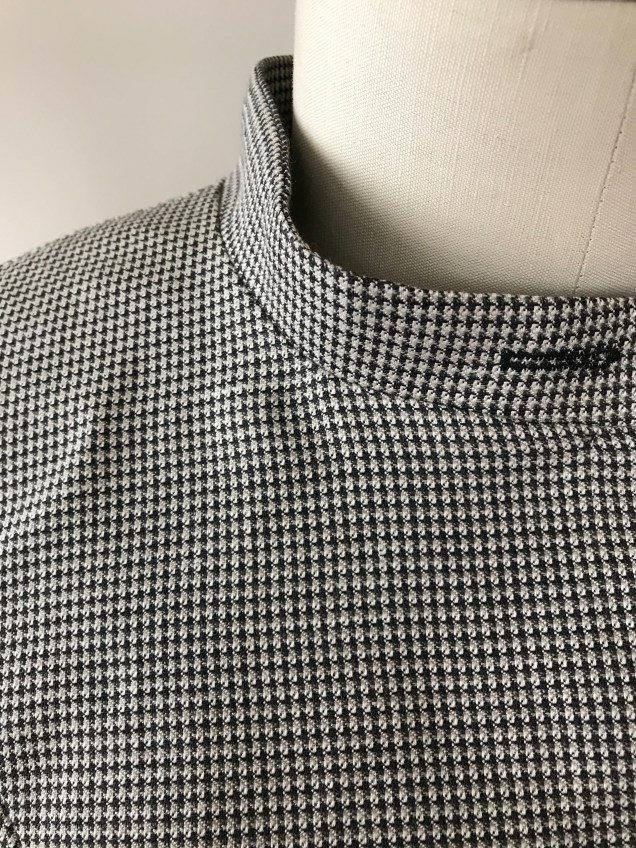
In a mentoring session, Sarah Veblen told me I could just mock up the collar once I got the body of the jacket constructed, but I was unsure about the neckline so I did a muslin of a part of the front, the back and the collar. Sarah made minor adjustments to the mockup during a You Choose Your Focus workshop here in Chicago in March. Her advice was to make the collar slightly shorter in the front, which I did.
The next issue I thought through was the button in the collar. I knew that trying for a functional buttonhole and button in that location was asking for trouble, particularly with the diminished amount of real estate that resulted from making the front of the collar dipping a bit lower than the rest of the collar. I knew a plastic snap behind a button would work, but that still meant taking a risk of running into all sorts of headaches with the buttonhole. My solution was to make the top buttonhole before assembling and attaching the collar. That gave the automatic buttonhole foot an unobstructed path to work with. The stitching is on the upper collar only and I never cut it open. I made several practice buttonholes, both before making the non-functioning one and before making the rest of them, just to make sure that nothing had shifted when I set the buttonhole foot aside to sew the rest of the jacket and to account for the differences between a single layer of fabric and a fashion fabric/interfaced facing sandwich with a seam connecting them. Except for some skipped stitches that had to be resewn by hand, that part of the process worked fine.
For this project, I made a complete checklist of all the construction steps in advance in an attempt to keep myself on track and help with time estimates. This is one of the suggestions Sarah has made to help me be more realistic about my expectations and chart my progress. Checklists, like shopping lists, are extremely helpful, but only if you read them! I was working merrily along without referring to my checklist when I realized that I worked the collar construction the way I do a rolled collar, assembling it before attaching it to the body, whereas I had wanted to use the method you use for a collar band on a tailored shirt. I caught my mistake too late and complained to Sarah that I was going to have to make a new collar. She pointed out that there is more than one way to approach this construction and, in fact, she never uses the tailored shirt method. I followed her advice and concluded that, for a lined jacket, both methods work just fine.
I did lose my momentum when my travel plans were changed and work got crazier. And, as you can see, I didn’t take a lot of pictures to document this project. My enthusiasm for this project dropped even more when I saw this bubble thing on one side:
The other side was perfectly smooth. Sarah tried to diagnose the problem by looking at pictures of what was going on inside.
After repeated pressings, extra clipping of the curve and general futzing, I remembered that I had needed to resort to spot steaming and some easing when sewing the neck seam. In all likelihood, one side got stretched out of shape in that process. Probably nobody would have noticed had I not pointed it out here, but I think it’s important to go over the pitfalls so we all can learn from them. Anyway, that close-up does show you my nice fake buttonhole.
The jacket is finally in my closet, and I might actually wear it if (1) I get the black linen skirt that goes with it sewn (right now all the pieces are cut out and only the back darts are sewn); and (2) I have a meeting that does not involve a video conference component (there is a reason nobody wears houndstooth prints on TV) on a day when the dew point isn’t in the stratosphere. Is that asking too much?
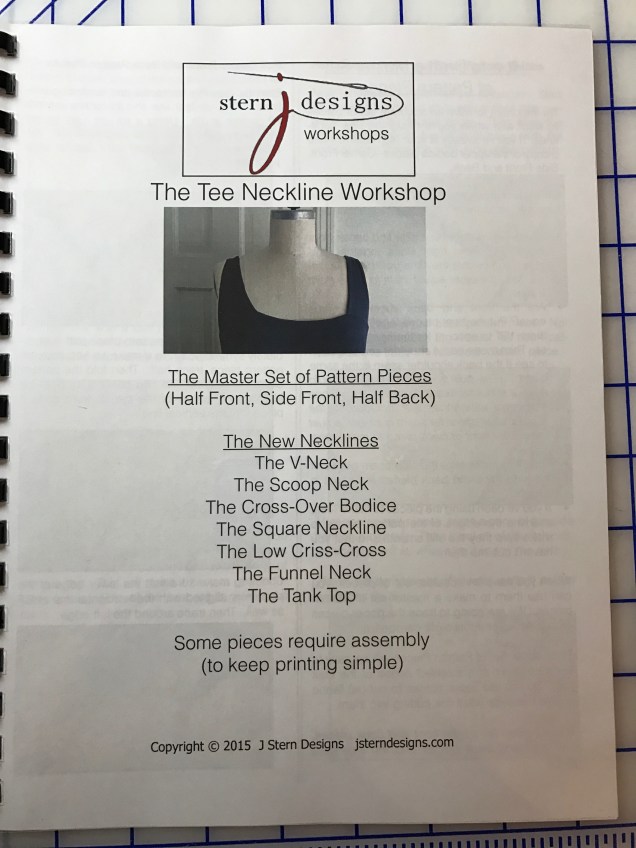
One of the great hands-on workshops I attended at last summer’s ASG Conference was Jennifer Stern-Hasemann’s half-day class called “Beyond the Boatneck.” Jen is a great teacher as well as an excellent designer and patternmaker. She sets a low-key, no-stress tone in her classes and is a joy to learn from.
The class description talked about pattern variations for her Tee pattern, but it actually was a pattern drafting class. I look at her approach as akin to a mom with young children sneaking veggies into a casserole. So many sewists – even experienced ones – are intimidated by the thought of patternmaking, but routinely make pattern adjustments. Whatever works, right?
The class materials included a booklet that has color photos and step-by-step instructions for drafting six new necklines and converting the tee into a tank top. Jen sells the book on her website, which is almost as good as having her patient guidance in class.
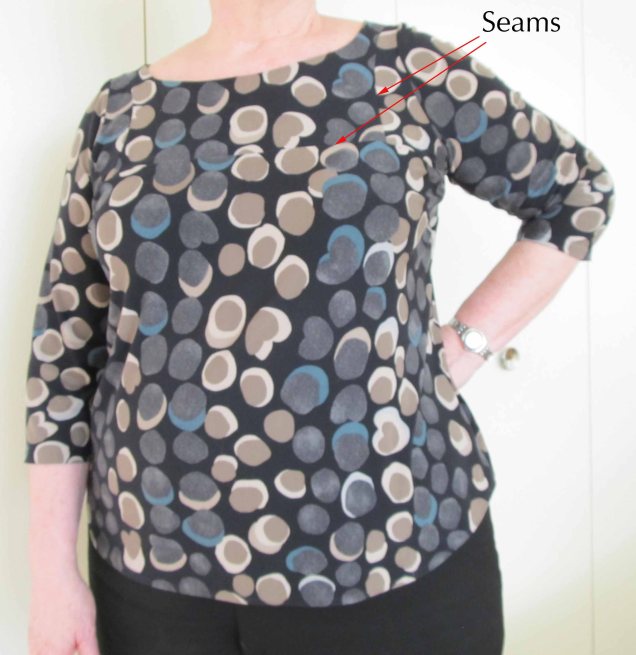
Most of the neckline changes can be achieved by swapping out a single pattern piece. As I explained in an earlier post, the Tee achieves its flattering shape with seams that form upper and lower parts of the front and back and an upper side front panel that acts as a dart.
The neckline variations are made by making a new upper front pattern piece. If the neckline is narrower than the original boatneck, the back piece needs to be widened at the shoulder to correspond to the combination of the upper front and side front pieces.
I was excited to make patterns for the variations in the book. Here are my patterns for the scoop neck (yellow in the upper left), v-neck (lower left) and crossover (right).
Scoop (left), Semi-Scoop (right)
V-Neck
Crossover
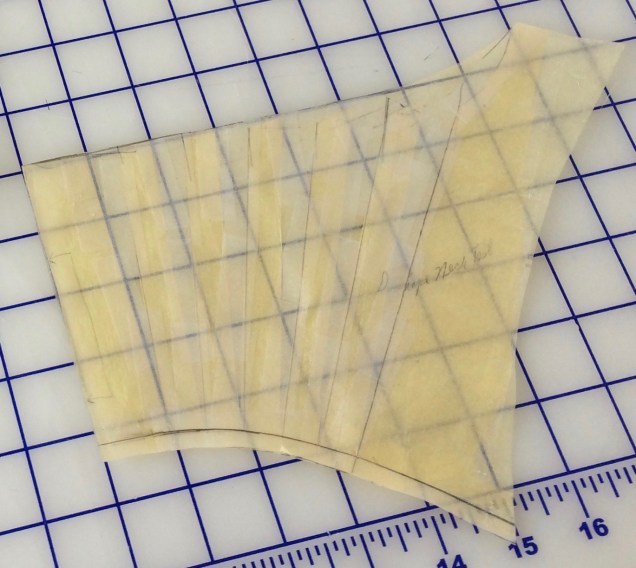
At the same time, I was struck with an idea that wasn’t in the book – a draped neck. I attended the workshop with my dear friend and Partner in Crime, Steph King. As soon as I had the words “drape neck” out of my mouth, Steph started tracing her center front piece and cutting strips for slashing and spreading it into a draped neckline. I waited until I got home to do mine.
My first draped pattern piece looks like this. The shoulder is at the upper right of the picture and the horizontal seam that connects the upper front to the lower front is now curved.
I cut two of these on the fold so I could use one as a facing, which is what I do most of the time with this pattern. The result was a seam at the neckline, which is okay but not fabulous.
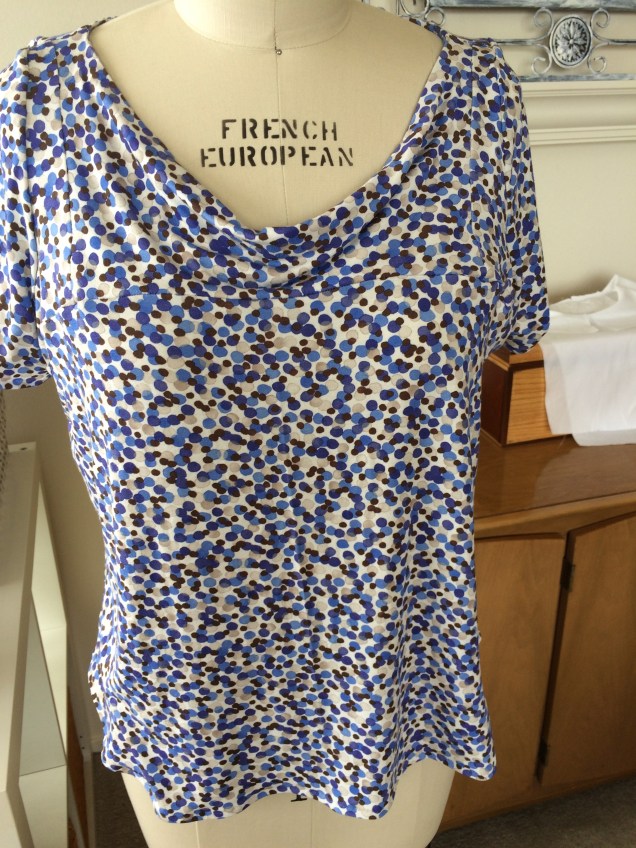
I love this drapey rayon knit from Marcy Tilton’s web site. It has all my colors in it and feels like a warm weather print, so I made this top with short sleeves. it looks great on the dress form, especially after I’ve futzed with it so the seam doesn’t show. When I’m wearing it, I’m not static like my dress form and movement will make the neck seam visible from time to time.
After seeing that eliminating the seam in the front neckline would have given me more of the effect I was going for, I decided to set aside my fears about dealing with what I think is a very strange-looking pattern piece when a drape neck forms its own facing by folding over. In thinking it through, I realized that drafting this type of pattern piece doesn’t require mastery of any mysterious geometrical gymnastics. It’s just a matter of tracing the pattern piece I’d drafted by slashing and spreading and flipping that over to make a mirror image, then overlapping them so that the two halves of the new piece meet in a straight line that the fabric can be folded over there and sewn in place. It ends up looking like this:
It’s not marked in this picture, but the straight line on the left is Center Front, which is cut on the fold of the fabric. That “V” at the shoulder was the bit I had found intimidating. From a patternmaking point of view. it’s really no big deal. It’s what forms naturally when melding the two pieces together. Construction – especially on a serger – can be a little tricky.
I didn’t take any pictures of construction, but as you can see from the labeled picture above, the tricky bit is sewing that V-shaped front shoulder seam onto a straight back shoulder seam and making sure none of the fabric scooches away when under the presser foot and leaves a hole. This is especially tricky with slippery and drapey fabric like the rayon-Lycra knits I want to use for this type of garment. Add to that the fact that it’s a knit and I want to serge it together and I start to wonder whether this was such a great idea after all.
After clipping into the V as far as humanly possible, I tried serging the pieces together and got a hole the first time. Unstitching a serged seam is such an unpleasant experience, I decided to do whatever it takes to avoid doing that a second time. My solution was to baste the shoulder seams by hand. Before you groan and say “hand basting a knit, are you crazy?” remember that (1) these are very, very short seams. We’re talking just a few inches. And, (2) I did a lot of hand stitching on my Miss Fisher top, which is a knit. Besides, hand basting takes a lot less time and is way less frustrating that unstitching a serged seam over and over again.
The basting did the trick and I was able to complete construction with no problem.
This approach is definitely a keeper.
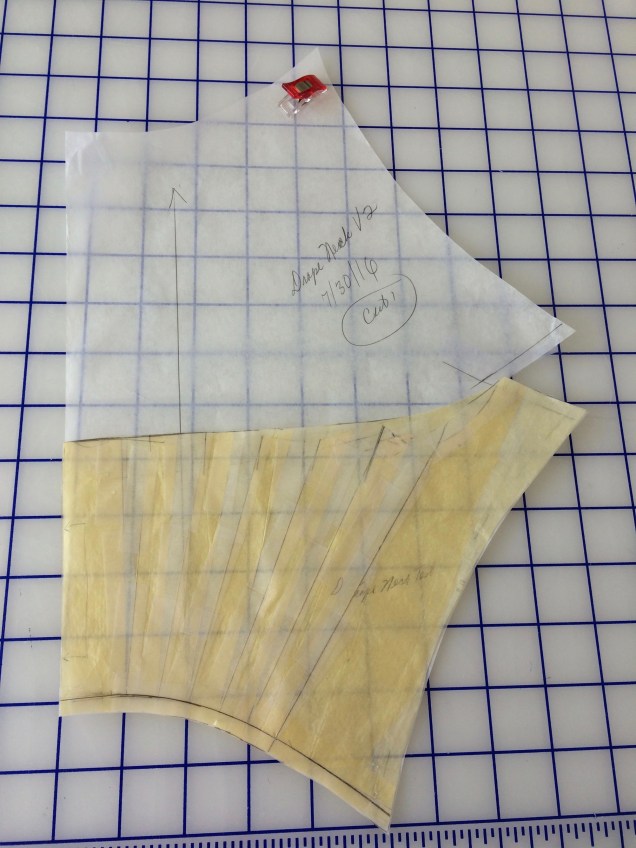
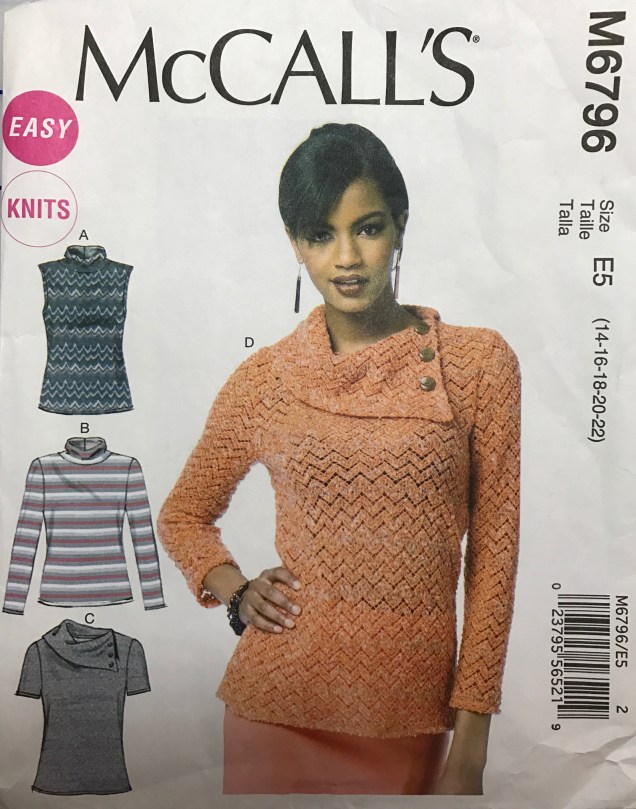
Next, I got it into my head that I wanted to try adding a collar. It’s been a few years since I’ve been wanting to try this particular collar. My lovely friend Marie wore a top made of McCall’s 6796 to a sewing group meeting once and I immediately bought the pattern.
The neckline on the pattern is pretty high and for that reason I took the pattern out and put it away several times. But last month I decided to try this collar with the J. Stern Tee and the scoop neck variation. After walking the neck seam on the tee and the collar, I did a bunch of slashing and spreading that gave me the little extra I needed in the back and the lots of extra I needed in the front.
After trying a mock-up with the scoop variation from the workshop, I decided the neckline had to be a little bit less scoopy. So I made a modified scoop neck pattern piece and adjusted the collar accordingly. I tried it out in this great rayon-Lycra knit from Sawyer Brook in a color they called Bluebonnet, but didn’t think it worked well. So, I made the top with the modified scoop neck but no collar.
It’s okay, but I had this picture in my head and this wasn’t it.
The thing is, I had bought enough of this fabric to make a twinset and so I had plenty left over to try the top with the collar again. In a mentoring session with Sarah Veblen, she said she thought the neckline needed to be higher for the collar and I said i thought it needed to be a bit narrower. She agreed and, with her help, we came up with the modifications I needed to make a slightly higher, slightly narrower semi-scoop pattern piece. With the somewhat narrower neckline, I had to make a new back piece as well. Instead of making the collar smaller, I decided to see what it would look like with some overlap. I then draped the collar onto the assembled front, side and back panels on the dress form and liked what I saw.
With this sewn, I then added the facing assembly and finished construction. Unfortunately, I got confused about which was the fashion fabric and which was the facing in the top panels and the finished product has the collar opening on the left instead of the right with the front overlapping the back. Sigh. The next time I do this I won’t take off my painter’s tape labels until after the whole thing is assembled. Another live and learn moment. Still, I’m pretty happy with the result.
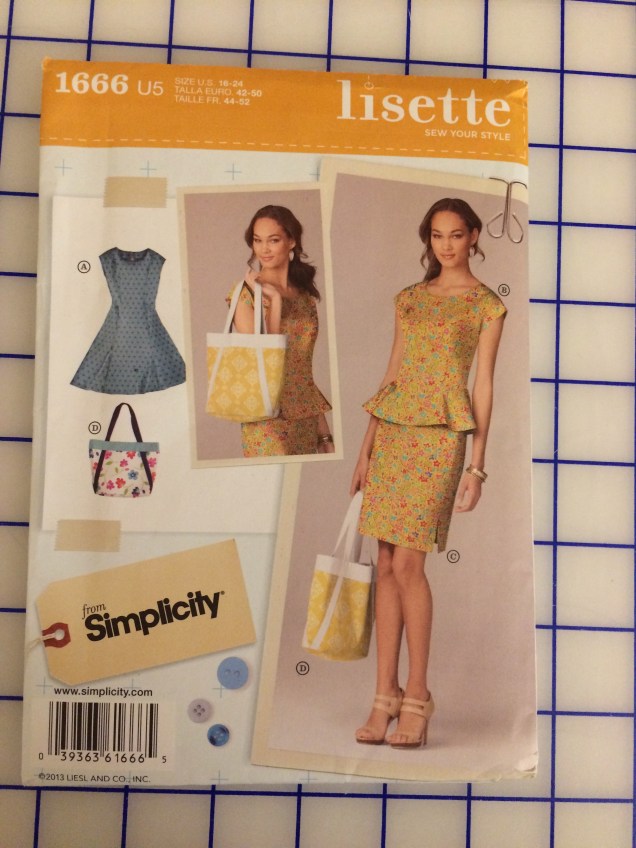
A while back a friend wore a peplum blouse she had made from Simplicity pattern 1666 and it looked fabulous on her. I remembered really liking the way peplums looked on a much younger me when I had the body I wish I had appreciated more. For reasons I can’t explain, no warning buzzers went off in my head telling me that maybe this wasn’t going to be the best option for my current body.
As the pattern envelope clearly shows, peplum = flounce. Putting a flounce on my curves is not a good idea, as I discovered when I made my first mock-up. That mock-up was dated January 2015 and there are no pictures of me in it. That said, this project wasn’t a total waste of time. I learned some interesting things I want to share with you now and I developed a neckline and collar that I’m looking forward to tweaking and using again.
I made the pattern for the first mock-up by starting out with my master bodice pattern for the shoulders, armscyes and princess seams and I tapered the pattern pieces at the bottom to conform with the corresponding area in the commercial pattern. Then I adjusted the peplum from the commercial pattern to fit to the top pieces. The peplum doesn’t go all the way around the body in this pattern. The center front panel extends to the hem and the peplum is attached at the front princess seams. I used the neckline from the Simplicity pattern and I think it’s a keeper, but I eliminated the cap sleeves.
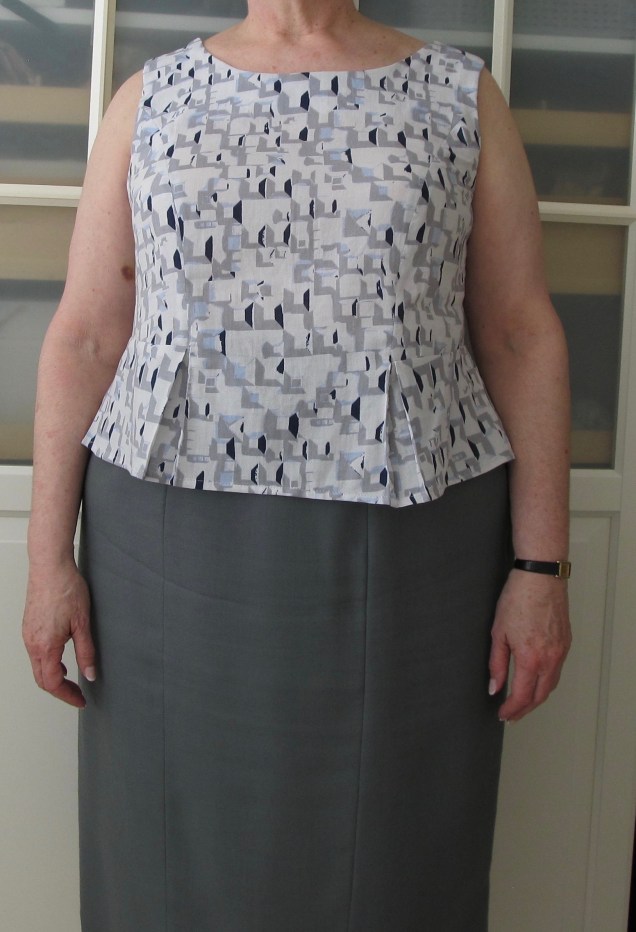
When I showed the mock-up to Sarah Veblen, she suggested we try using inverted box pleats extending down from each of the vertical seams (princess seams, side seams and center back). The second mock-up seemed like an improvement so I made a wearable mockup in a cotton print. I wasn’t happy with it. Sarah admitted it wasn’t a great look for me.
One thing she suggested was eliminating the box pleats at the front princess seams. I was only too happy to do that, because getting those puppies attached with the pleats intact was nerve-racking. That was an improvement, and I’ve worn the wearable mockup with that change. I asked Sarah whether things might improve if I added a collar and she thought that might balance it out better. So, I mocked up a rolled collar, tweaked it in consultation with Sarah and set out to make a final version of the blouse.
The first thing I did was make a clean copy of the peplum pattern with the pleats clearly marked. I used color-coding and arrows to make sure I understood how they got folded.
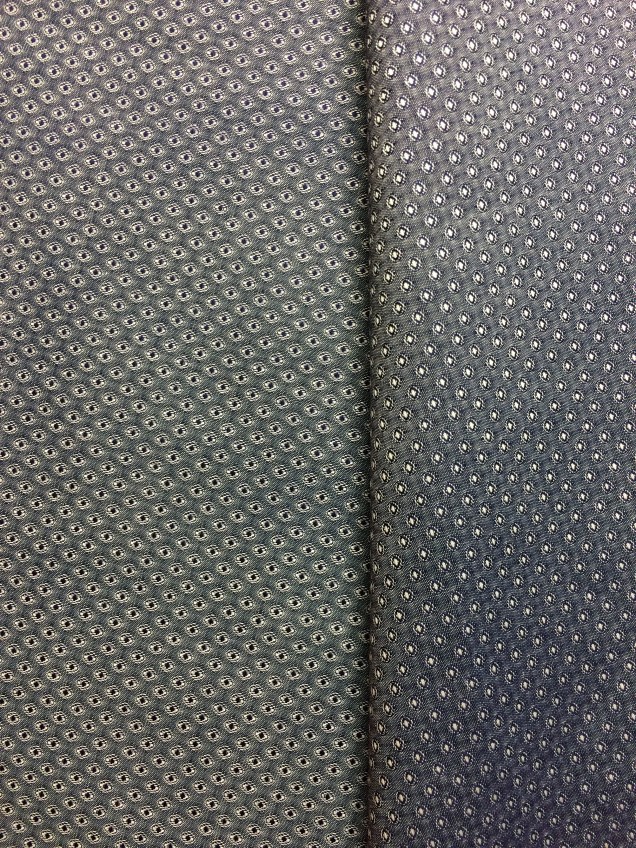
The straight of grain is at the front princess seams and so center back is the area with the most bias. Pleats and bias don’t necessarily play well together, but I had chosen a stable cotton shirting, which helped.
I’m pretty sure the side on the right is the “right” side of the fabric, but I like the side on the left better and so that’s what I used as the right side.
When making a pattern with pleats, it’s important to true the seamlines and then add the seam allowance. To do this, you pin or use temporary tape to hold the pleats closed, then cut away any ragged places on the line or curve at the hemline and the top seamline. If you don’t do this, you can end up with the hidden part of the pleat hanging below the rest of the hem or some other unevenness.
I thread-traced all the pleat markings so they would be exact and visible from both sides.
Another thing I learned is that pleats tend to behave better if you hem before pressing in the pleats, so I did that. I used the method Janet Pray of Islander Sewing Systems teaches in her shirtmaking class for the narrow machine hem. This consists of pressing the hem up at the hemline (this one was ⅝” from the edge) with the tip of the iron, then crimping by machine at ¼” and using the stitching line and the pressed fold line as the guides for double-folding the hem.
Pressing Peplum at ⅝”
I then used Wonder Clips (Janet Pray does not use pins or anything else) to keep it all in place and sewed from the right side. I find it helpful to use the blind hem foot on my machine helped me to keep the stitching at the same distance from the edge.
I finished all seam allowances with a three-thread serge finish and made an all-in-one facing for the neck and the armholes.
The part of construction that I thought would be tricky was attaching the peplum to the front at the princess seams. This is similar to an inset corner, so I pulled out all my sewing reference books and articles I’ve collected on inset corners and cut some scrap fabric to make samples. Almost all the techniques I’ve read about involve snipping into the inside corner and opening it up to almost a straight line, a method that’s given me mixed results. Louis Cutting’s method uses double-sided fusible web and topstitching, which works very well, but this garment wasn’t one I wanted to topstitch. The technique I was most interested in using is one I’ve made samples of before that I learned from a class taught by Susan Khaljie. It’s her technique for sewing a basque waist. After reviewing all my other resources, I decided this method is the hands-down winner. (Yes, I did use an Islander industrial shortcut and a couture technique in the same garment.)
You can find the technique on page 95 of Susan’s book, Bridal Couture. Even if you don’t think you’ll ever sew a wedding gown, if you have any interest in sewing with lace and making beautiful evening wear, this book should be in your library. (Hard copy is out of print, but the e-book version is excellent.) Essentially, what you do is sew two straight seams perpendicular to one another. Here are the front and back of the sample I made for this garment.
The couture method has you reinforce the inside corner with a patch of organza and for less elaborate garments you can use fusible interfacing. I had trouble getting such a small amount of fusible interfacing to stay put on this textured fabric so I ended up skipping this step. The next step in preparing the corners is to stay stitch along the stitching lines of both pieces, shortening the stitch length so that you have tiny stitches right at the corner. I used a 1.1 stitch length at the corners. That allows you to clip the inside corner, getting right up to the stitching. It also provides a guide for final stitching.
Stay stitching the corner
The next step is to pin so that the corners match on both pieces.
Then finish pinning one of the seams. When you stitch, part of the time you will only have one piece under the machine. That’s where my finger is in the picture below.
After sewing both seams, this is what it looks like.
And this is what it looks like when completed. Whew!
Welcome to In the Sketchbook, a monthly look at fashion design sketches that we are working on for ourselves. Sketching garments on a personal croquis is a great way for the individual couture enthusiast to move beyond the use of commercial patterns and into a world of personalized design! It can be intimidating at first, but with a little bit of practice it becomes something you look forward to. Join us for a look of what we have going on In the Sketchbook! Brought to you by Wendy Grossman of Couture Counsellor and Steph King from Siouxzeegirl Designs.
I’m pretty sure everyone who undertakes creative projects hits a wall or goes through a dry patch from time to time. I’m painfully familiar with writer’s block, and so it shouldn’t come as a surprise that something similar has been happening with my sewing and personal design efforts.
While working my way out of this slump with a project that should be completed in a few days, I’ve been giving some thought about the French jacket that I started in a workshop more than three years ago. When something has been sitting untouched for that long and the only emotion it evokes is guilt, you have to wonder what’s going on. The fabric is very nice, the fit is great. So what’s the problem?
One thing may be that these jackets are all about the embellishments and I’m not much of an embellisher. Another possibility is that I’ve come to see that collars are an important element of garments for me and French jackets are usually collarless. Usually. Not always. When I mentioned this to Sarah Veblen, she immediately started playing around with the spare fabric I have and suggested a collar for my unfinished jacket. I’m not convinced about putting a collar on this one, partly because I’m not sure it will hold up well when the jacket itself has so little structure and it’s progressed beyond the point where I could build something supportive into it. But that did get me thinking about adding a collar to a future French jacket made from some fabric in my collection that I absolutely adore.
It also got me to thinking about the skirt I’d make to go with the unfinished jacket. The designs I sketched earlier have a lot of pleats and seem to be too heavy or too bulky, but a small pleat inset lower down might be just what I need. Here is that skirt with some possibilities for collared French jackets.
I haven’t decided whether I like them better with self-fabric or contrasting fabric.
Then there’s the possibility of using lace as a collar.
None of these ideas have embellishments yet, but they might be a start.
Be sure to check out what my dear friend Steph King of Siouxzeegirl Designs is up to at 10 Sewing Machines & a Serger. And, we’d love to see and hear about what you’re sketching too.
Here is a story – more of a saga – about a project that explains why the subtitle of this blog includes the word misadventures. At the beginning, it didn’t seem like it was going to be that big of a deal. My ASG Neighborhood Group, Sew Chicago, decided to make a tailored shirt the group project for the ASG Chicago Chapter fashion show that was held on October 22nd. The shirt had to have a collar, cuffs and at least one embellishment. It seemed like a fairly straightforward project and a chance to polish some essential skills. I was half-right in my assessment.
When I discussed the project in a mentoring session with Sarah Veblen, she described the features she likes to put into a woman’s shirt. We were on the same wavelength. Not only did her concept match my vision, but I had an earlier project to use as a starting point.
I made a white-on-white shadow striped shirt from New Look 6407 several years back. I drove my ASG group crazy with my obsession over trying to learn how to attach the collar/collar stand assembly, but otherwise did okay with it. I wanted to use my armscye princess master bodice pattern instead of the darted bodice from the earlier shirt, but I also wanted to add a yoke. Sarah convinced me that I should skip the yoke.
I slipped the shirt on for Sarah and the first thing she did was reach for my pins to reshape the collar. She then drew in a curved neckline, which is much better on me than a straight v-neck. These changes didn’t seem beyond my capability, but I wanted to make a test shirt to make sure that the pattern changes were right. Because those changes were in the details rather than the body of the pattern, I decided to make a wearable mock-up. Why go to all the trouble of making a collar with collar stand on a muslin, right? Besides, the practice would give me confidence and I’d end up with two new shirts in my wardrobe instead of one.
I have quite a selection of cotton and linen shirtings in my fabric collection, so no new purchases were required. I pulled out several and these two just happened to be next to each other.
Turned-back cuffs on sleeve laying on shirt body
The cotton wood-cut print is from Emma One Sock. The lighter blue in the print doesn’t match the blue of the other fabric, but these two fabrics kept telling me they belonged together. The fabric in the background isn’t a solid. It’s a cross-weave of blue and white that gives it a bit of visual texture. It occurred to me that combining two fabrics, which I almost never do, would meet the embellishment requirement for the group project. That sealed the deal. I wasn’t aware of it at the time, but the light blue cotton actually had a tiny it of Lycra in it. That was not happy news and it caused some minor issues, but I was committed to the fabric combination.
The changes I had to make the pattern gave me more trouble than I had anticipated. Most tailored shirt patterns have a curved edge on the front of the collar stand, but this one had a straight edge that slanted inward. I went through a few different iterations trying to get the collar stand right, then ended up curving it. You may remember that in my Tulip Dress, I forgot what template I used for the curves in the hem, so I wrote myself a note on the pattern piece this time.
It’s good to learn from our mistakes. Here’s another lesson I learned in this project. Drafting a pattern piece on folded paper so you can have a full piece doesn’t always mean that both sides will be identical. The paper can shift if you’re not careful. Grrrr!!! This happened with the collar stand, which is a skinny little piece and so it really does make sense that the paper might shift. Thank goodness I have one of those inexpensive light boxes for those times in pattern work when it’s hard to see the lines I’m trying to trace (usually when I’m making a fresh pattern because the original has too many changes taped on top of one another).
Still, I was struggling with getting the collar stand right. One of the things Sarah suggested that I try was to “drape” the neckline/collar stand assembly on my dress form to see where the collar stand should end. That worked great.
Then I walked the stand to the collar and got those two pieces just where I wanted them.
With my pattern ready, I was feeling confident. I’ve made a lot of garments since I made that first shirt so I was expecting things to go much more smoothly than they did before. Also, I watched Janet Pray’s fabulous shirtmaking class on Craftsy and went over the collar assembly several times. What could go wrong, right?
The weave of the fabric for the practice shirt is a twill, but it is is still shirt-weight. The only twills I had worked with before were bottom weight for pants.
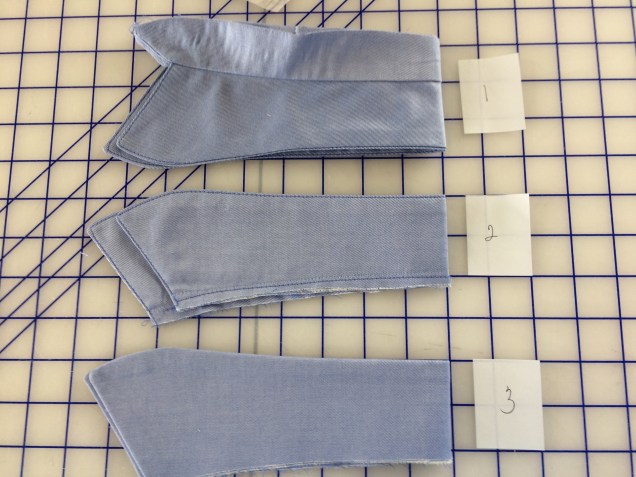
I didn’t think the fabric would give me any problems, but it did. This is the collar on the collar pattern piece. The distance from center back to the right edge (left as worn) is just fine. Look how not fine it is on the opposite end. I made three of these suckers, each one with different degrees of imbalance.
Collar Crime Scene Photo
After I took this photo to send to Sarah Veblen so she could pull me out of my tailspin in a mentoring session, it occurred to me that the numbered stickies make it look like crime scene photos I’ve seen on TV. As you can see, number 2 is the worst offender. It’s about ½ inch off on one end. By the time I cut number 3, I carried it to the ironing board as if it were a baby, futzed with it to get it to match the pattern piece perfectly on the ironing board, them after I fused the interfacing I left it to cool and dry overnight. I wasn’t taking any chances. Still, it wasn’t perfectly symmetrical, but I was done with this step!
You might be able to tell that my topstitching technique improved between collars one and two. After I topstitched the first collar, I remembered the tip about placing folded fabric or cardboard under the “heel” of the presser foot to even out the foot so it doesn’t have to climb any hills at places like corners. I used my stitch-in-the-ditch foot (edge joining foot to a quilter) with a stitch length of 3.0 and the needle a couple of clicks to the right to get a decent edge stitch.
The thread looks darker than the fashion fabric, but it’s actually an exact match for the darker of the two threads that comprise the fabric. When you lay a strand of it directly on top of one of those lines, it disappears.
Are you imagining how much quality time I spent with Mr. Seam Ripper on this project? And this was just the practice shirt. I had to make another one for the runway and my time was disappearing.
I’m happy to report that the Islander Sewing System “burrito method” for attaching a collar stand or waistband works beautifully. It’s hard to wrap your mind around (no pun intended), but once you try it a few times it’s not that difficult.It solves the problem of getting all those pesky edges tucked in and out of sight. I first learned the method watching Islander DVDs. Last summer at ASG National Conference I took a class with Janet Pray and felt it all clicked for me when she walked us through the method for waistbands. I reinforced that with the Craftsy shirt class and now I feel like I’ve got it.
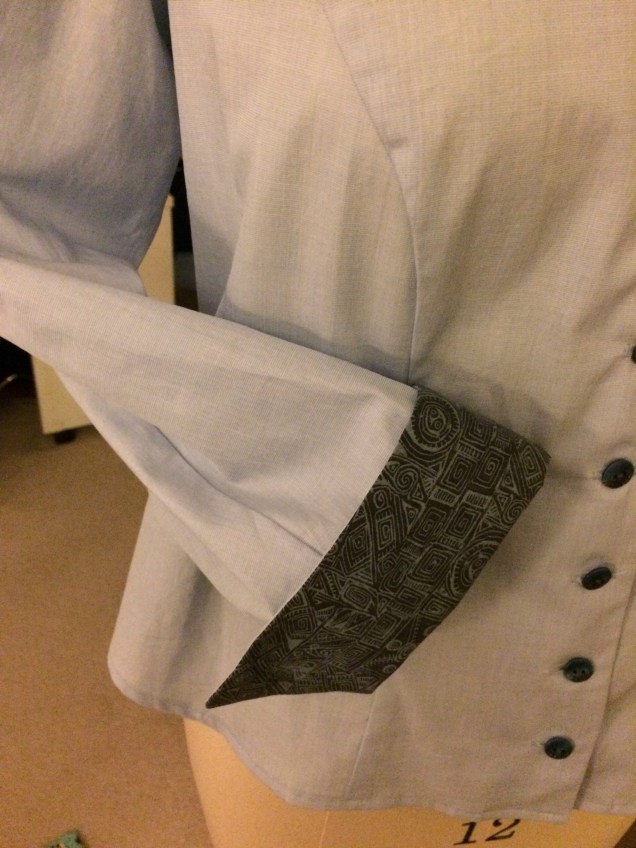
What I didn’t understand was that the turned-back cuffs I was putting on my shirt could not be attached with the “Burrito Method” without a placket. It took me several attempts to realize that. By this point, I was so sick of tailored shirts I could scream.
I didn’t even put the cuffs on the practice shirt, but instead switched over to sewing the shirt for the runway. The solution for the cuffs was to attach them and then hide the raw edges under bias-cut strips that I attached pretty much like a Hong Kong finish. I topstitched them to the sleeves because the stitching is hidden when the cuffs are turned back.
FYI, pinning the cuffs to the outside of the sleeve doesn’t work. There are gaps. The only way to avoid a zillion puckers is to turn the sleeve wrong side out and pin the cuff inside the sleeve. (And, test turning before sewing saves quality time with Mr. Seam Ripper.)
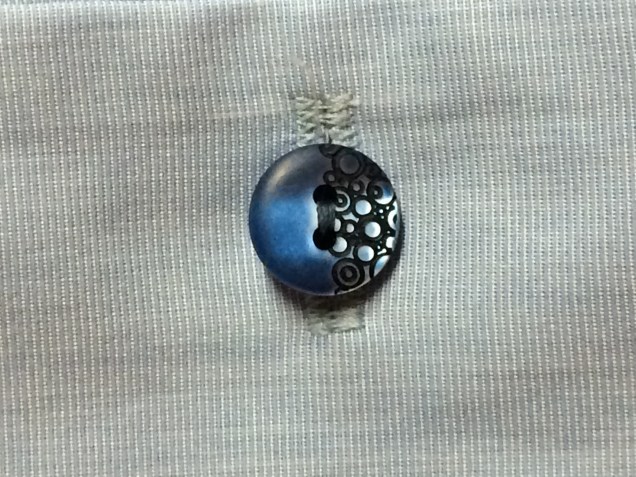
Here’s a close-up of the cute buttons I used on this shirt.
Those buttons were sewn on the morning of the runway show, even though I started this project in September, thinking I was giving myself ample time. There were more mistakes along the way, but those were mistakes that came from going on auto-pilot instead of paying close attention to what I was doing. I learned that the act of writing out every step of construction helps avoid those kinds of mistakes. Another valuable lesson.


 It’s not marked in this picture, but the straight line on the left is Center Front, which is cut on the fold of the fabric. That “V” at the shoulder was the bit I had found intimidating. From a patternmaking point of view. it’s really no big deal. It’s what forms naturally when melding the two pieces together. Construction – especially on a serger – can be a little tricky.
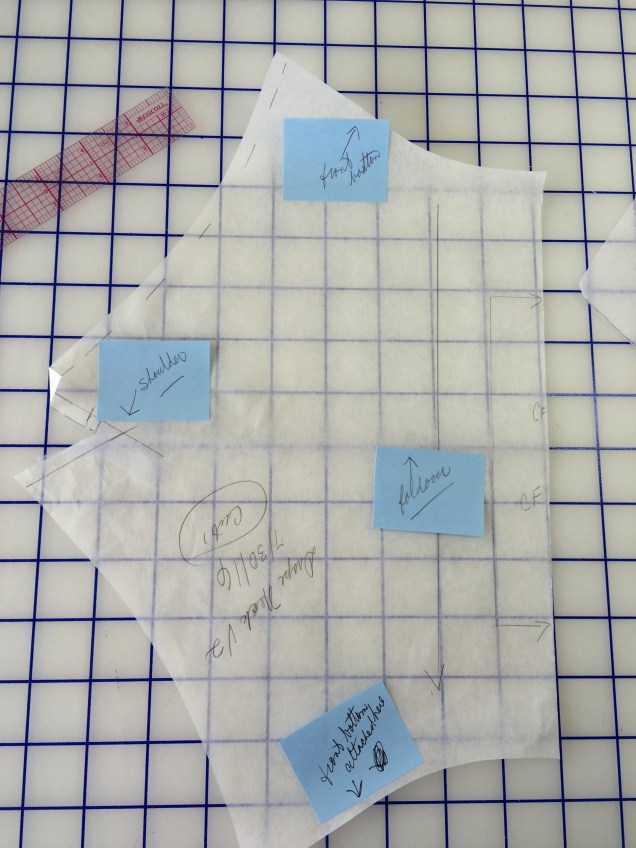


 After trying a mock-up with the scoop variation from the workshop, I decided the neckline had to be a little bit less scoopy. So I made a modified scoop neck pattern piece and adjusted the collar accordingly. I tried it out in this great rayon-Lycra knit from Sawyer Brook in a color they called Bluebonnet, but didn’t think it worked well. So, I made the top with the modified scoop neck but no collar.


 So, here’s the finished blouse.
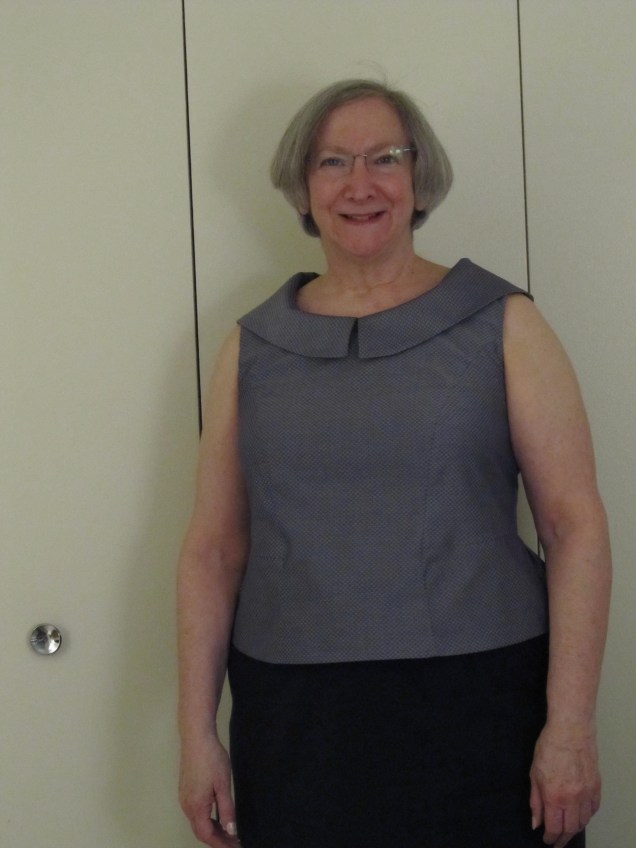


 Then there’s the possibility of using lace as a collar.