I feel like I should pay the fabulous Jennifer Stern Hasemann of J. Stern Designs royalties already. Her Women’s Tee is just about the only knit top I make and it never fails to get compliments. I didn’t do much sewing this past summer, but toward the end I made an entire batch of short sleeve J. Stern tees – 5 of them!
On one I tried foldover elastic at the neck. I like the way it looks with that navy and black dot rayon from Emma One Sock, but it’s not my favorite neck finish. For the others I did what I usually do, which is cut duplicate pieces of the top back, front and side panels and use them as a facing. The result is a clean, bulk-free finish.
I got into the groove of production sewing with these. I used white thread on four of the tops with woolly poly in the lower looper. I went from serger to ironing board to sewing machine (for the neckline seam and understitching), then back to the serger and ironing board to finish construction. The only time I had to change thread on the sewing machine was to put on the foldover elastic. Then I rethreaded the serger for the light gray workout tee and saved the coverstitching of the hems for the end.
Converting from serging to coverstitching has gotten easier with practice (like everything else about sewing). I’m almost always using lightweight knits so I like to use Gail Yellen’s method of prepping the areas to be hemmed with fusible web so nothing shifts under the machine. It’s a tad fussy, but listening to a podcast while I work at the ironing board helps.
This gave me a nice casual wardrobe refresh. Thanks Jen!
I’ve been asked whether I gave up blogging. One might even wonder whether I gave up sewing. Perish the thought! Since my last post, I’ve found a new apartment, moved in and have been dealing with the fact that work hasn’t let up for a minute. And other stuff. I’ve finally gotten to the point where I can unpack my sewing supplies, take my machine out of its box (which I kept after I bought it a year ago because I knew I wanted to move), retrieve my serger from my dear friend Stephanie King’s living room and organize my fabric collection.
I’ve been in the new place for just under three weeks and whenever I find myself getting frustrated with the pace of the unpacking I remind myself that not only did I move my home, but I also moved my office and my sewing studio and they are all in the same place. Then there’s the whole organization project. I made lots of changes with this move and I’m about as obsessive about organizing stuff as I am about sewing, so I’ve made A LOT of trips to The Container Store.
I promise to finish a post on my latest project in a few days. Until then, enjoy whatever fabulous creations the lovely and talented Stephanie King of Siouxzeegirl Designs has to share.
Welcome to In the Sketchbook, a monthly look at fashion design sketches that we are working on for ourselves. Sketching garments on a personal croquis is a great way for the individual couture enthusiast to move beyond the use of commercial patterns and into a world of personalized design! It can be intimidating at first, but with a little bit of practice it becomes something you look forward to. Join us for a look of what we have going on In the Sketchbook! Brought to you by Wendy Grossman of Couture Counsellor and Steph King from Siouxzeegirl Designs.
I spent the first week of this month in Baltimore, most of the time in Sarah Veblen’s class, “Exploring Fashion Design – Design II.” So I thought I’d show you some of the sketches I made in class.
This collar is from an inspiration picture from the ’50s. I’ve decided to use it for another version of my two-piece dress and I think this lightweight wool from A Fabric Place would be perfect for it.
Even though I’m not really in the mood to think about winter coats right now, I think I’ve finally found a collar that works.
This neckline detail was based on something I saw in one of Sarah’s designer books – of course it was Dior! I’m thinking about what direction to take this in, but I really like it.
I decided I’d like to experiment with some detail in my sheath dress. I like the idea of channel stitching, inset pieces, maybe pin tucks. Sarah got me started when I told her what I had in mind but felt stuck and I took it from there. Now I need to sew up some samples.
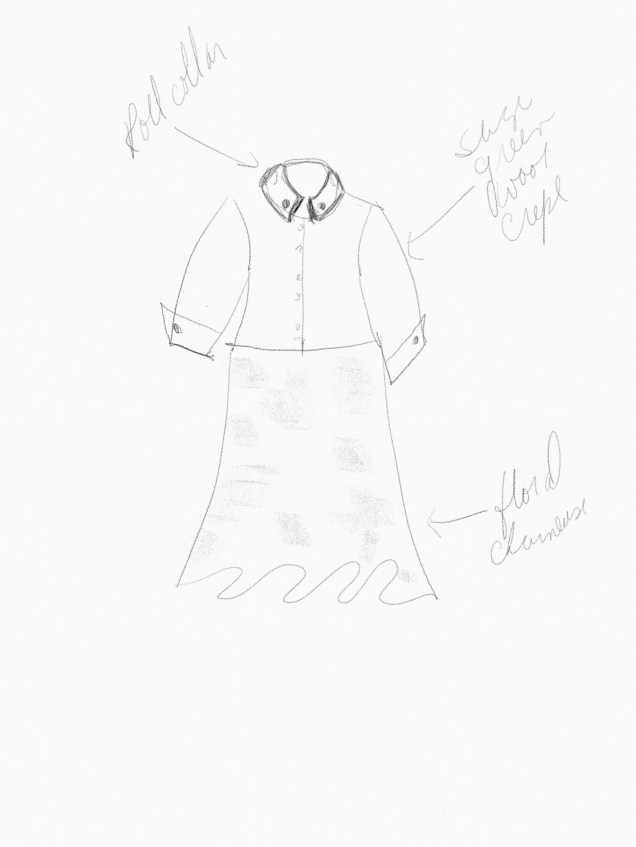
And this is a dress I sketched after I got home. I want to use this fabulous fabric combination. The sage green wool crepe is a gift from my dear friend Steph King and the charmeuse is from A Fabric Place. I was sure it would be no problem to have this dress ready in time for the Haute Couture Club of Chicago fashion show luncheon, but then the days on the calendar disappeared and now that luncheon is only a week away. Yikes!
Be sure to check out what fabulous designs my dear friend Stephanie King of Siouxzeegirl Designs is showing at 10 Sewing Machines & a Serger. We’d love to see and hear about what you’re sketching, so please leave a comment.
Welcome to In the Sketchbook, a monthly look at fashion design sketches that we are working on for ourselves. Sketching garments on a personal croquis is a great way for the individual couture enthusiast to move beyond the use of commercial patterns and into a world of personalized design! It can be intimidating at first, but with a little bit of practice it becomes something you look forward to. Join us for a look of what we have going on In the Sketchbook! Brought to you by Wendy Grossman of Couture Counsellor and Steph King from Siouxzeegirl Designs.
I’ve been remiss in blogging in general and it’s been a few months since I’ve posted what is in my sketchbook, so here I am trying to get back in the swing of things.
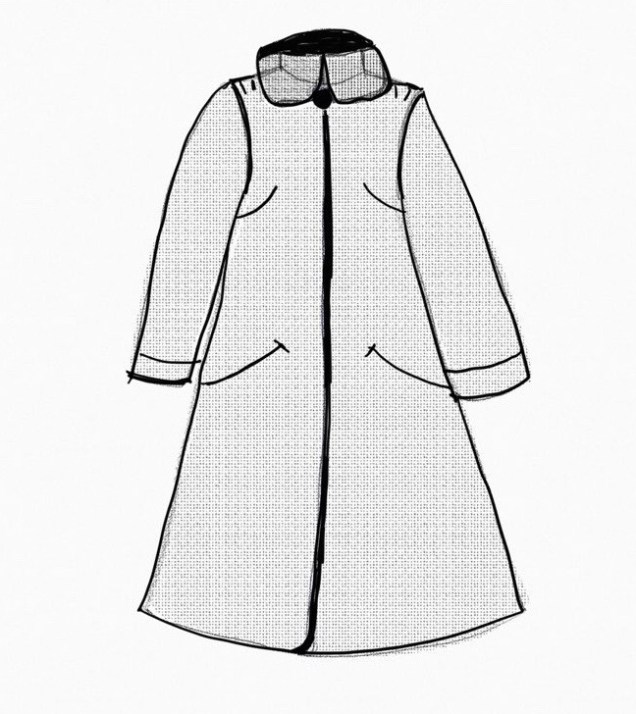
I’ve decided it’s time I tried making a coat and a warm raincoat for late fall/early spring is what I’m aiming for in my first attempt. The thing is, I’m having a lot of difficulty figuring out the neckline and collar. I prefer open necklines and with a coat that is supposed to keep you warm or dry or both that just isn’t practical. The thing is, every time I tried to sketch something with a higher neck, it seemed out of proportion to me. I’m still trying to find a good balance on this and it will take some more work before I’ve settled on something I’m happy with. Here is what I have so far.
If this one were made up, you wouldn’t see the collar stand underneath. I was just playing with an idea. The coat would have a single statement button and hidden placket and maybe French darts and curved welt pockets.
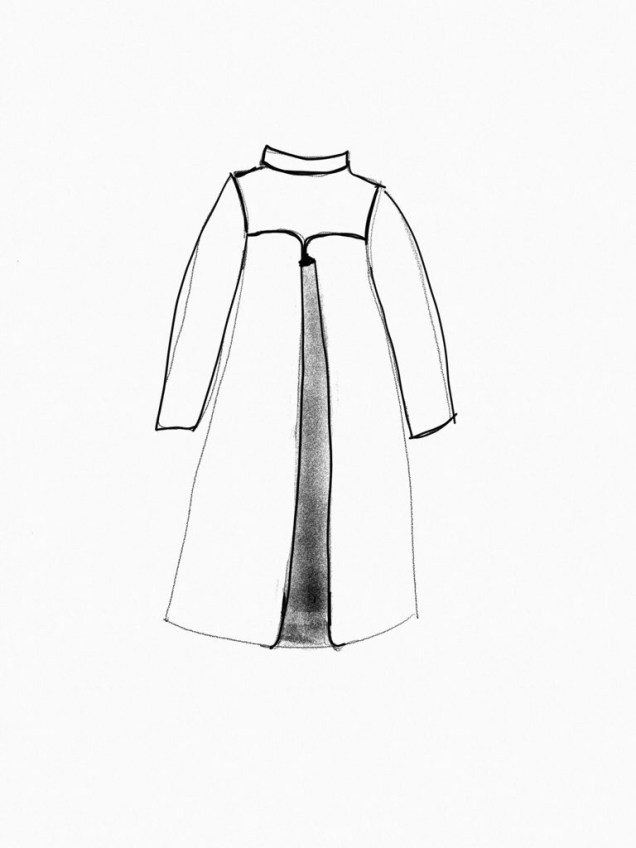
This may or may not be the back of the first sketch. I thought a Swing pleat with a yoke might add some interest.
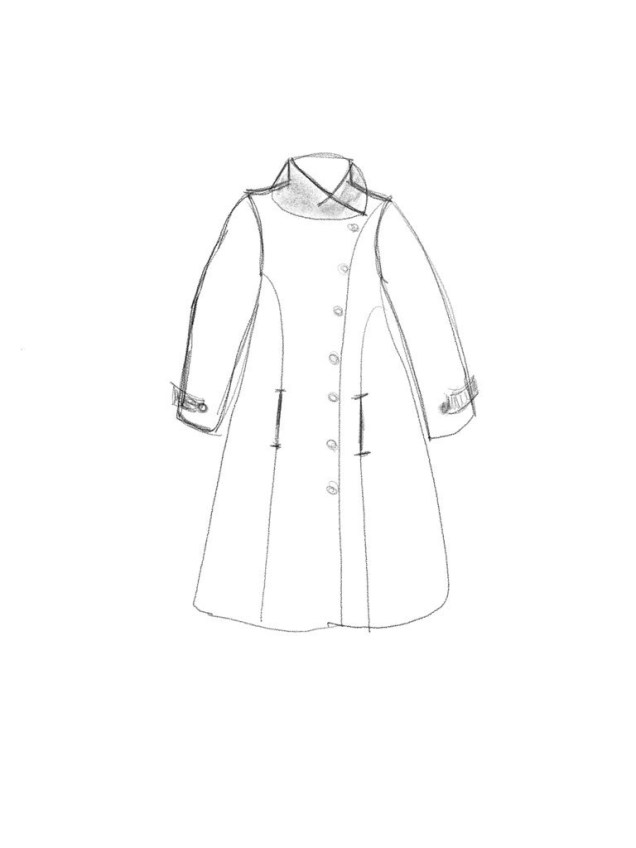
Here’s an attempt at a wrap-over collar with princess seams, vertical welt pockets in the princess seams and button tab detail on the sleeves. This is a knock-off of a Vogue pattern I’ve seen and I think I’d like it better in a wool melton.
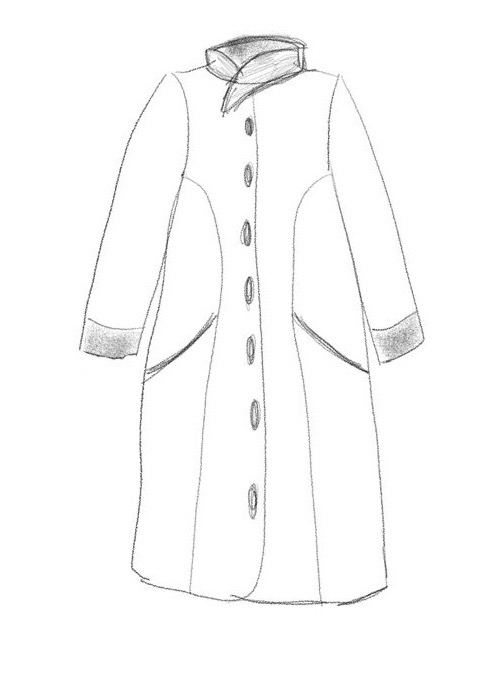
Another attempt at a wrap collar, princess seams, curved welt pockets. This time with buttons showing.
As I said, I’m still not there on a coat, but at least I have a start.
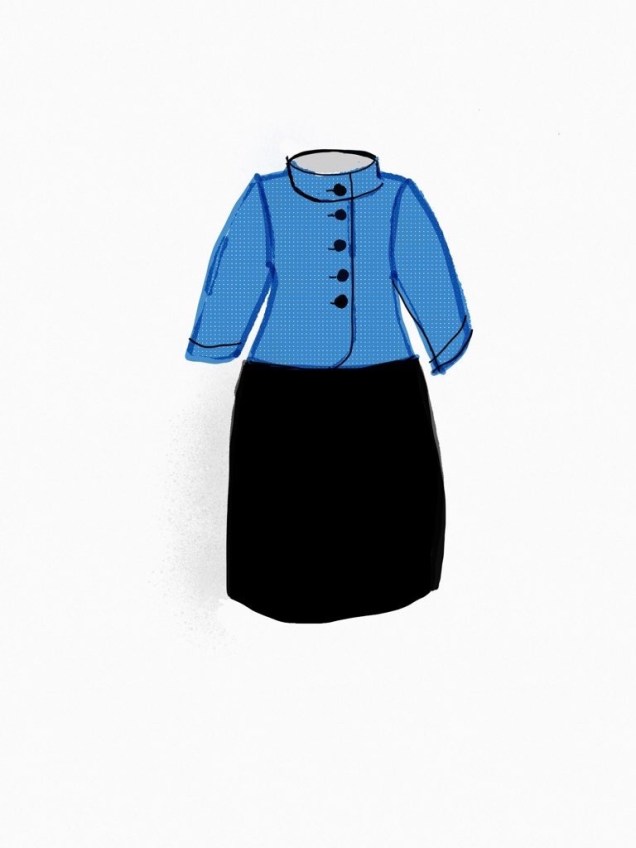
The very rough sketch of the jacket and skirt below came to me in a flash one day. I’d like to take that 60’s rolled collar that I’ve used in two-piece dresses and my LBD, turn it around so it opens in the front and maybe anchor it with a button on either side.
Finally, I’ve been noodling about partial rolled collars (this time, the ones that look almost like tailored shirt collars. I’m mocking up some tests, but this is the general idea of where that’s going.
That’s what I have for this month. I think my friend Stephanie King of 10 Sewing Machines & a Serger is taking a break from In the Sketchbook this month. Check back with both of us next month. Meanwhile, we’d love to see and hear about what you’re sketching, so please leave a comment.
Welcome to In the Sketchbook, a monthly look at fashion design sketches that we are working on for ourselves. Sketching garments on a personal croquis is a great way for the individual couture enthusiast to move beyond the use of commercial patterns and into a world of personalized design! It can be intimidating at first, but with a little bit of practice it becomes something you look forward to. Join us for a look of what we have going on In the Sketchbook! Brought to you by Wendy Grossman of Couture Counsellor and Steph King from Siouxzeegirl Designs.
Another month has flown by and it’s time to see what’s in the Sketchbook. I promise I’m sewing and I’ll have a finished garment ready to show and discuss with you next week. In fact, there should be three in rapid succession. Please bear with me a little longer.
To start off I’d like to show you a sketch I did first thing Monday morning after attending another fabulous hands-on workshop with Sarah Veblen over the weekend.
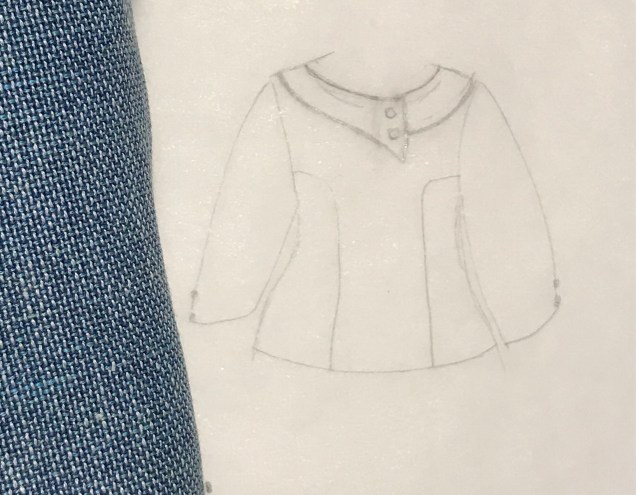
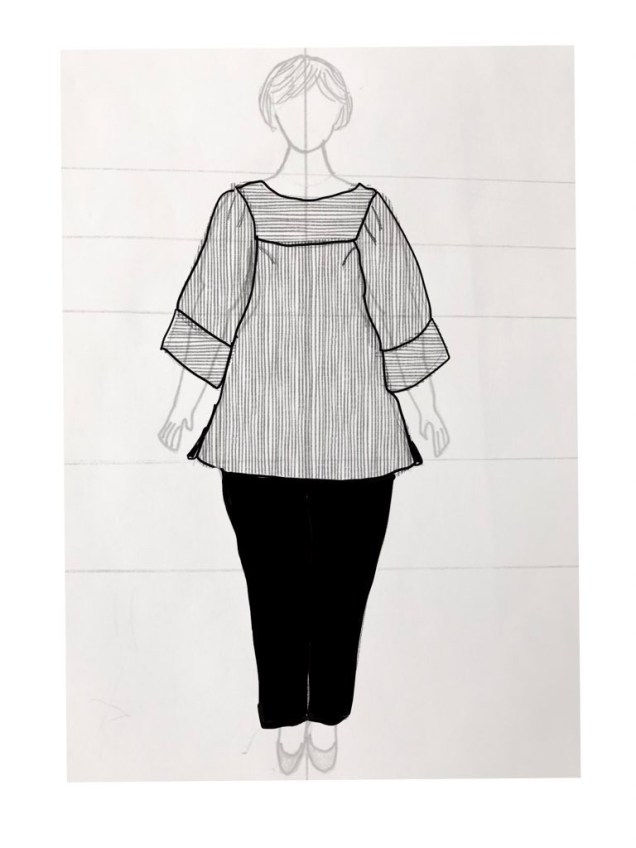
Sarah shared some inspiration pictures with us and when I was going over my class notes to solidify what I’d learned and compile a list of follow-up things I needed to do (a good habit I’m trying to cultivate), I found my copy of those pictures folded into my notebook. Looking at one of the pictures again, I immediately thought about making this casual tunic to wear with black pants.
Also during the workshop I happened to mention to Sarah that I’m struggling with sketching fullness at the hems of garments. She showed me her method step-by-step on a sticky note and I practiced it right away to get the hang of it.
Apart from sewing my business travel wardrobe this month, I have bias on the brain. Our ASG neighborhood group, Sew Chicago, has adopted “Show Your Bias” as the group challenge for next fall’s fashion show and Stephanie King and I are doing a bias presentation to the group in May.
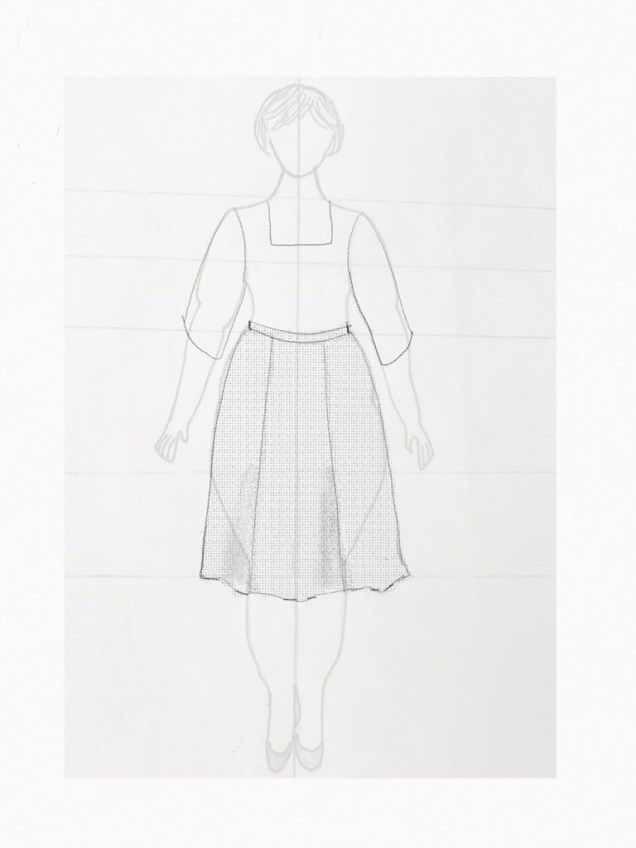
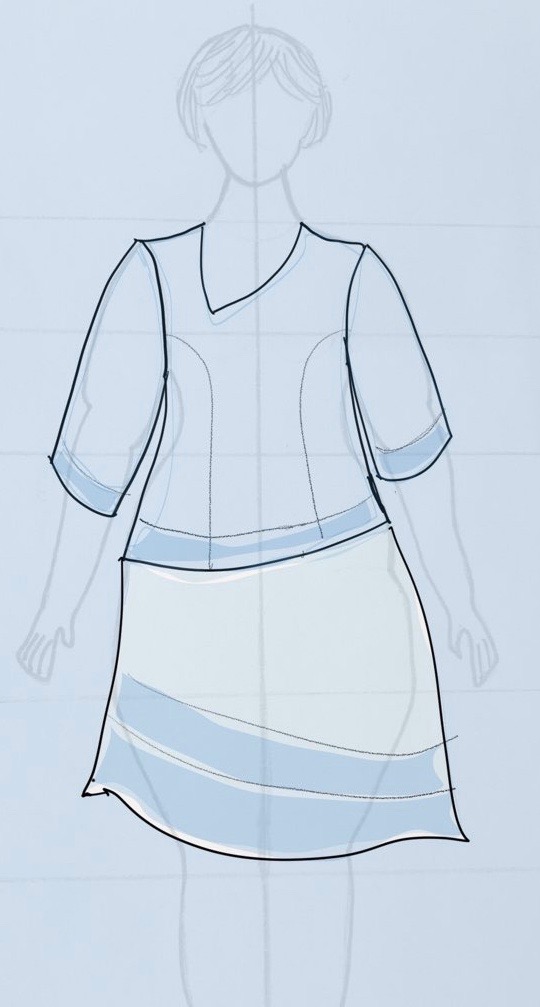
Ever since I saw the exhibit “Making Mainbocher” at the Chicago History Museum, I’ve been thinking about how skilled Mainbocher was at giving serious work suits and even uniforms a feminine flair. None of his skirts were restrictive pencil skirts and most, if not all of them, were cut on the bias. One tweed suit in particular caught my eye. I noticed that he not only made the skirt on the bias, but he also inserted godets. I’m not convinced I need godets to get the effect I’m after, so I sketched this skirt to make with a lovely gray tweed wool I found last month at Haberman’s Fabrics in Royal Oak, Michigan.
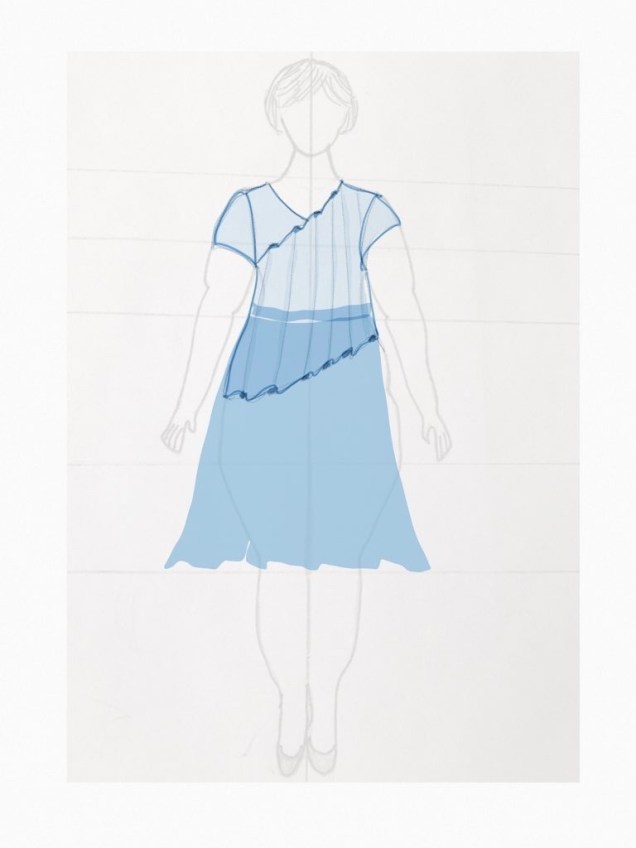
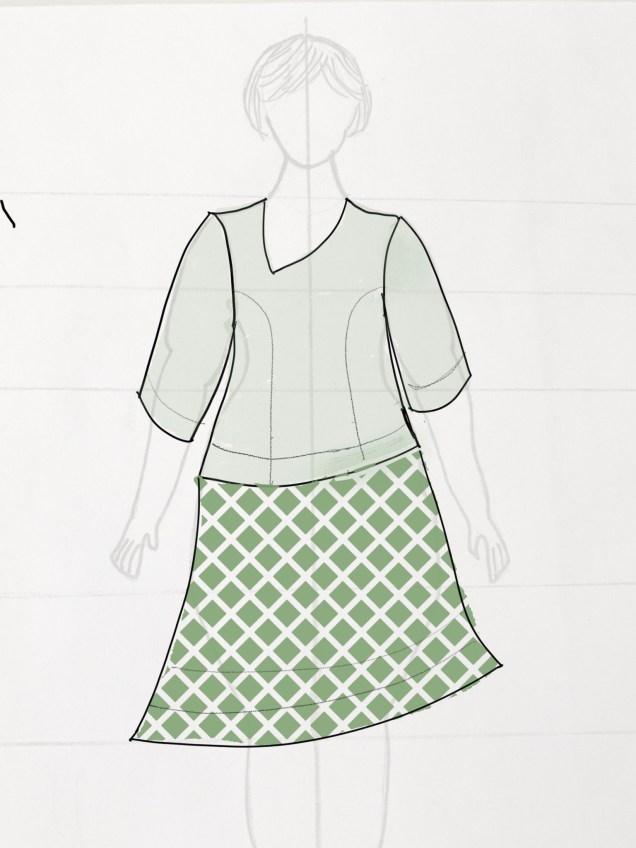
Then I started wondering where else I could use bias and whether just part of a garment on the bias would work. So I played around with this skirt and top combination.
I think it looks better with the skirt echoing the hem of the top.
I tried this ensemble with a sheer on top, but the jury is still out on it.
That’s it for now. Be sure to check out what fabulous designs my dear friend Stephanie King of Siouxzeegirl Designs is showing at 10 Sewing Machines & a Serger. We’d love to see and hear about what you’re sketching, so please leave a comment.
I was in college when Diane von Furstenberg’s wrap dress found its way into almost every woman’s closet, but when I tried it on the store I didn’t think it was for me. So, when Jenny Rushmore introduced her line of sewing patterns for curvy women, Cashmerette Patterns, with a curvy-friendly version of the wrap dress called Appleton, I bought a copy of the pattern but wasn’t sure I’d ever make one for myself. Then I saw how fabulous it looks on my lovely friend Stephanie King of Siouxzeegirl Designs and she let me try hers on. It looked really nice, so I decided to give it a try.
It may seem odd, but the biggest mental barrier I had to overcome besides my skepticism about how the dress would look on me was my past difficulties with starting from someone else’s pattern. I knew this is a very well-drafted pattern, but my experience has been that when I start with someone else’s pattern I have to make a ton of adjustments to get it to fit me. And I did have to grade across sizes to get the hips to fit without falling off my shoulders. I actually made two mock-ups and almost ended up making a third, which seems absurd for a knit dress, but I couldn’t help myself.
My job was made easier by the fact that my dress form is now padded to resemble my figure pretty closely. This was another thing I had resisted doing because i didn’t think I wanted to live with a reminder of the shape my body is in now. But, I agreed to participate in a pilot class on draping that Sarah Veblen was developing and so I made a basic dress sloper out of heavy weight muslin from my bodice and skirt master patterns for a workshop several months ago. Sarah draped out pretty the wearing ease until it was quite form-fitting. I installed a heavy-duty separating zipper down the back and had my new dress form cover. I then proceeded to stuff the space between the muslin and my dress form with foam pads from Fabulous Fit and batting. I got really frustrated in the draping class and convinced myself that I’m no good at draping and this entire exercise was a giant waste of time that would have been better spent sewing. Then when I was working on this project, after trying on the first mock-up, I put it on the dress form and the next thing I knew I was draping adjustments.
For the mock-ups, I used cotton interlock knit from Joann’s (with a coupon, of course). The first mock-up gapped at the bust and clung in all the wrong places, so those pictures will not be posted anywhere.
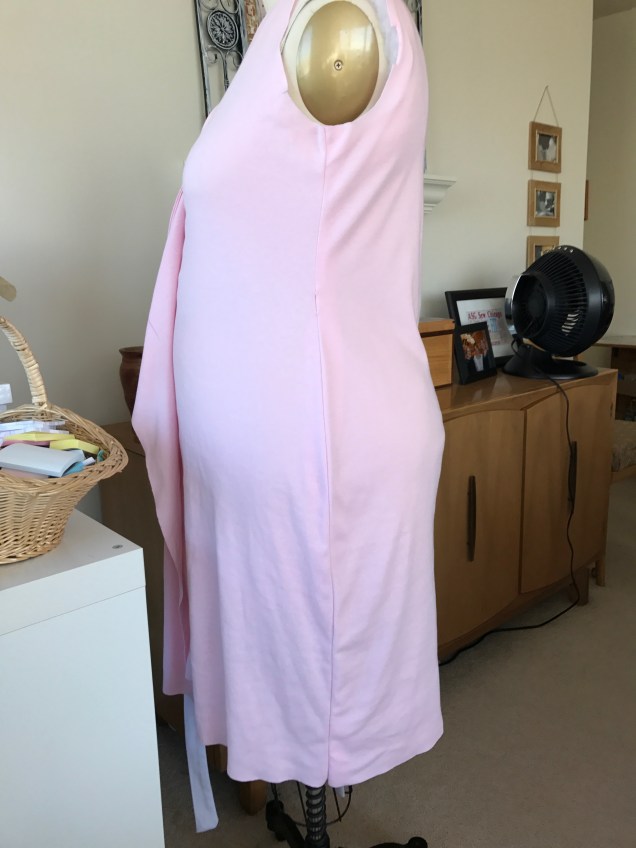
In the first mock-up, I noticed that the side seam was more toward the back than my master pattern’s side seam, plus it swung to the back at the hips. Because I needed to increase the circumference there, I decided to bring the side seam in line with the side seam on my master pattern so I could be sure the final version was hanging plumb. Here is a side view of muslin number 2.
That was all well and good, but I made a mistake that is typical for me, which is to add too much to the hips and taper below that and end up with what I refer to as the jodhpur effect. One of the suggestions Sarah Veblen made in a mentoring session was to have the skirt flare out a bit instead of dropping straight from the hip. That adjustment really helped.
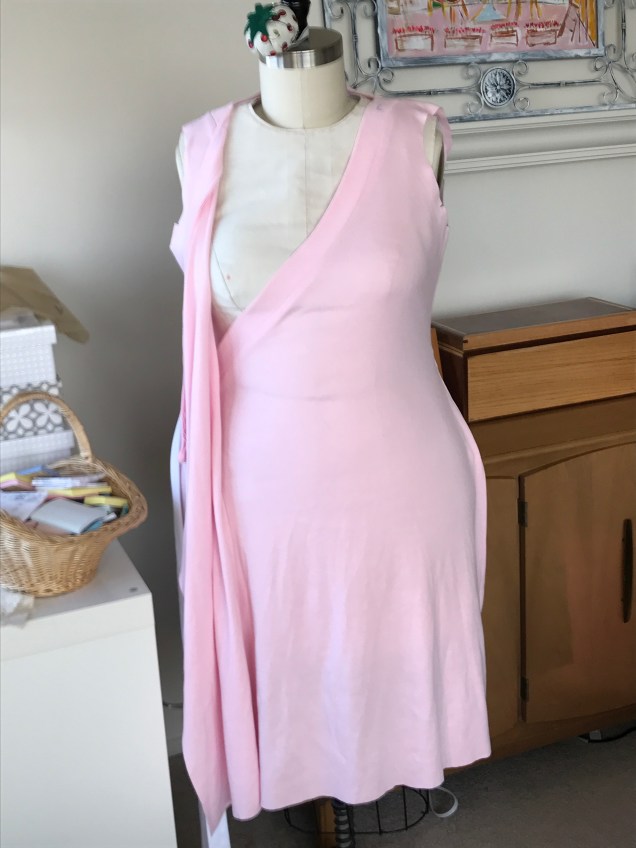
As you can see, there is no center front marking and no horizontal balance lines. The pattern does not have center front marked, which makes sense because it’s different on different types of figures. I had marked horizontal balance lines on my first mock-up but Sarah told me that wasn’t necessary in this dress, which she had fitted on other students. Still, when I was working to adjust the first muslin it helped to work with the front and back independently so I could get them to be as level as possible.
Another thing that I did early on was lower the waist so that the ties went around my waist. The pattern is drafted so that the wrap is higher than the natural waist, almost Empire height. The problem with lowering the waist was that it created gaposis at the bust. So, I put the waist back where it wanted to go.
Sarah suggested that I might want to add shaping darts to the back. Darts were my nemesis during the draping class, but I could see how the fabric really “wanted” to have them added.
As you can see, I pinned the darts to the outside, which is not what I was supposed to do. It got the job done here, but I’m trying to learn to make my fingers manipulate the fabric so that the dart intake is toward the dress form. I’ll get there. Eventually.
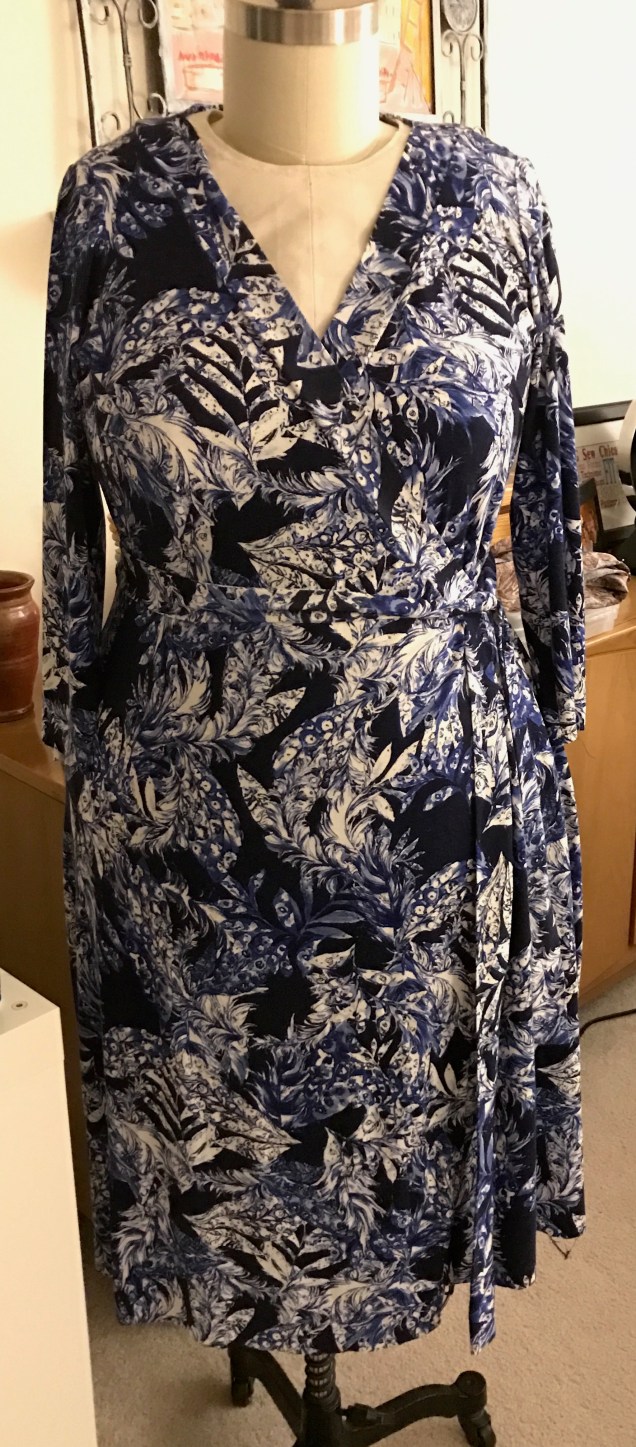
I wanted to make this dress in an ITY knit, but the ones in my collection were in quantities suitable for knit tops, not a dress. I had trouble finding ITYs (only because I was looking for them!) and then I found this lovely rayon-Lycra knit from Stone Mountain & Daughter. I was hesitant, thinking that Rayon is too drapey and possibly clingy for a dress on me, but this fabric has a lovely dry hand and worked beautifully.
Next came the challenge of hemming. Again, I’m really spoiled by working with master patterns developed with Sarah Veblen because when the horizontal balance lines are parallel to the floor, so is the cut edge of the fabric at the bottom. Hemming is a straightforward process of turning up the fabric an even amount all the way around and stitching. Not so on a pattern that is not customized to a particular body.
I could have asked a sewing friend to pin the hem for me, or even paid my dry cleaner to do it, but I wanted to get this project finished and move on to what’s next. My first attempt was to use the contraption that stands on the floor and you squeeze a bulb so chalk dust spits out on your dress as you turn in place. That didn’t work at all. So, I resorted to the technique I’ve used for fitting myself or having Sarah analyze my fit issues long distance – setting up the tripod and camera and using a 10-second delay to take a series of pictures.
First I pinned where I thought the hem should be, then I looked at the pictures and saw where it was uneven. I made adjustments to the pinning and took more pictures. After two rounds of this, I got it to where I was satisfied.
For the actual pinning, I found it was much easier to mark a few reference points with pins on the dress form and then work on a flat surface. When I got it to where it looked straight to me, I trimmed where the hem allowance was deepest, pressed and stitched. I adjusted the pattern, but where the hem ends up on any individual dress will probably vary with the type of knit I’m using.
As you might be able to tell from this picture, I’m still shying away from having the ties go across my tummy. So, my solution is to tie them at the side so that they only go across the back. The other thing I debated was whether to add a hidden snap in the front to prevent unscheduled appearances of lingerie. I was worried that it might pull, but I tested it out with a small safety pin and discovered it’s not noticeable. So, I’m adding a small nylon snap for security.
The dress is incredibly comfortable to wear and, now that I’ve done the pattern work, will be pretty quick to sew again.
Welcome to In the Sketchbook, a monthly look at fashion design sketches that we are working on for ourselves. Sketching garments on a personal croquis is a great way for the individual couture enthusiast to move beyond the use of commercial patterns and into a world of personalized design! It can be intimidating at first, but with a little bit of practice it becomes something you look forward to. Join us for a look of what we have going on In the Sketchbook! Brought to you by Wendy Grossman of Couture Counsellor and Steph King from Siouxzeegirl Designs.
This month, I’ve been trying out drawing apps on the iPad Pro and learning how to use the different features that are offered. Like everything else, the results improve with practice. Although I was excited about sketching on lovely tracing vellum, electronic sketching seems to be much better for me. I remember feeling this way about writing when I bought my very first, very rudimentary personal word processor. For a diehard perfectionist, there is something so liberating about being able to pour out thoughts before they have to be committed to paper. The undo button and the ability to erase without leaving the slightest trace of a mistake allows me to venture well beyond where I go with pencil and paper.
Even bold color can be erased and you can’t erase paint or felt markers. Then there is the fill function, which I’m still trying to master. And the ability to add a background, which I did in the sketch on the right without knowing how that happened or how to do it again. Like I said, practice is needed.
Square necked variation on Spoonflower Dress with Sleeves
The apps I’m using allow you to work with layers, so my personal croquis can serve as my guide the way it does when using tracing paper or vellum. I can lower the opacity of the croquis or turn off its visibility entirely before finalizing my sketch. You can also sketch individual pieces of a separates ensemble on their own layers to try out different looks and you can do the same with design details.
So far, the apps I’ve tried are Paper 53, Sketches, Procreate and Adobe Sketch. My brain is resistant to Adobe software. It was all I could do to learn InDesign when I needed to and to this day I only know how to do a few things in Photoshop, so I’m not sure I’ll ever feel comfortable with Adobe Sketch. I’m getting fairly comfortable with Sketches and I’m working my way through the very helpful e-book that’s available for Procreate to learn how to use its cool features. It’s a process.
I’m looking forward to learning how to duplicate an image onto a new layer and flip it so I don’t have to draw both sides of a symmetrical piece, or I can fix a mistake when I draw one asymetrical element in the wrong direction as I did here.
Okay, enough tech talk. Let’s get to the designs.
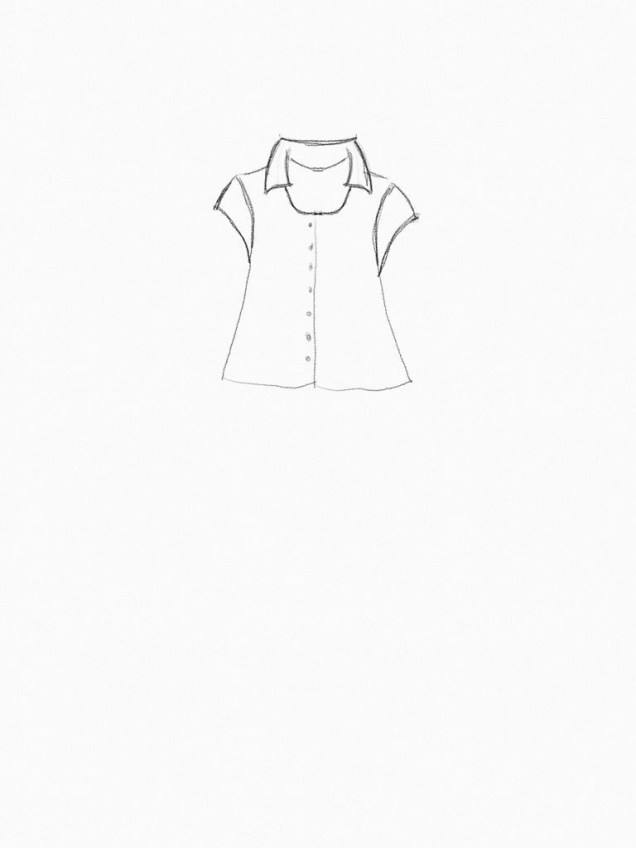
I’ve been inspired by the fabulous samples Mary Ray showed and the techniques she taught the ASG Chicago Chapter earlier this month. The mismatched asymetrical outfit just above and and the pink square-neck blouse that I paired with a trumpet skirt in the earlier picture are examples of what has been percolating in my brain since taking that class.
Here’s another sketch where I got the swoops all going in the same direction and I played around with pattern fill in the skirt.
A technique that really captured my imagination in Mary’s class was sewing partial tucks on a grid to add a waffle effect to flat fabric. Mary told us her inspiration for this was the book, The Art of Fabric Manipulation by Colette Wolf. This is a book that was given to me as a gift by my dear friend Scottie and I’ve been inspired paging through it but haven’t tried any techniques in it yet. It’s time to change that.
Here is what I’ve been thinking about as a first trial of this technique.
This is my attempt to show using the tucks in the area that a yoke would otherwise go in a knit cardigan with a hemline that dips in back. The tucks will provide added fullness in the body of the garment and I think will work well in a lightweight rayon knit.
Before I got tucks on the brain, I sketched this jacket with a version of my favorite 60’s stand-up collar.
I also tried my hand at sketching the split collar from McCall’s pattern 6796 that I talked about in my last post.
As you can see, I’m having fun with this. I hope you are, too. Be sure to check out what fabulous designs my dear friend Steph King of Siouxzeegirl Designs is showing at 10 Sewing Machines & a Serger. We’d love to see and hear about what you’re sketching, so please leave a comment.
Welcome to In the Sketchbook, a monthly look at fashion design sketches that we are working on for ourselves. Sketching garments on a personal croquis is a great way for the individual couture enthusiast to move beyond the use of commercial patterns and into a world of personalized design! It can be intimidating at first, but with a little bit of practice it becomes something you look forward to. Join us for a look of what we have going on In the Sketchbook! Brought to you by Wendy Grossman of Couture Counsellor and Steph King from Siouxzeegirl Designs.
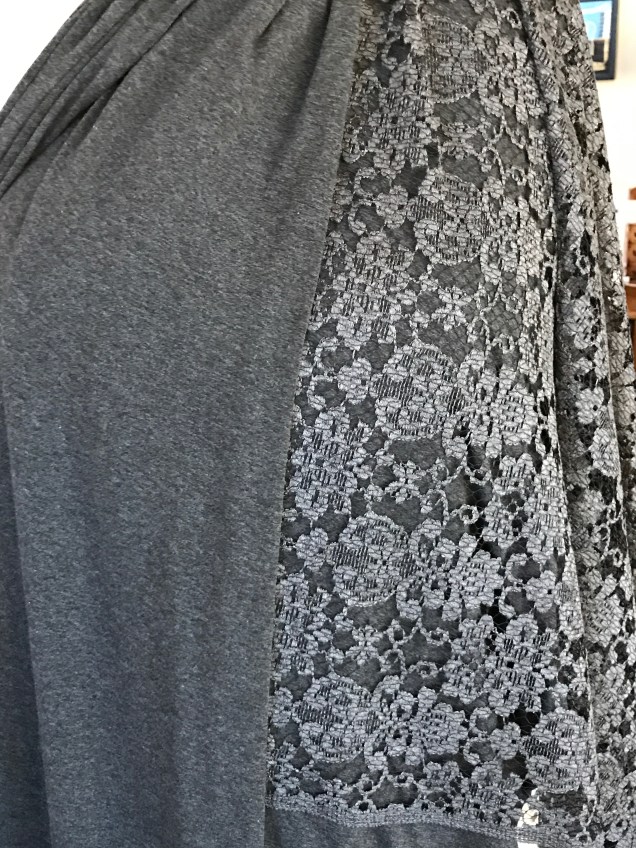
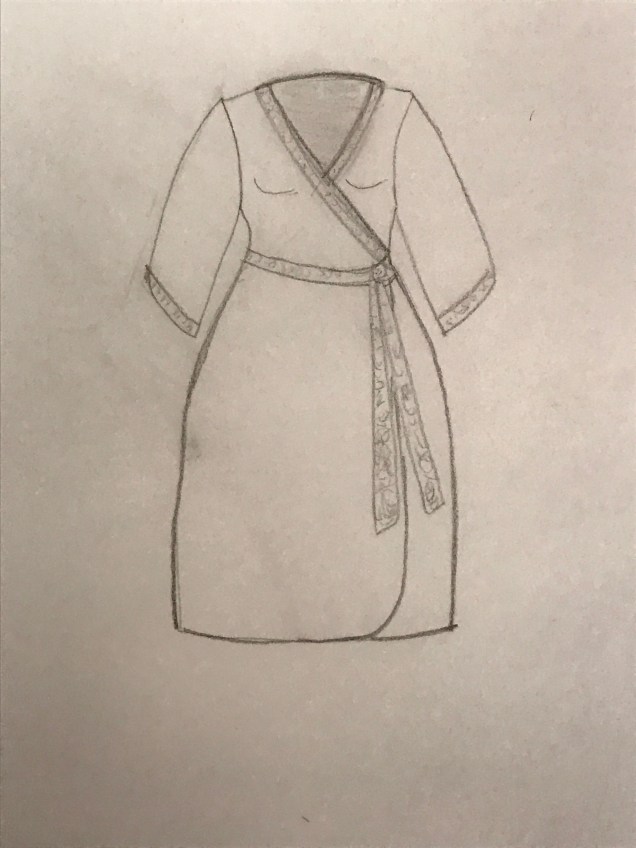
I thought it might be a nice change to take a look at some garments that are actually in development. I’ve been working on pattern adjustments for the Appleton Dress by Cashmerette Patterns. This is a classic wrap dress designed for curvy figures. I think ITY (interlock twist yarn) knit is perfect for this dress, but I had trouble finding what I was looking for. I knew all the ITY knits in my fiber archive are cut in quantities that are only sufficient for a top so I searched to see whether I had anything in rayon that isn’t too clingy. One of the “discoveries” I made was a charcoal gray knit that has been tucked away for a very long time. I thought it would be just right, so I set it aside to prewash. Then I was looking for lace for the project we’re going to talk about in a minute and I cam across this lace mesh from MarcyTilton.com and had one of those aha moments.
The lace looks a bit lighter in the picture than it does in person, but I think you get the idea. To me, knit and lace is an unexpected combination, especially a knit that’s not at all dressy like this one. I immediately thought it would look great on the neck bands and ties of the Appleton dress.
I’ll see if I can make it work on the sleeves, but I suspect I’ll need the stretch of the knit there. I thought about putting it on the edge of the overlap piece all the way to the hem, but I think it would be too much with the tie in that area. This is why sketching out ideas helps. You see issues you didn’t think of when the design is all in your head.
While I was noodling over the Appleton Dress, I wondered what it would look like with a collar.
I like it. Maybe with contrasting fabric, maybe not.
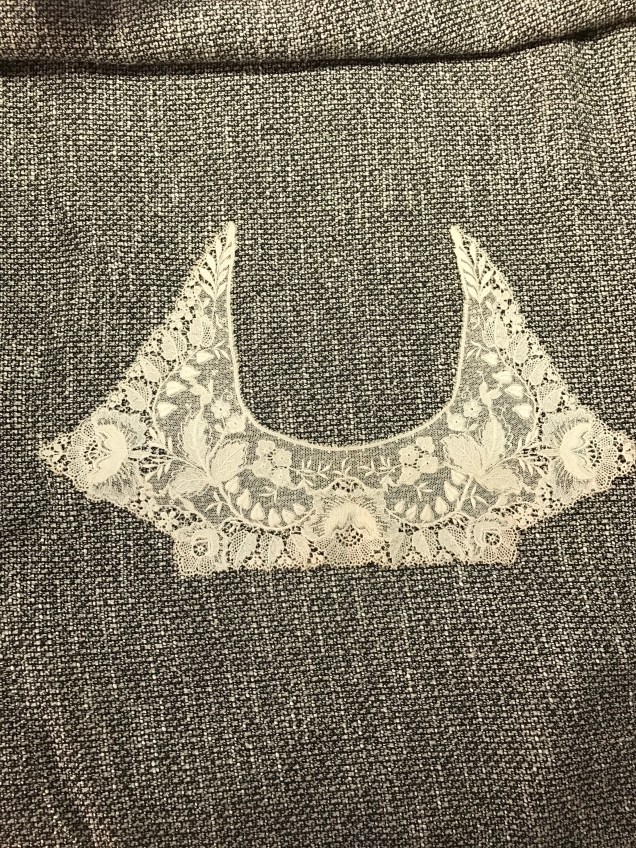
Another project that occupied a chunk of my time this month involves lace combined with tweed. I have this fabulous salt-and-pepper tweed made of cotton(!) that I ordered from SawyerBrook.com a couple of years ago. It’s very soft and should be in an unstructured garment, so I thought about using the design for my Spoonflower dress and adding ¾ length sleeves.
In contemplating collars, I wondered whether it might look nice with a collar made of lace. That started a whole quest that made me feel like Goldilocks. One lace was too much of a stark white, black did nothing for the fabric, various laces in ivory were too dense, and on and on. I kept coming back to a lace neck piece I acquired at an ASG fabric exchange several years ago. It’s the wrong shape and it doesn’t lend itself to sitting under a collar made from the fashion fabric (the sketches look like a dog with a beard), but the color and density are perfect.
In a mentoring session, Sarah Veblen agreed that this is the lace I should use. She advised me to draft the neckline around it and forget about making a collar. I told her I was thinking about cutting out the flower at each of the points so the piece is not quite so wide and she agreed that’s a good idea. She suggested using the flowers somewhere else, maybe even at the top to balance out the width. I need to play around with them once I get them cut. I’m going to follow Pamela Legget’s advice for cutting out the motifs: sharp scissors, good lighting, no wine.
Here’s the sketch for the dress. I think it looks like it has measles and is wearing a bib. I definitely need to work on my sketching ability in the new year.
Finally, I want to show you a sketch of a dress that I haven’t chosen fabric for yet. I sketched it using a cool new toy – um, tool – that I treated myself to. It’s the Apple Pencil, which I used with the iPad app, Paper 53. I want to use the silhouette of my Leaf Dress in a 3-season dress with sleeves. I think this will be a lot of fun to make and to wear.
That’s it for now. Be sure to check out what fabulous designs my dear friend Steph King of Siouxzeegirl Designs is showing at 10 Sewing Machines & a Serger and wish her a happy birthday while you’re over there. And, we’d love to see and hear about what you’re sketching, too.
Welcome to In the Sketchbook, a monthly look at fashion design sketches that we are working on for ourselves. Sketching garments on a personal croquis is a great way for the individual couture enthusiast to move beyond the use of commercial patterns and into a world of personalized design! It can be intimidating at first, but with a little bit of practice it becomes something you look forward to. Join us for a look of what we have going on In the Sketchbook! Brought to you by Wendy Grossman of Couture Counsellor and Steph King from Siouxzeegirl Designs.
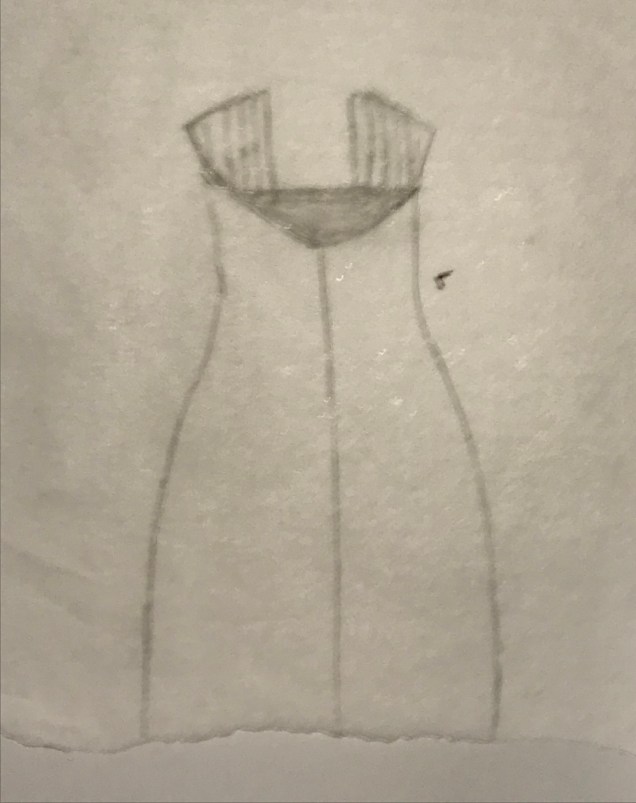
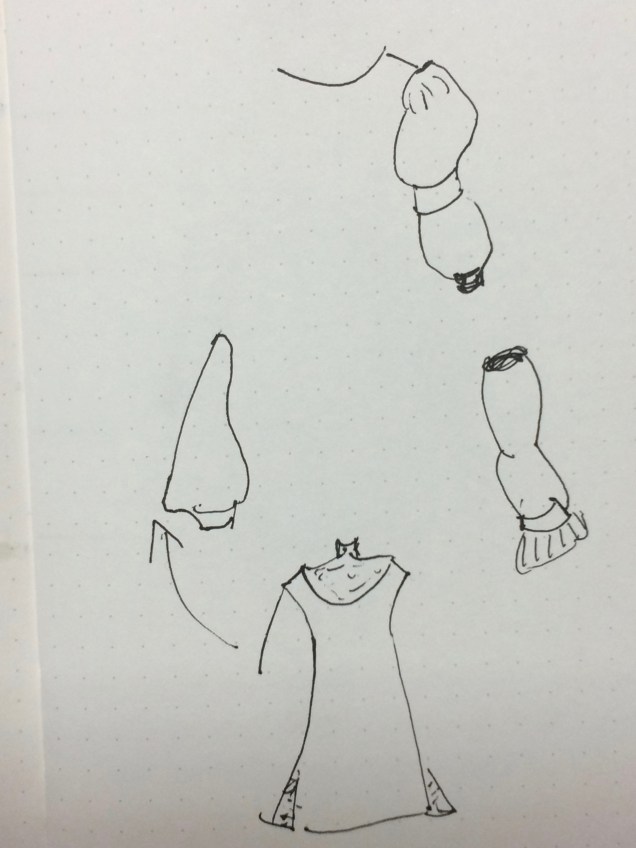
I’m afraid there’s not much new in my sketchbook this month, but I have been giving some thought to sleeves. I’m taking a seminar on Victorian fashion in art this fall and this week’s topic was Dante Gabriel Rosetti and the Pre-Rafaelites. That led to a series of slides showing examples of what was known as Artistic Dress as part of the Aesthetic Movement. and I immediately started scribbling in my mini-sketchbook.
There was a lot of volume in the sleeves, but also interesting shapes. The one at the top was full, had a band mid-way down, then was less full and ended in a cuff. I’m thinking the fullness can be scaled down and the band and cuff might be made of contrasting fabric, or the full bits could be made of mesh or lace and the band and cuff could be the fashion fabric used on the body of the garment.
The sketch at the bottom was my attempt to get the idea of the entire dress down quickly before the teacher wen to the next slide, so the arrow points to the sleeve that goes with the dress. There was contrast fabric in the goddess at the hem and the yoke at the neck. The fullness in the sleeve happened near the cuff, like a poet’s sleeve, but with a more definite shape.
The one on the right doesn’t look anything like what I was trying to capture.
This is a sketch I’ve been ruminating about for a while. It has two different versions of an openwork sleeve I’d like to try. The one on the left is supposed to be thin bias tubes draped to hang off the shoulder seam. I have no idea whether it will work in real life. The one on the left poses the possibility of using overlapping curved strips of fabric that have finished edges. Again, very theoretical.
One more sleeve design I’ve been ruminating about is to insert lace or mesh down the middle of a sleeve. I think this might be nice if the lace were used for the cuff and collar as well. The Haute Couture Club of Chicago is having a lace challenge in March and I’m hoping this will prompt me to actually use some of the lace I’ve been collecting, thinking about, and practicing on samples of for techniques.
Something to think about.
Be sure to visit my dear friend Steph King of Siouxzeegirl Designs at https://10sewingmachines.blogspot.com to see what amazing things are in her sketchbook this month. And if you’d like to join in on the fun, please leave a comment for one of us.
Welcome to In the Sketchbook, a monthly look at fashion design sketches that we are working on for ourselves. Sketching garments on a personal croquis is a great way for the individual couture enthusiast to move beyond the use of commercial patterns and into a world of personalized design! It can be intimidating at first, but with a little bit of practice it becomes something you look forward to. Join us for a look of what we have going on In the Sketchbook! Brought to you by Wendy Grossman of Couture Counsellor and Steph King from Siouxzeegirl Designs.
On this third installment of In the Sketchbook, I’m exploring combining structured fabrics with soft, drapey fabrics and asymmetry.
Earlier this month, I was getting off the elevator after a morning workout as a neighbor was getting on to go to her office. She was wearing a lovely navy linen jacket and a flowy skirt in a floral print. I thought about how nice she looked and the image brought to mind two fabric pairings I have that are waiting to become something new to wear.
Both of the soft fabrics were acquisitions from A Fabric Place outside Baltimore in May. The gorgeous sage green wool crepe was a gift from my dear friend Stephanie King, who saw how perfectly it goes with the green, peach and pink silk charmeuse. The blue-gray wool was also a purchase from A Fabric Place. It was part of an assignment during Sarah Veblen’s Design I class for me to pair a sheer floral with a “serious” fabric.
Here are the sketches.
I’m thinking asymmetric coat dress for one of the two fabric combinations. I haven’t settled on the neckline/collar yet, but if I go with the green, I thought the charmeuse would be nice as a cuff and maybe a band on the dress as well as the mock skirt peeking out from underneath the wool. If I go with the blue-gray, I’m thinking soft folds everywhere the sheer is used (but not actual ruffles). These ideas need to percolate some more.
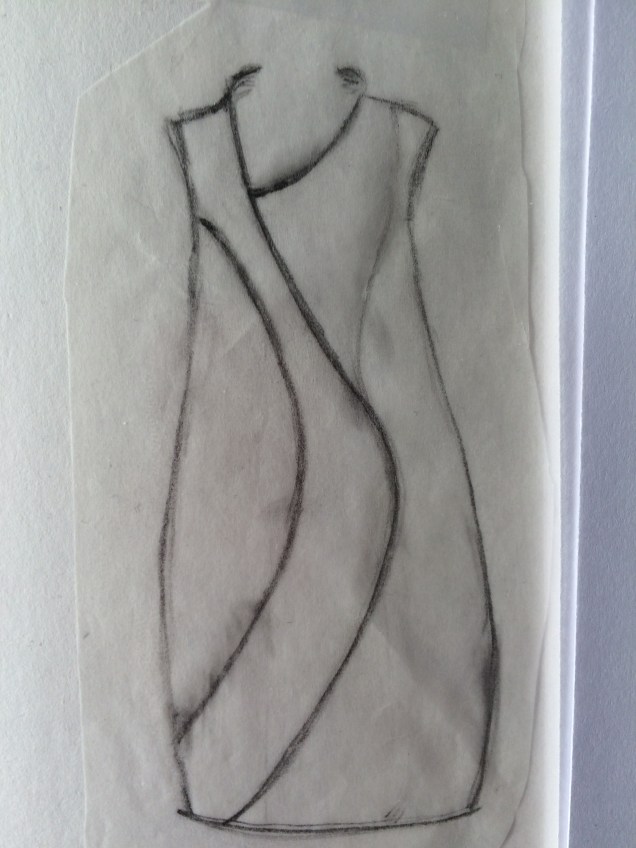
Here is another asymmetrical design idea that’s been percolating in my brain. It was an assignment in Design 1 to come up with a “swoop” design.
The pattern work on that one will be quite the project.
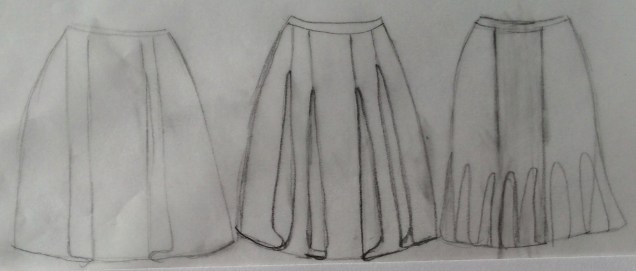
Right now, I’m in relaxed summer mode with my sewing. I found some fabric in a drapey light neutral that I was thinking about making into a summer skirt. The fabric doesn’t lend itself to pleats, but I wanted a relaxed silhouette. S0, here are the ideas I sketched out as possibilities.
Lots to think about.
I’d love to hear what you think about these and about what you’re sketching. Be sure to check out what’s in Steph’s sketchbook at 10 Sewing Machines & a Serger.


 I’ll see if I can make it work on the sleeves, but I suspect I’ll need the stretch of the knit there. I thought about putting it on the edge of the overlap piece all the way to the hem, but I think it would be too much with the tie in that area. This is why sketching out ideas helps. You see issues you didn’t think of when the design is all in your head.
 In a mentoring session, Sarah Veblen agreed that this is the lace I should use. She advised me to draft the neckline around it and forget about making a collar. I told her I was thinking about cutting out the flower at each of the points so the piece is not quite so wide and she agreed that’s a good idea. She suggested using the flowers somewhere else, maybe even at the top to balance out the width. I need to play around with them once I get them cut. I’m going to follow Pamela Legget’s advice for cutting out the motifs: sharp scissors, good lighting, no wine.
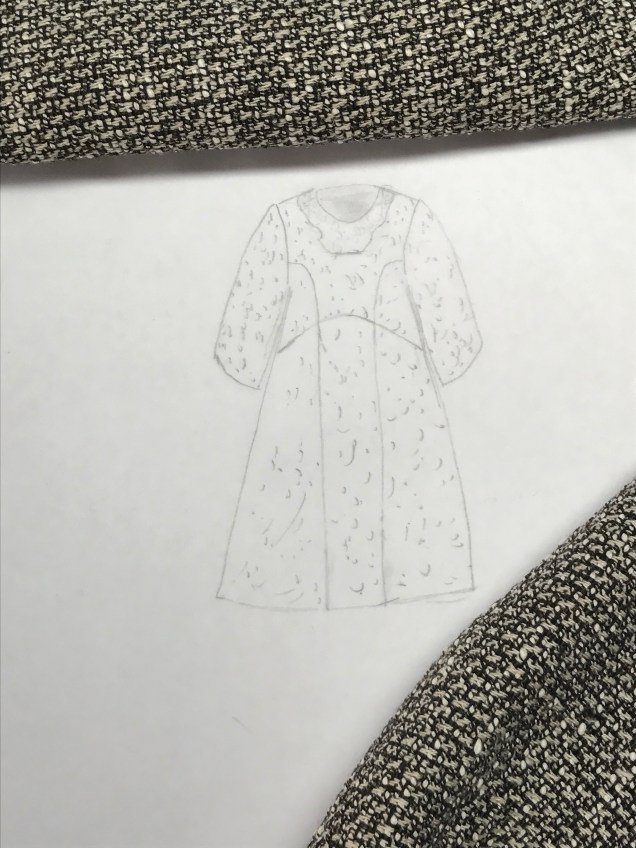

 There was a lot of volume in the sleeves, but also interesting shapes. The one at the top was full, had a band mid-way down, then was less full and ended in a cuff. I’m thinking the fullness can be scaled down and the band and cuff might be made of contrasting fabric, or the full bits could be made of mesh or lace and the band and cuff could be the fashion fabric used on the body of the garment.
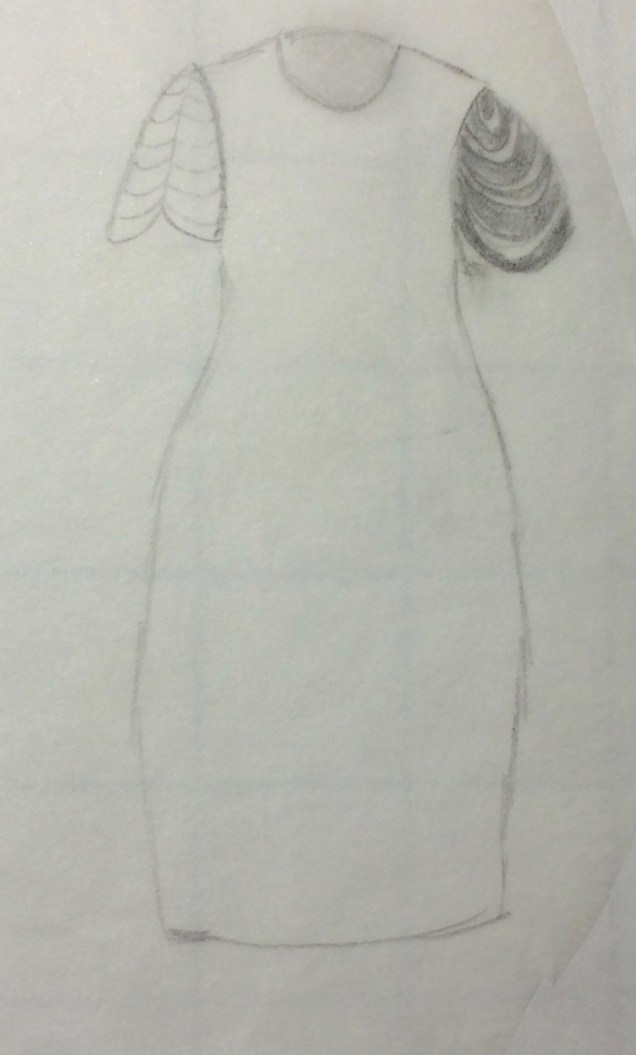 This is a sketch I’ve been ruminating about for a while. It has two different versions of an openwork sleeve I’d like to try. The one on the left is supposed to be thin bias tubes draped to hang off the shoulder seam. I have no idea whether it will work in real life. The one on the left poses the possibility of using overlapping curved strips of fabric that have finished edges. Again, very theoretical.
 One more sleeve design I’ve been ruminating about is to insert lace or mesh down the middle of a sleeve. I think this might be nice if the lace were used for the cuff and collar as well. The Haute Couture Club of Chicago is having a lace challenge in March and I’m hoping this will prompt me to actually use some of the lace I’ve been collecting, thinking about, and practicing on samples of for techniques.