The Bias Challenge

For this year’s ASG Chicago Chapter fashion show, my neighborhood group, Sew Chicago, challenged ourselves to create a garment that has at least 50% of the visible area sewn on the bias.

Show Your Bias
Four members of Sew Chicago met the challenge to “Show Your Bias” on the runway

Before embarking on this challenge, my experience with bias had been limited to bias bindings for necklines and armholes and using a single bias panel in the Decades of Style Stardust Skirt.   So, of course I did a ton of research on the subject and shared what I had learned with the Sew Chicago Neighborhood Group.

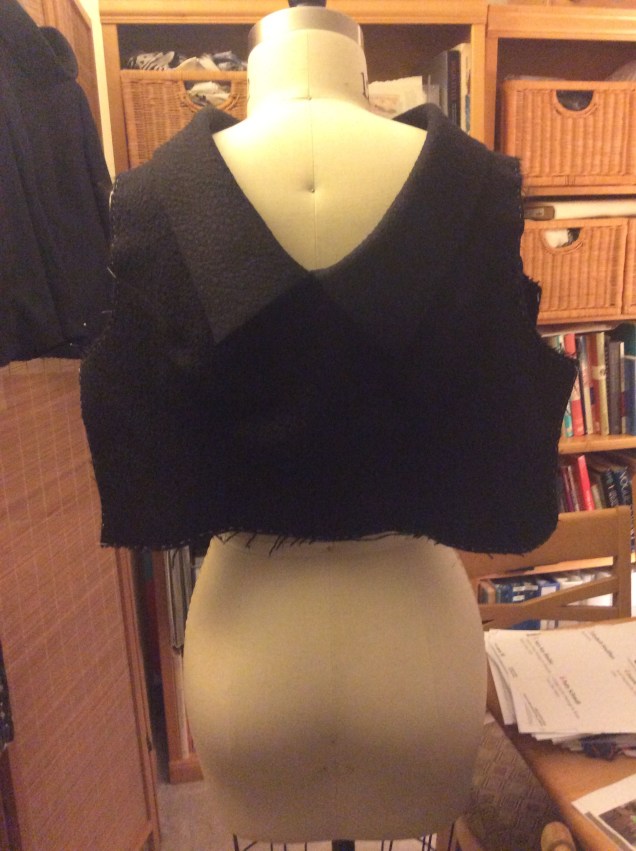
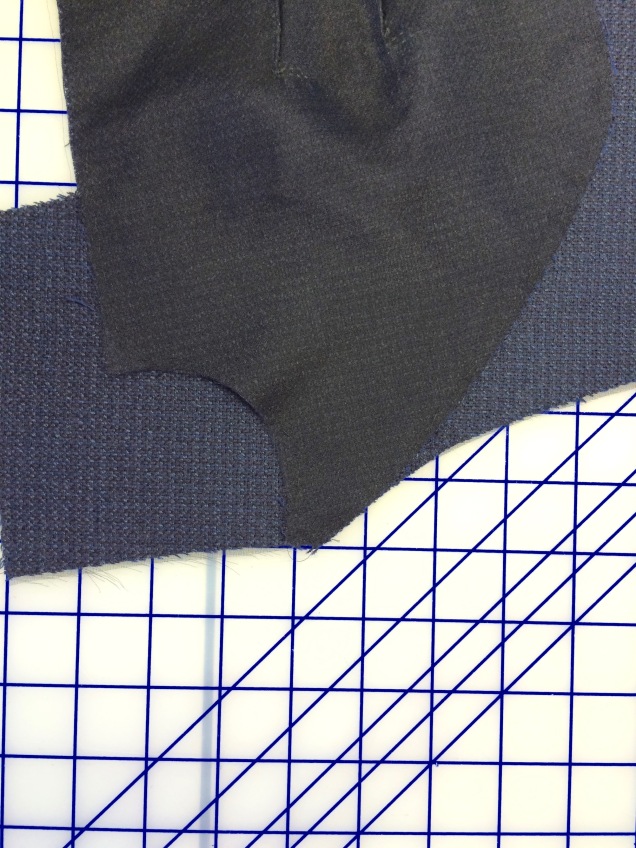
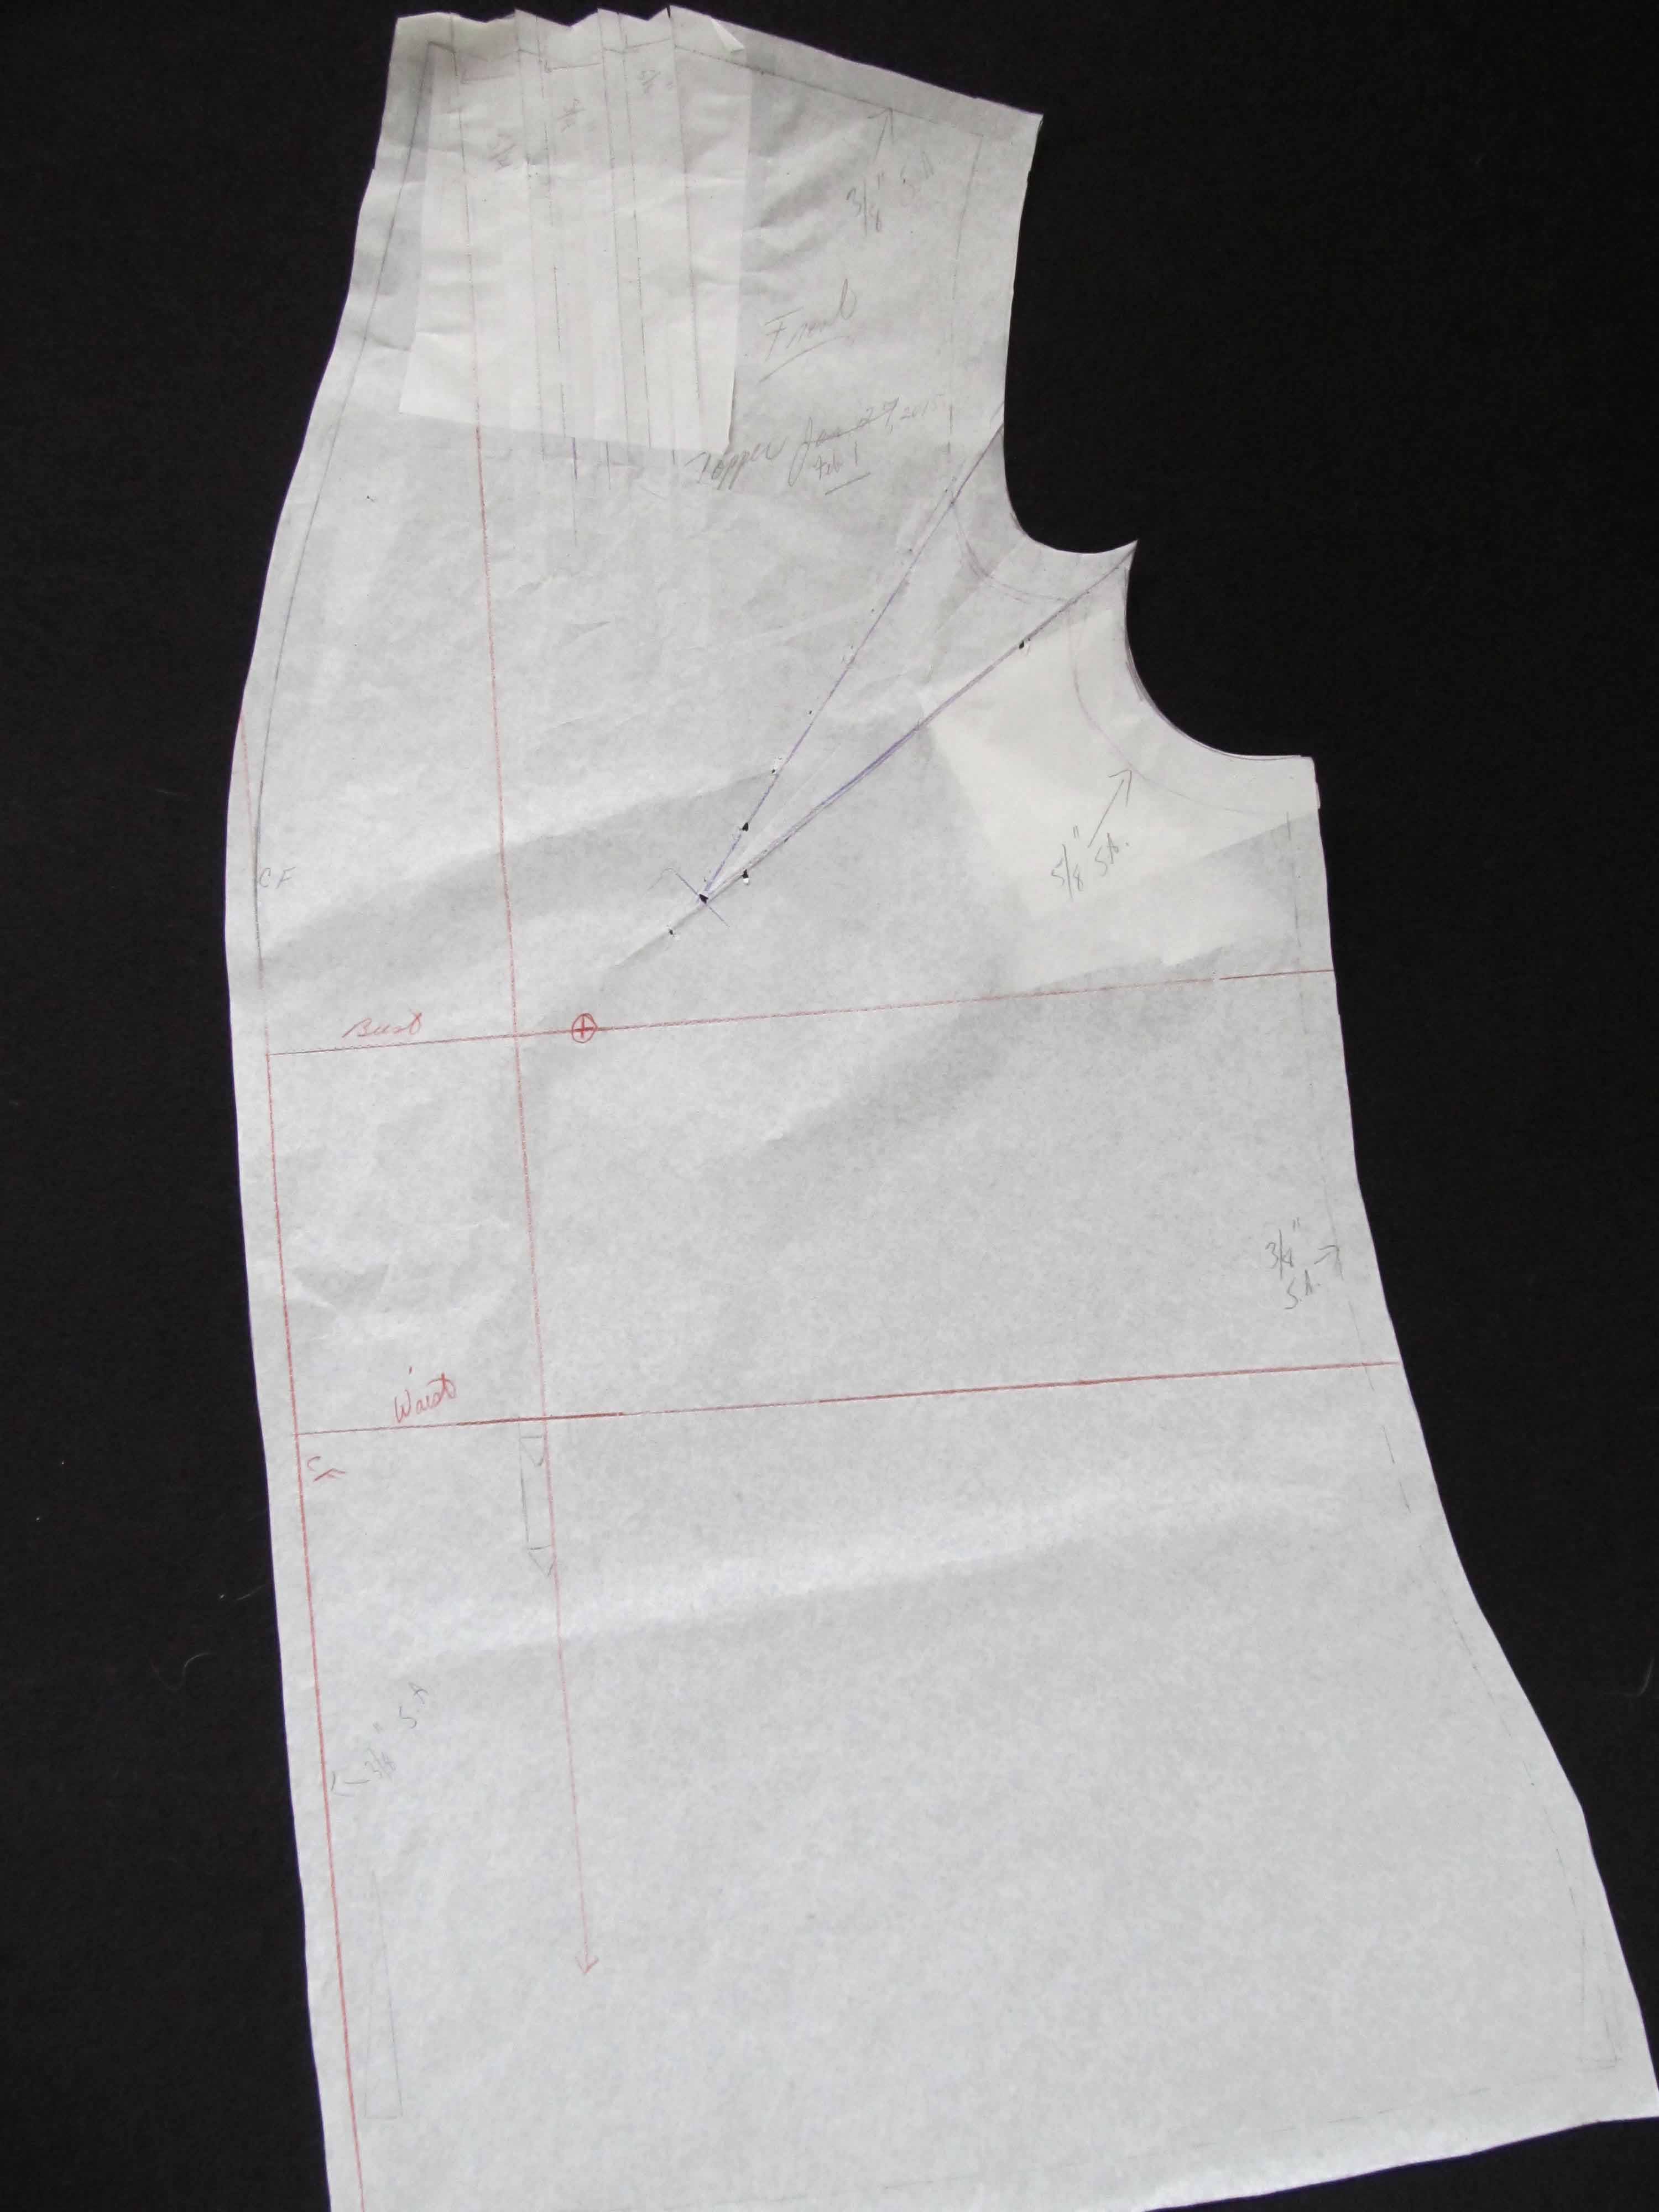
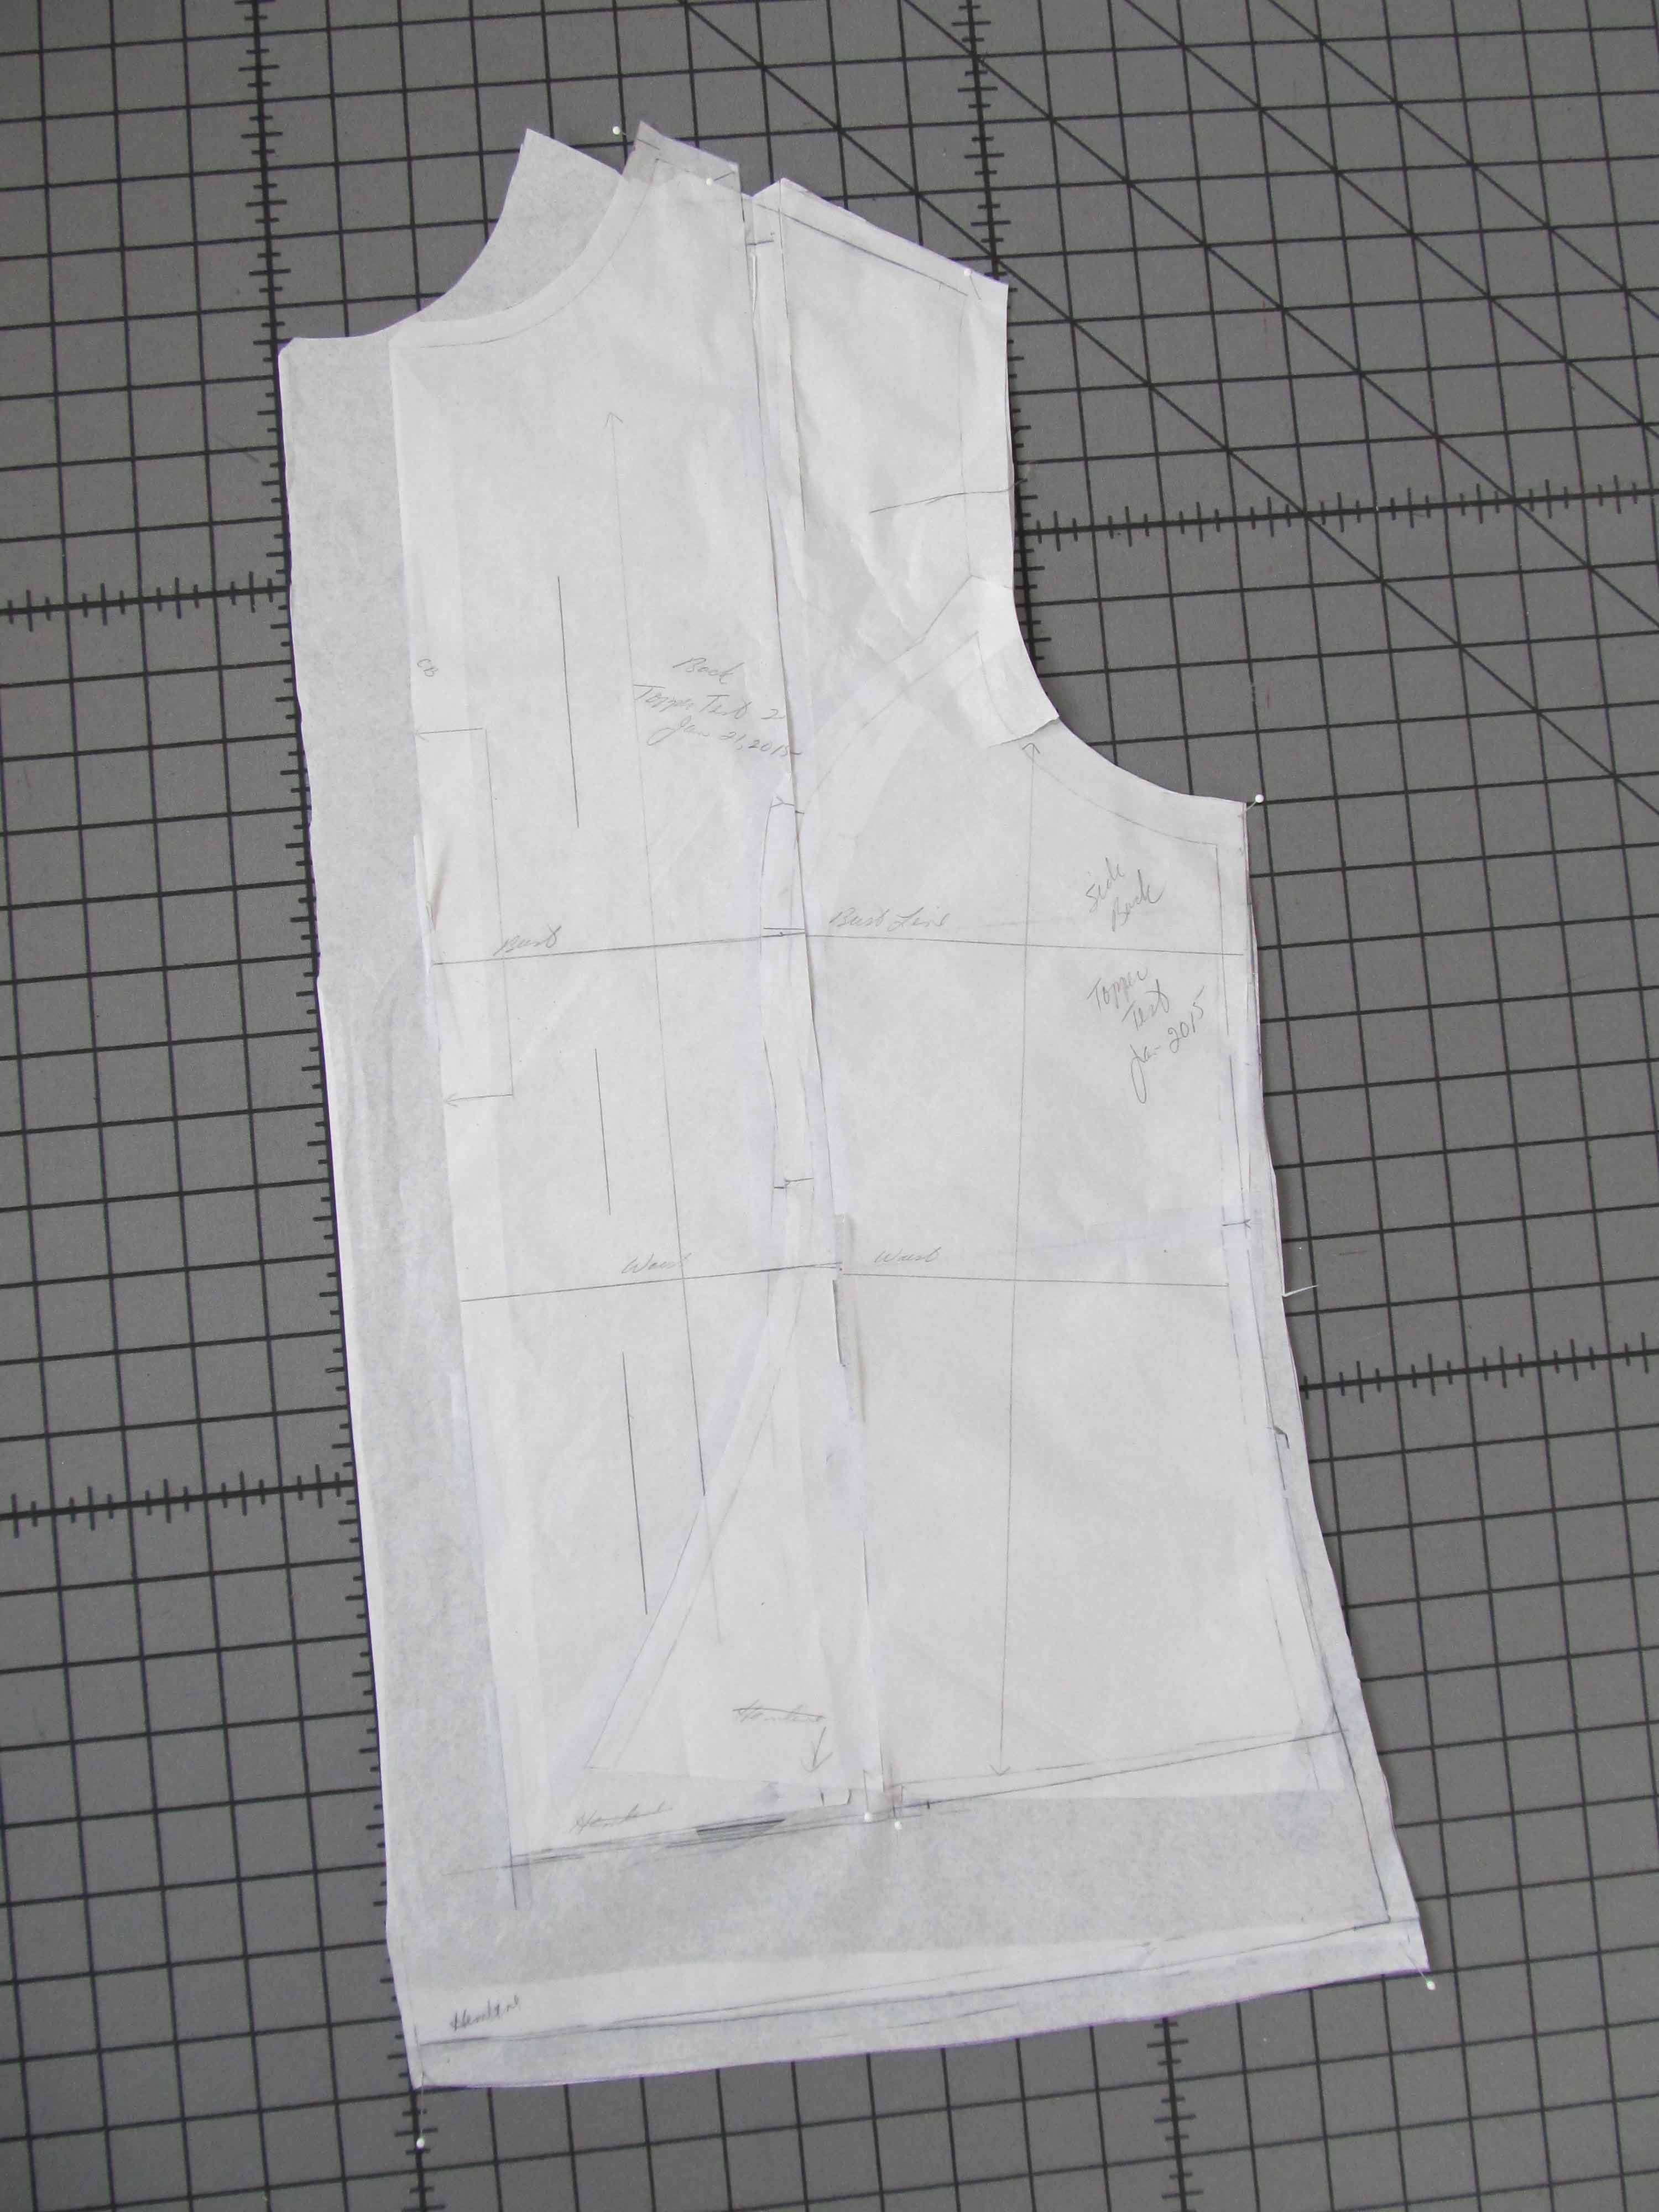
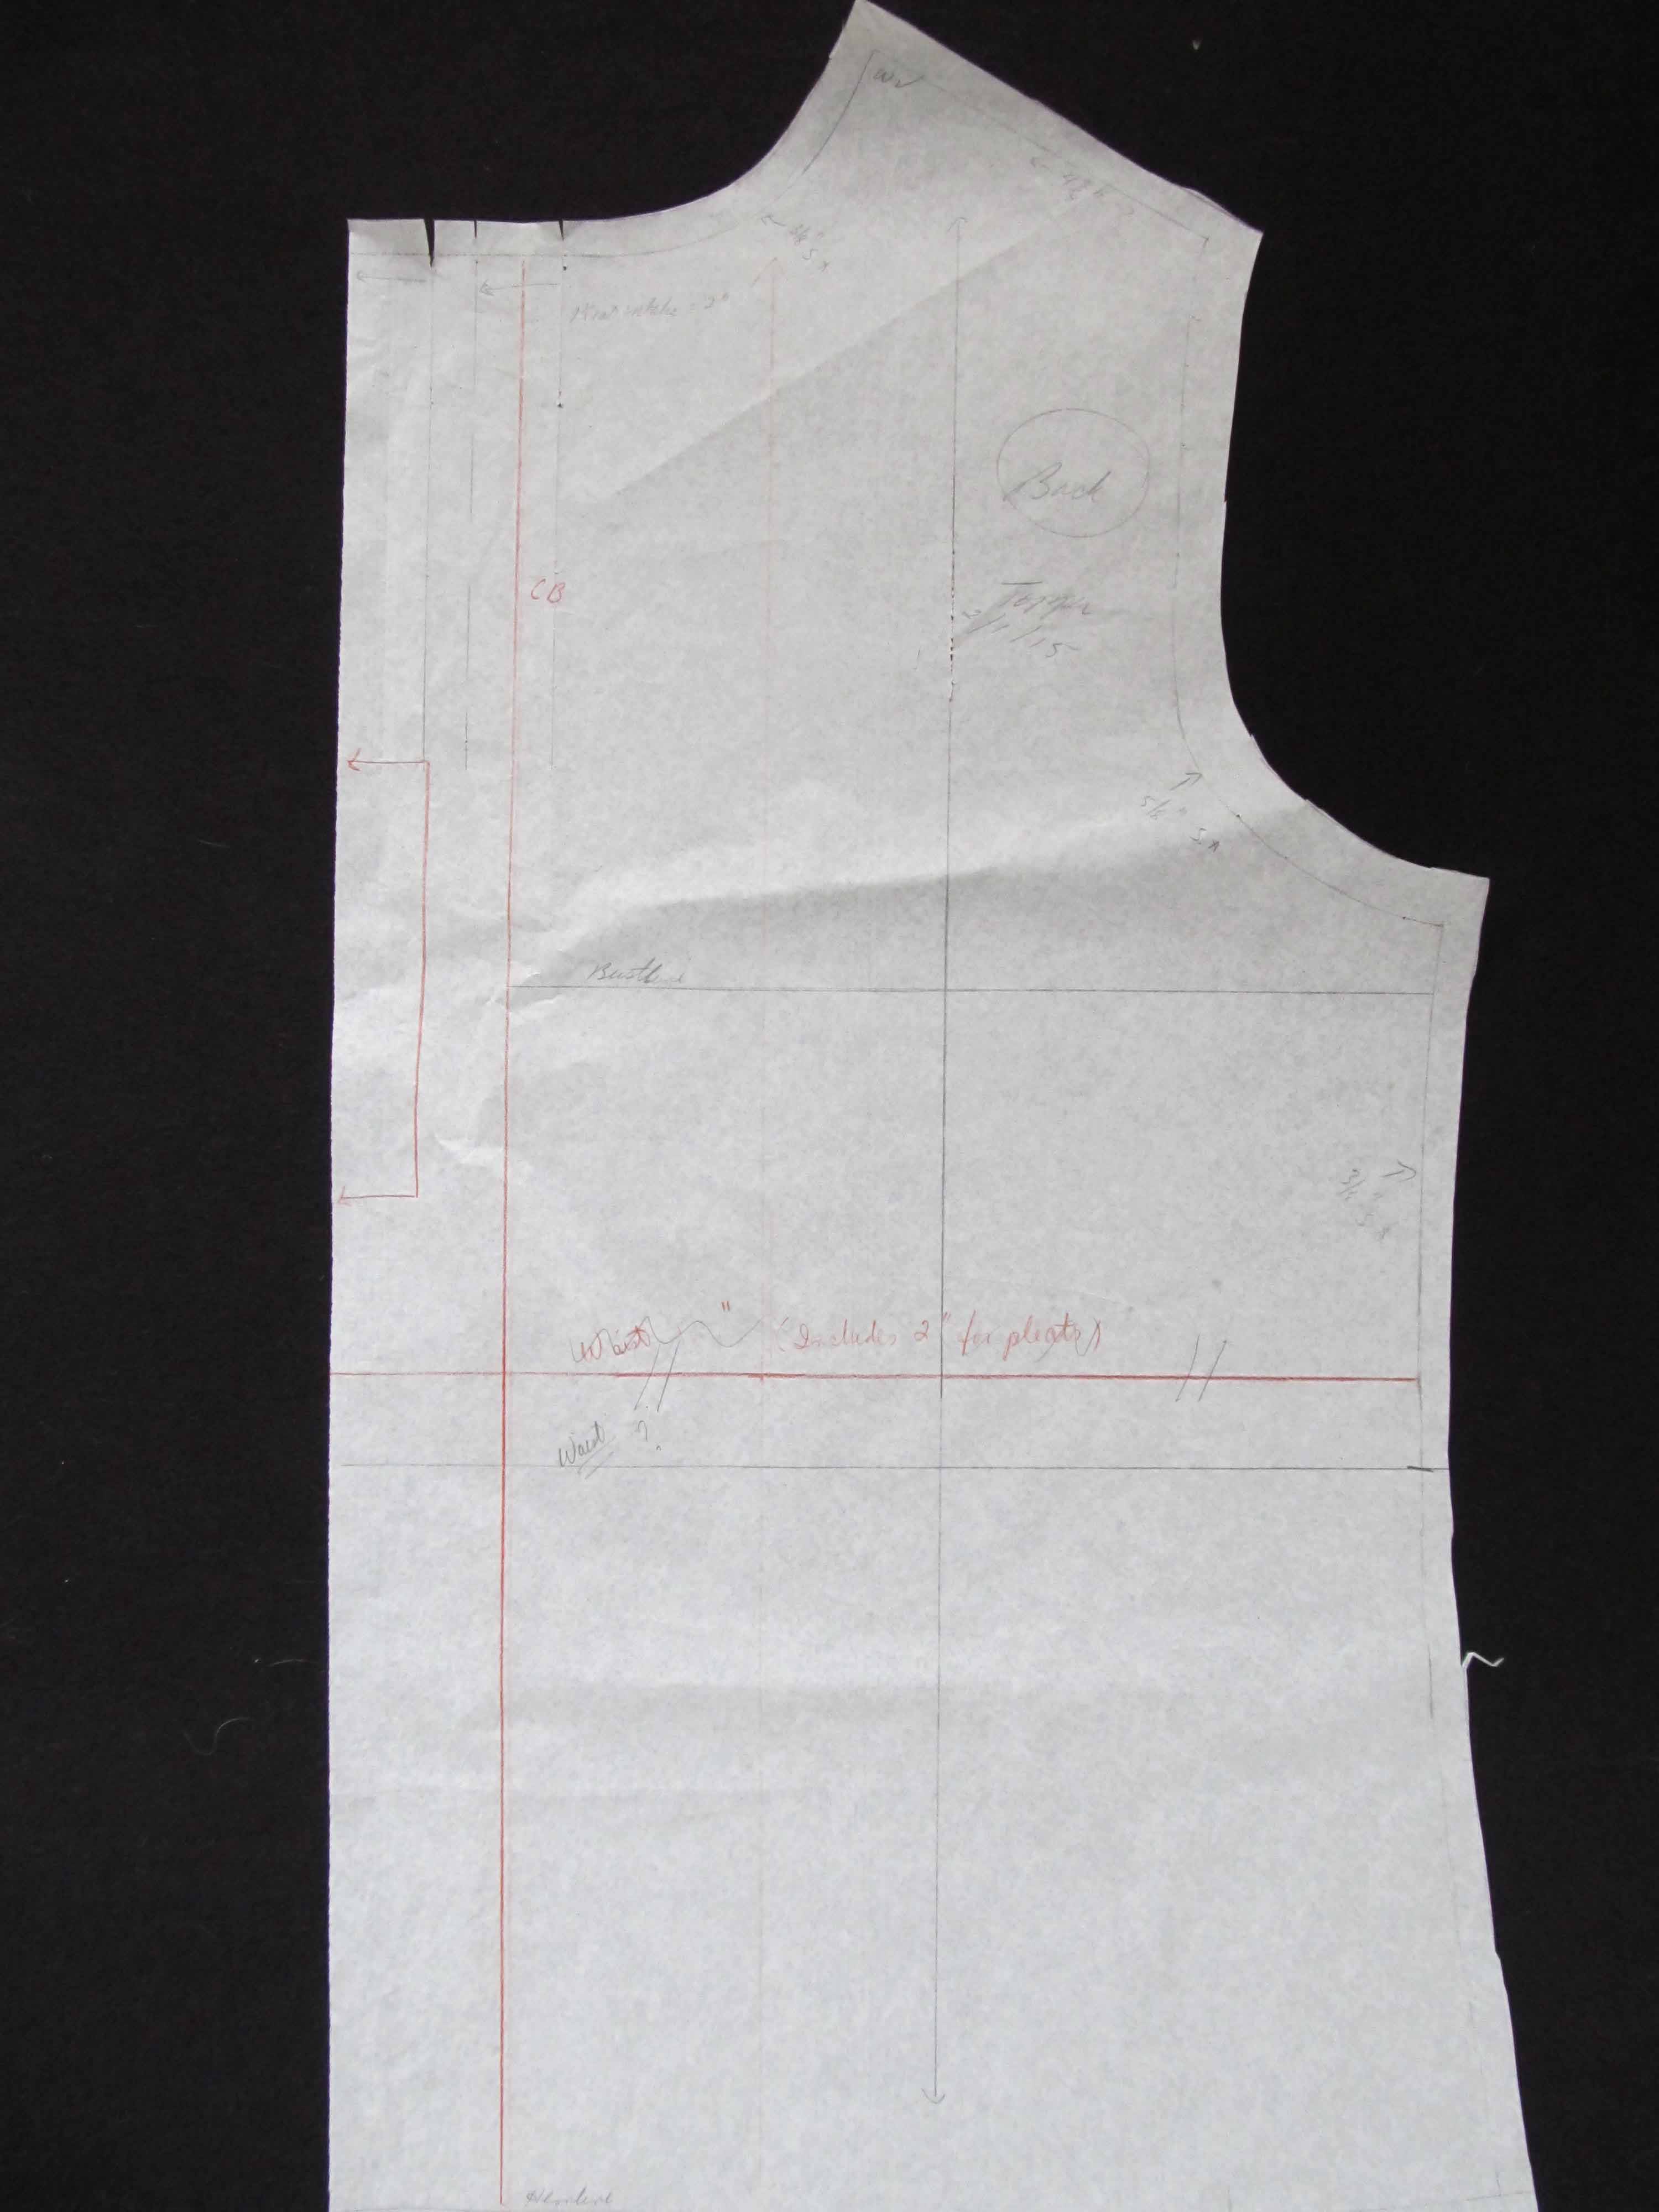
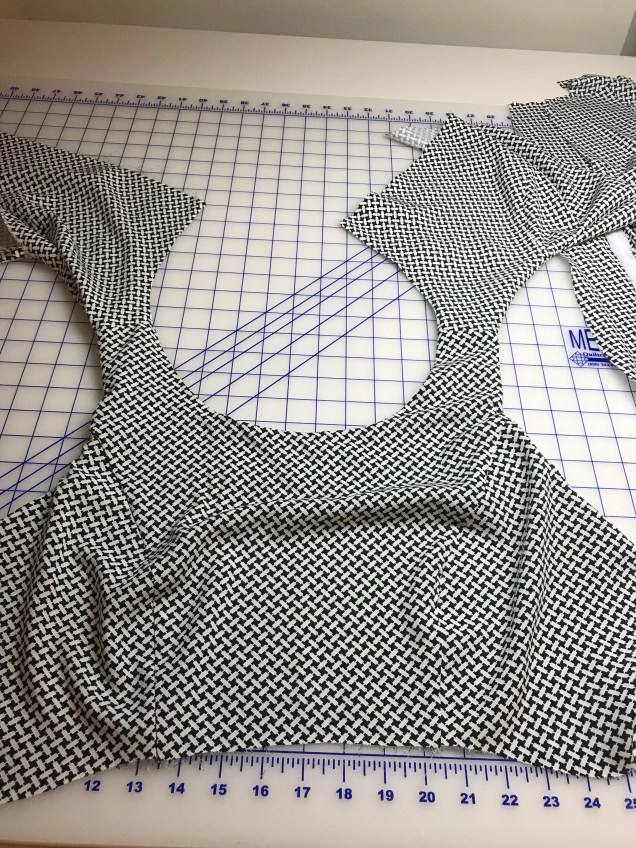
My plan for the challenge project had been simple, or so I thought. I copied my master skirt pattern, which is for a slightly pegged pencil skirt with princess seams. I used the slash and spread method to swing out the seams at the side, side front and side back, kept the center back seam as it was in the original and added a center front seam. I then converted the grainline on each piece to bias.

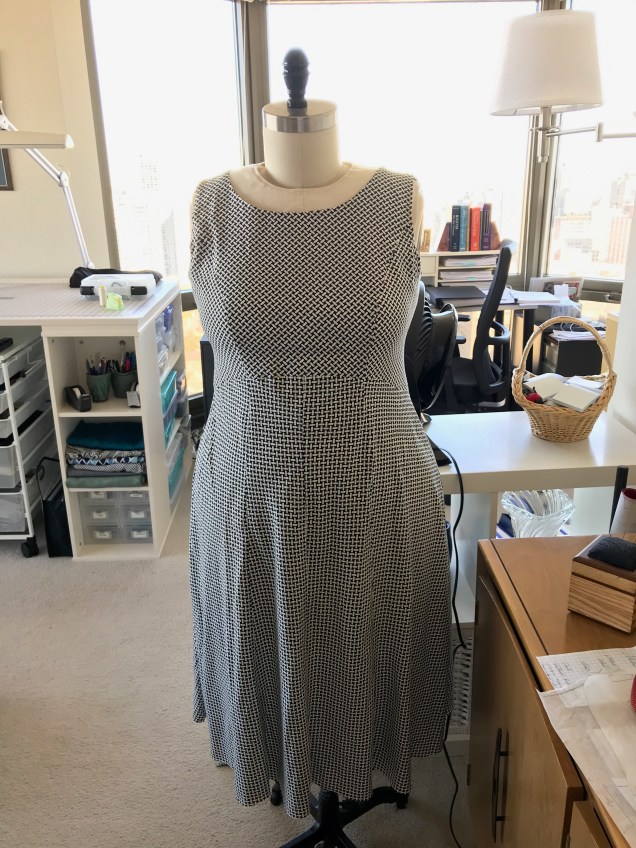
I decided to test first with a wearable muslin, which turned out to be a very good call. I was planning to make the skirt in rayon challis so I tested in a less expensive rayon challis I had bought on sale. The skirt sewed like a dream and I was very excited about having a wearable muslin I actually wanted to wear. When I tried on the skirt I really liked the way it looked and moved. I then put the skirt on my dress form so the bias could relax overnight. When I put the skirt on to show Sarah Veblen in a mentoring session I discovered that the seams had developed waves just below the waistband and those wavy seams made the fabric in between pooch out. Sarah had me try various methods to address the problem, but it just got worse and later showed up at center back. I didn’t keep any of the pictures because I was so fed up with the whole project.

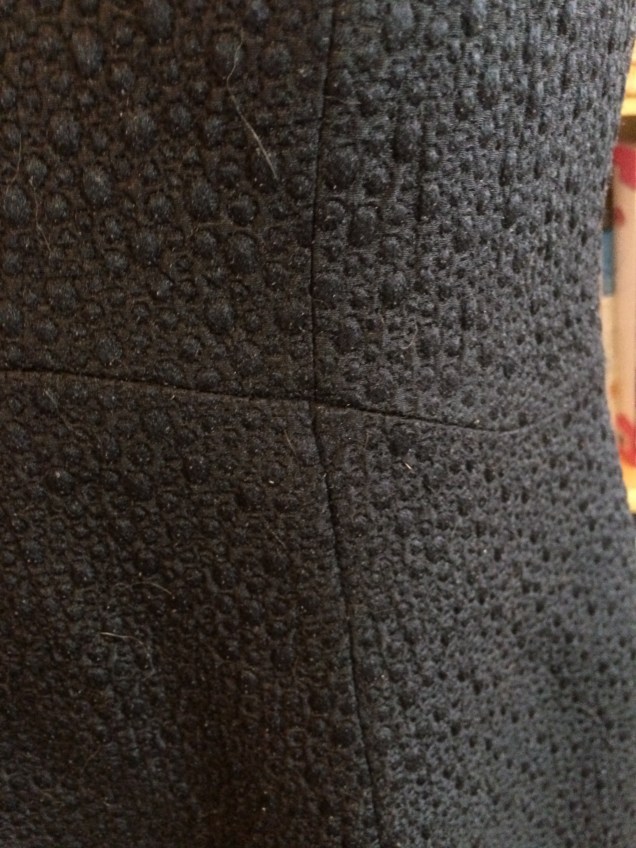
In thinking through what had happened, I came to the conclusion that the problem was showing up in the curved sections of the seams. My master pattern follows my curves and I had preserved those curves in the bias pattern, whereas most bias skirt patterns only have side seams and they tend to be straight. The message I thought the fabric might be sending me was “I like to curve when I’m on the bias, but I want to do it on my own terms, not in a way that’s dictated by a pattern.” It’s not any different from the messages my cat gives me, which is that whatever she does, she wants it to be her idea, not mine. I know I overthink everything, but this made sense to me. Cats and bias are both pretty finicky.

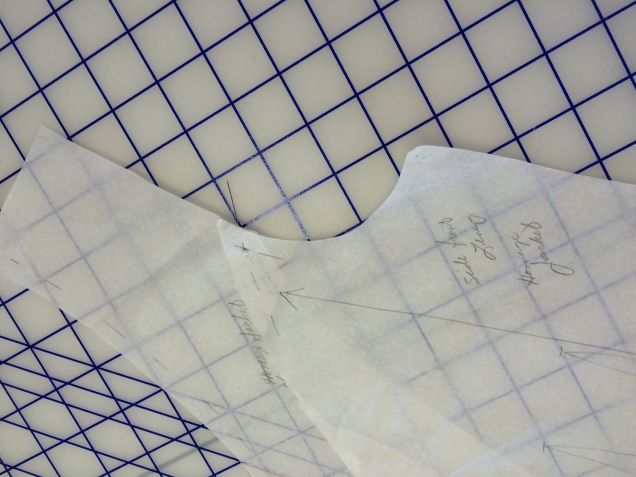
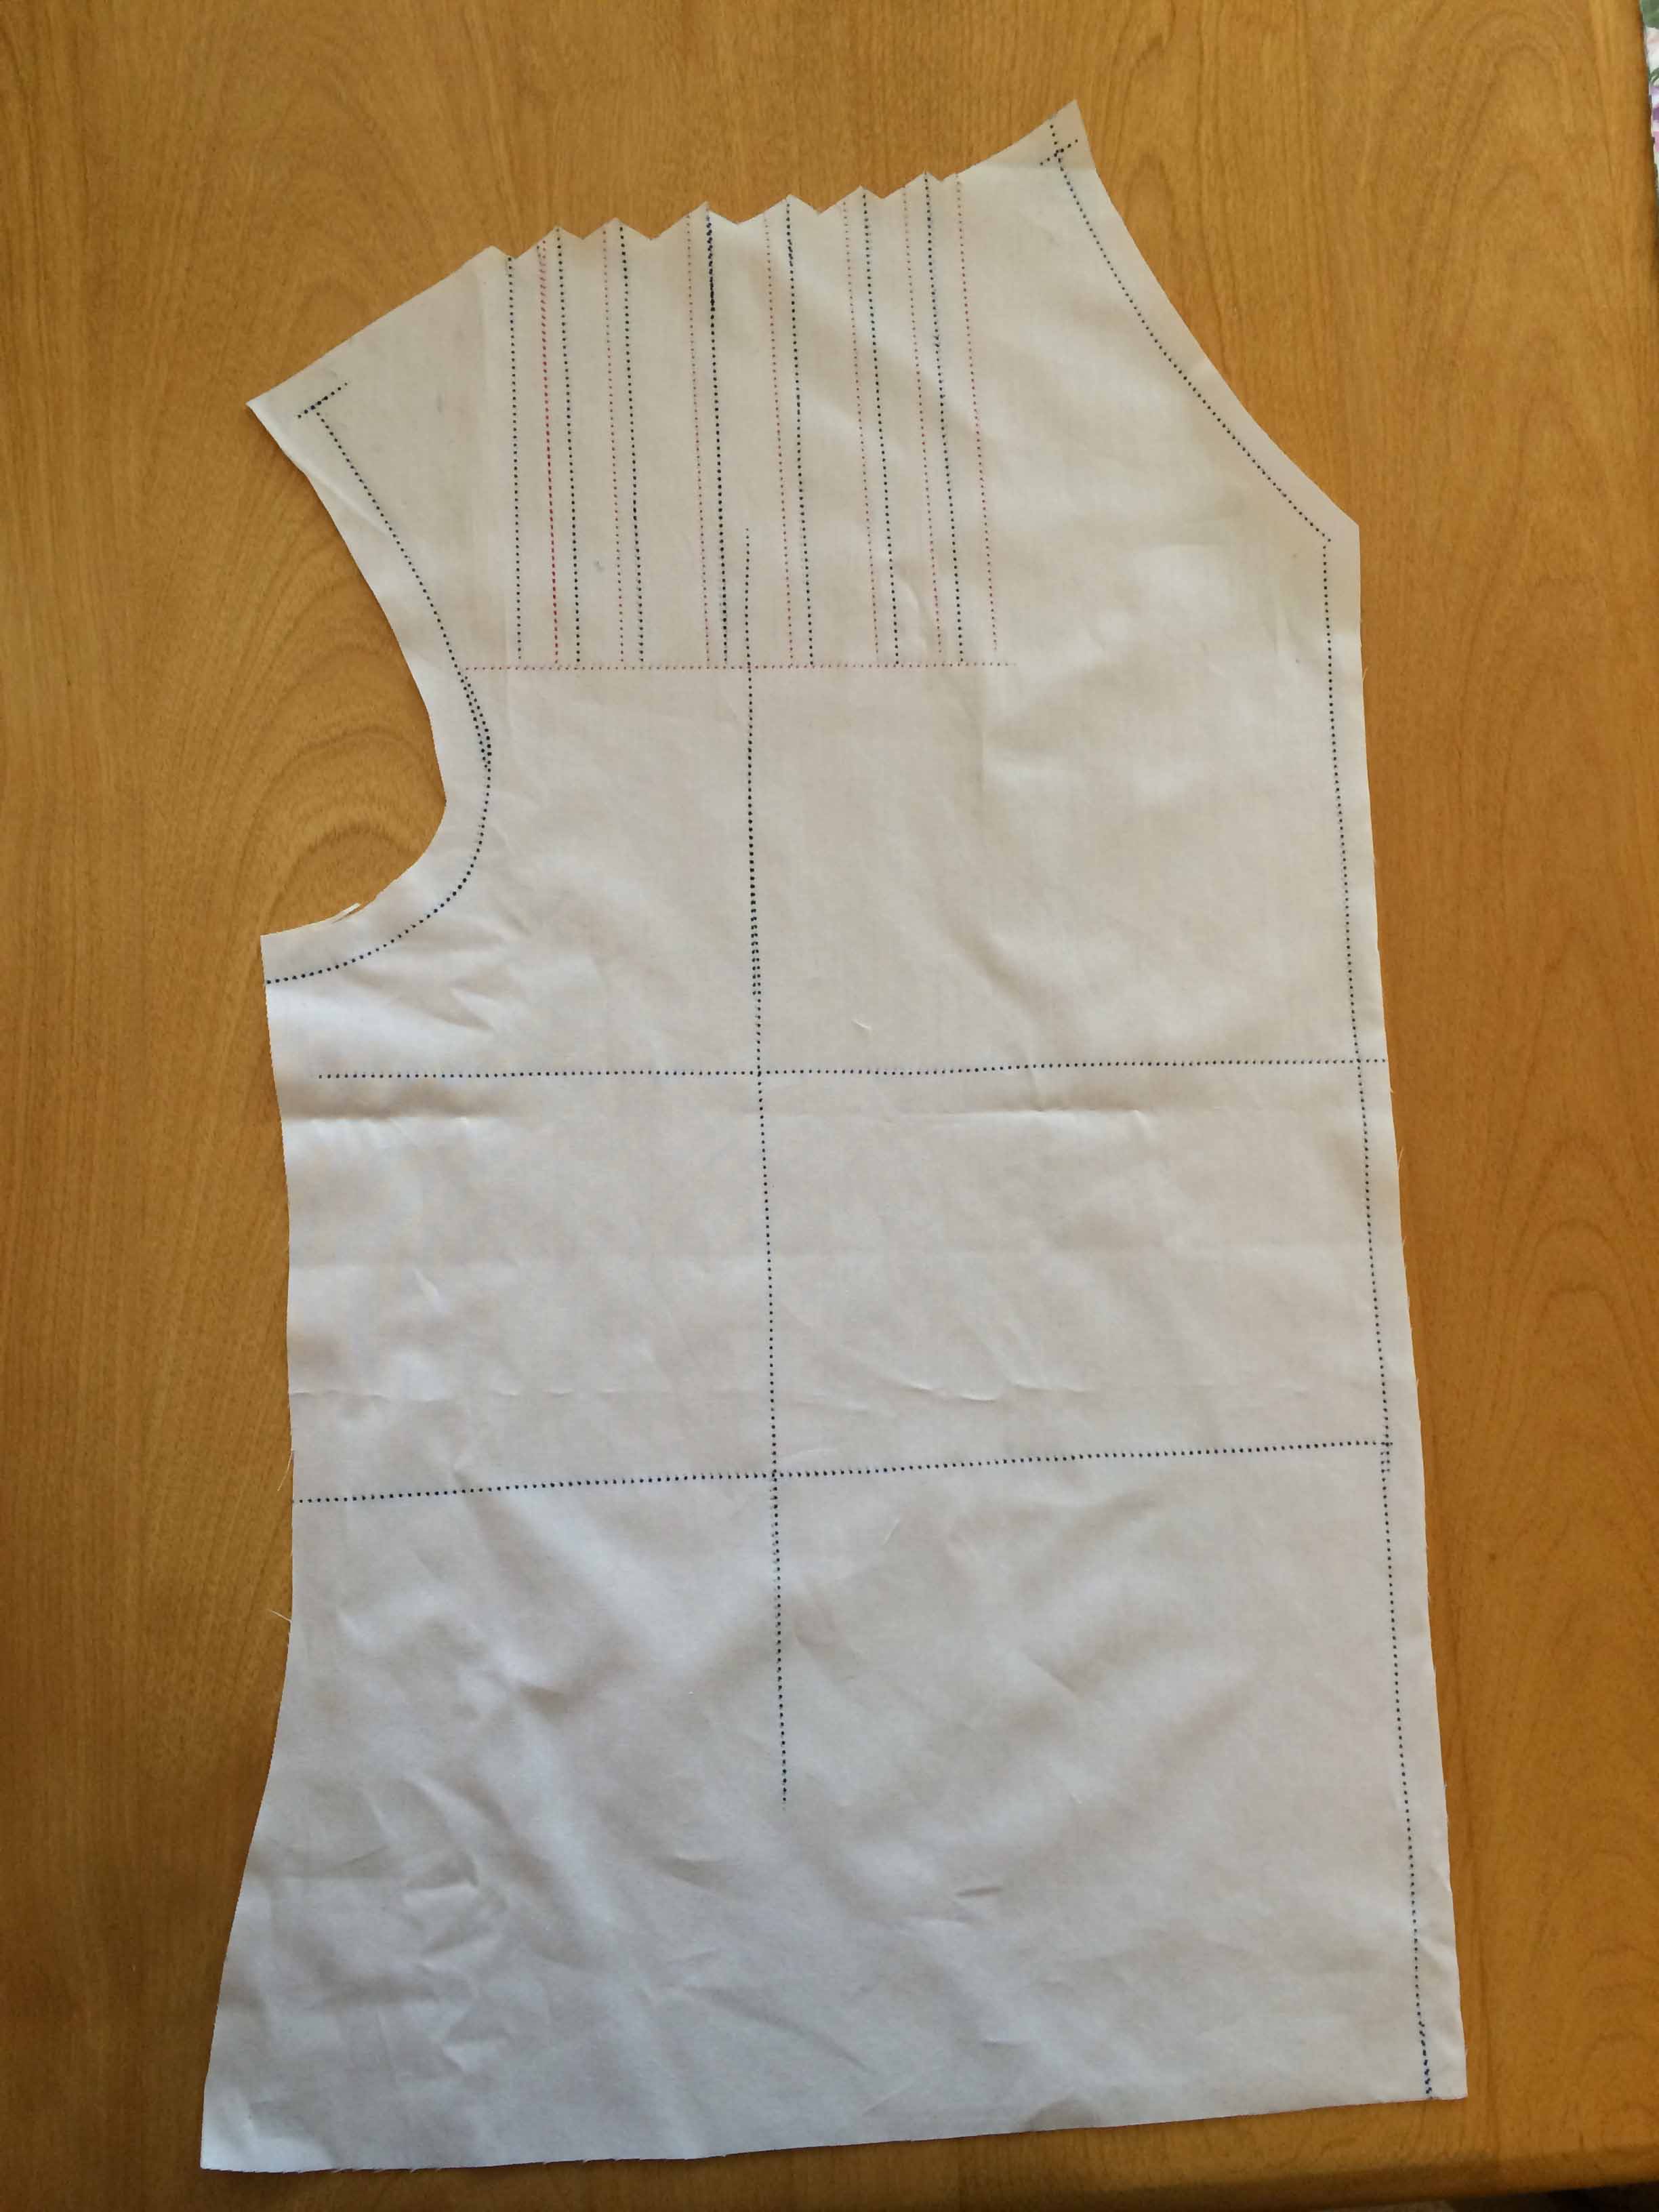
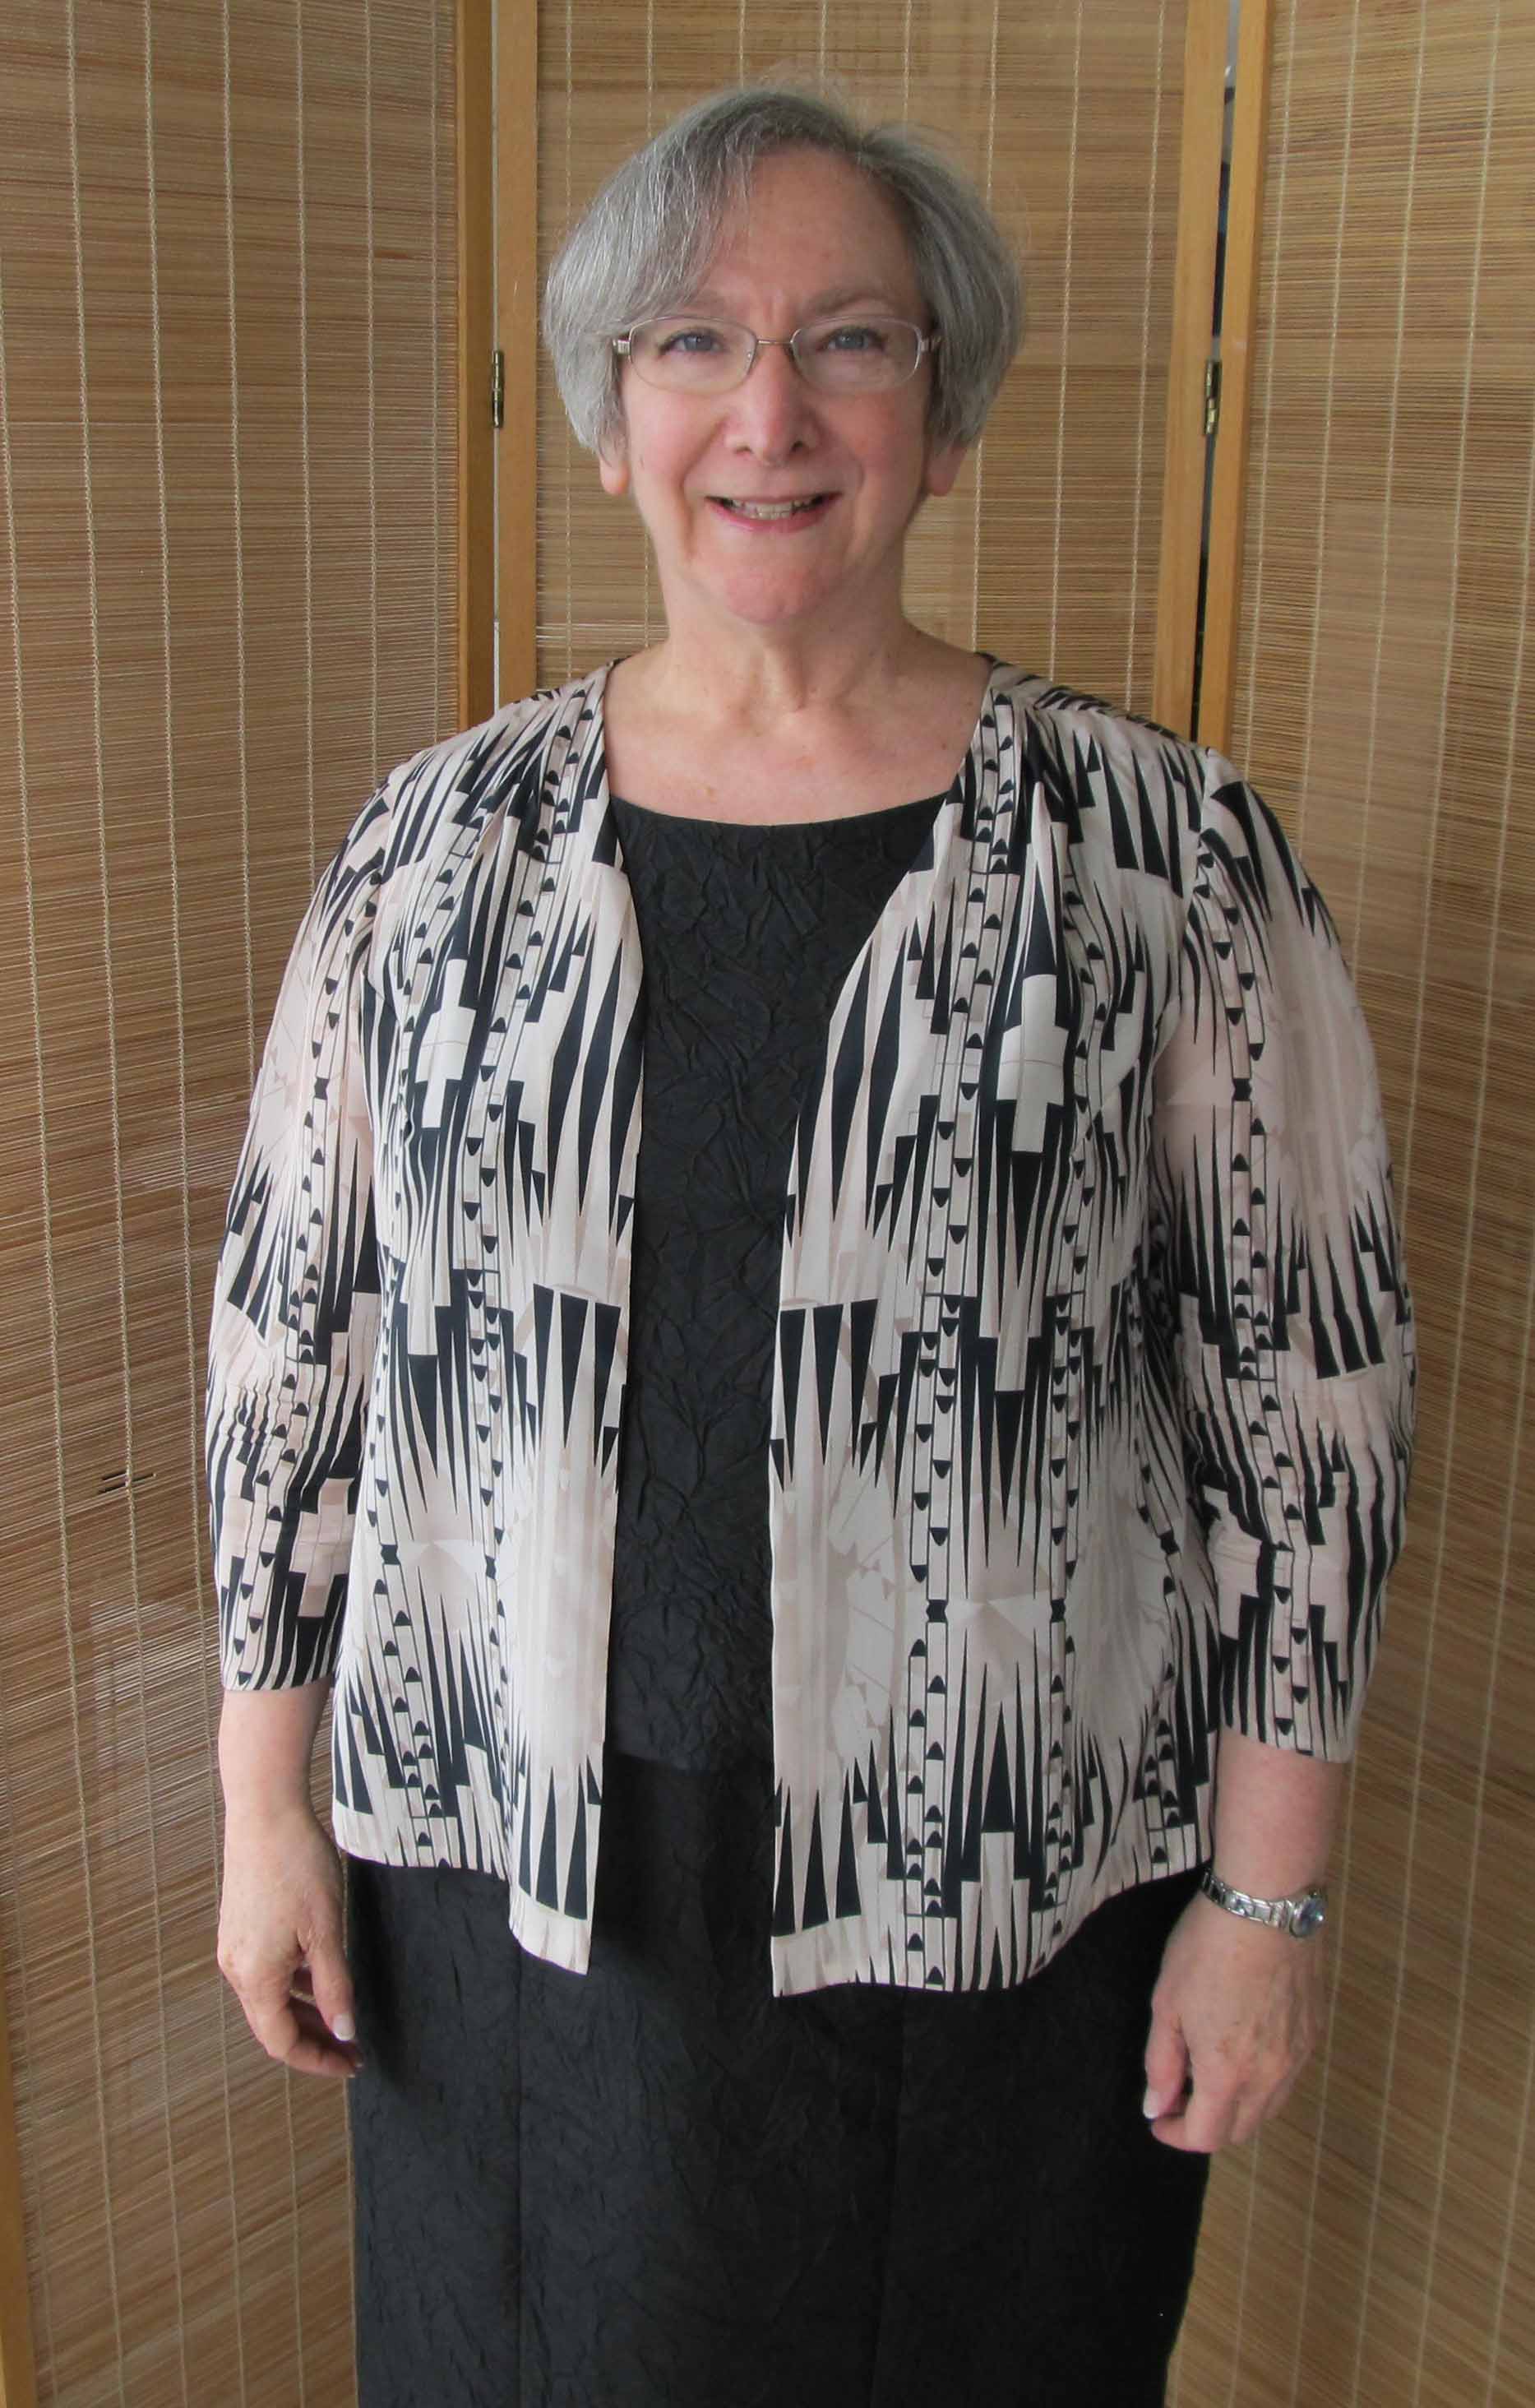
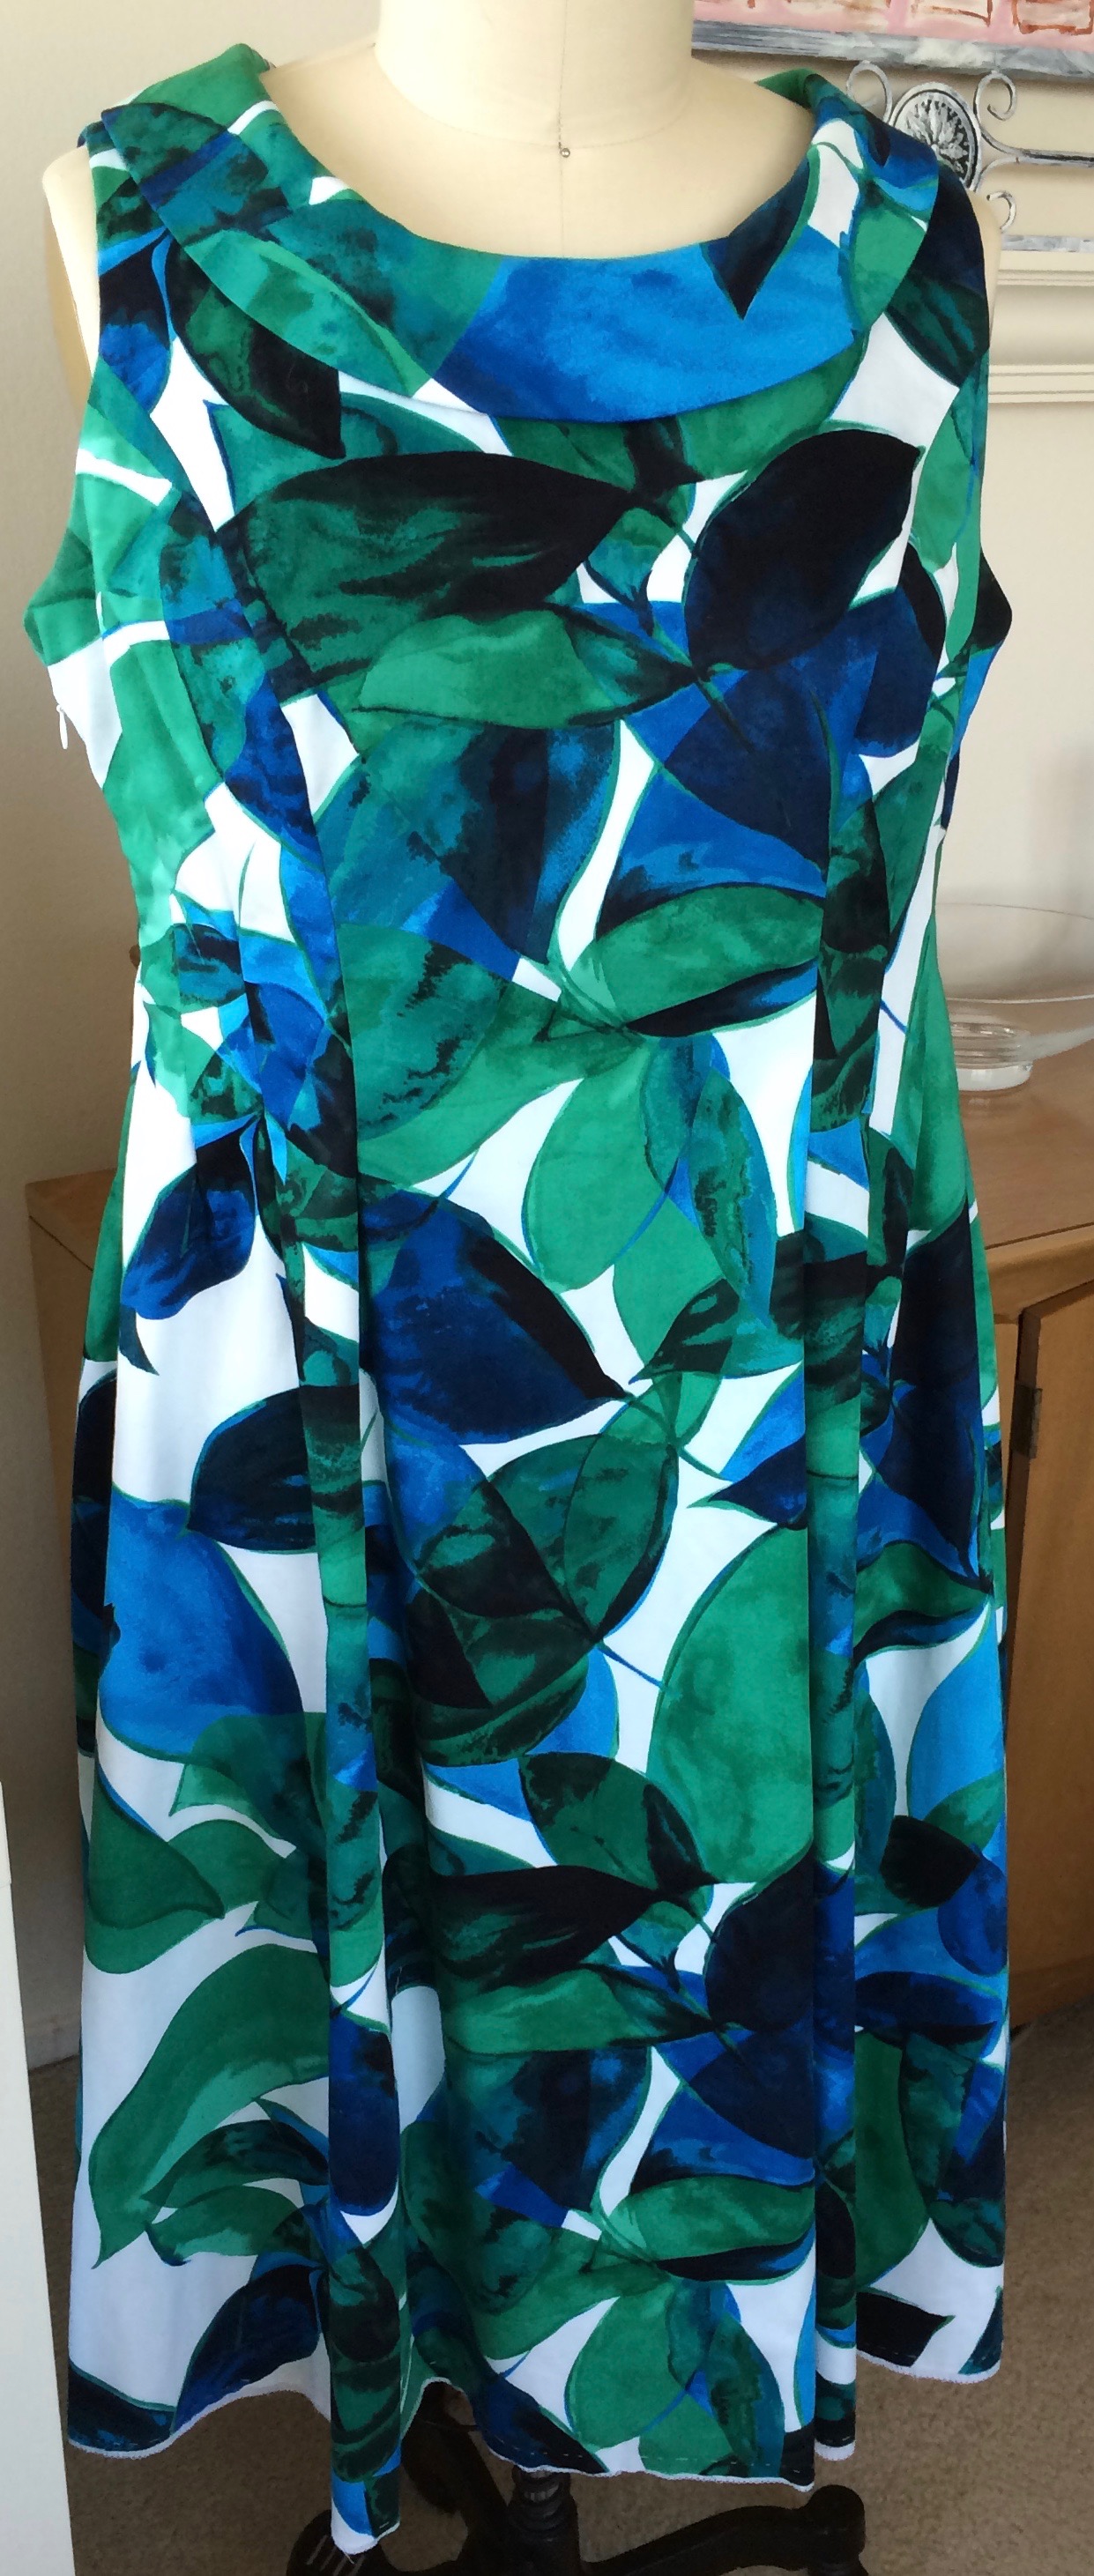
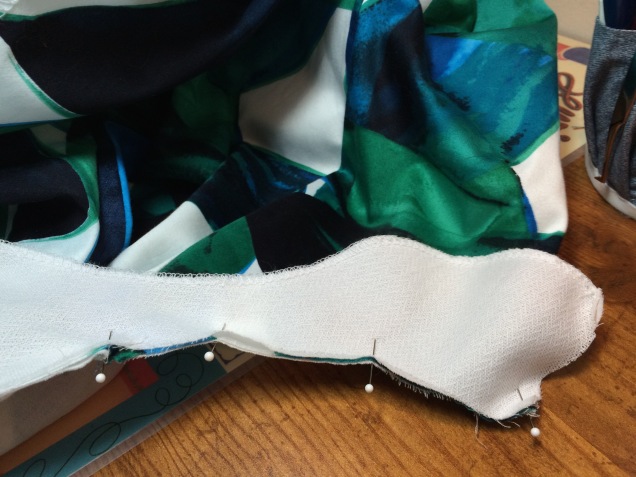
Having identified what I thought might be the problem, the next thought that popped into my head was a possible solution. The dress I had developed for the Sew Chicago Spoonflower Fabric Challenge has a fitted bodice, a curved Empire seam and a skirt portion with a relaxed fit. What if I took those skirt pattern pieces, eliminated all of the curves from the vertical seamlines and flared out the pieces straight from where they attach to the Empire seam?

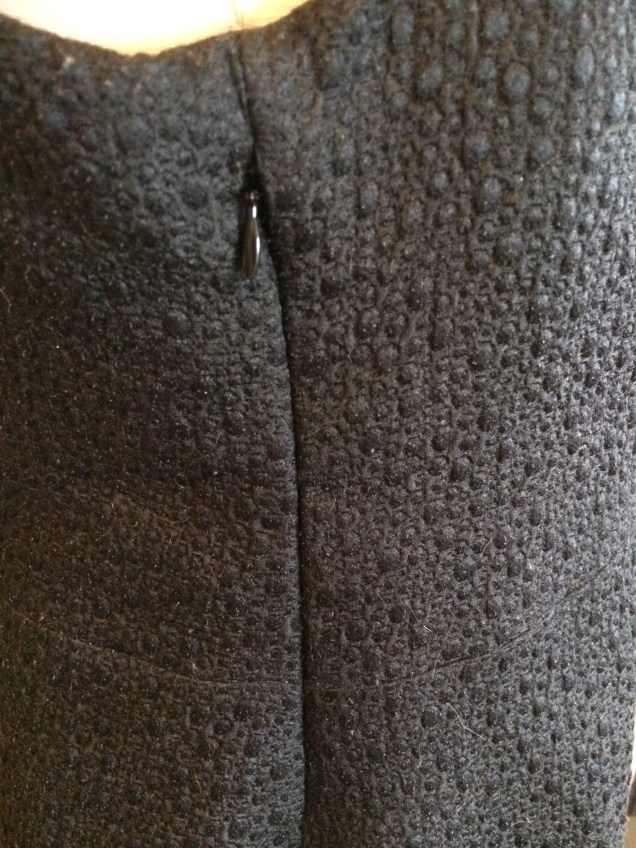
I could cut the bodice on straight of grain and, for some extra insurance, place a zipper at center back but stop it at the Empire seam so there would be no zipper in any part of a bias seam. Sarah thought this might work, so that’s what I did.

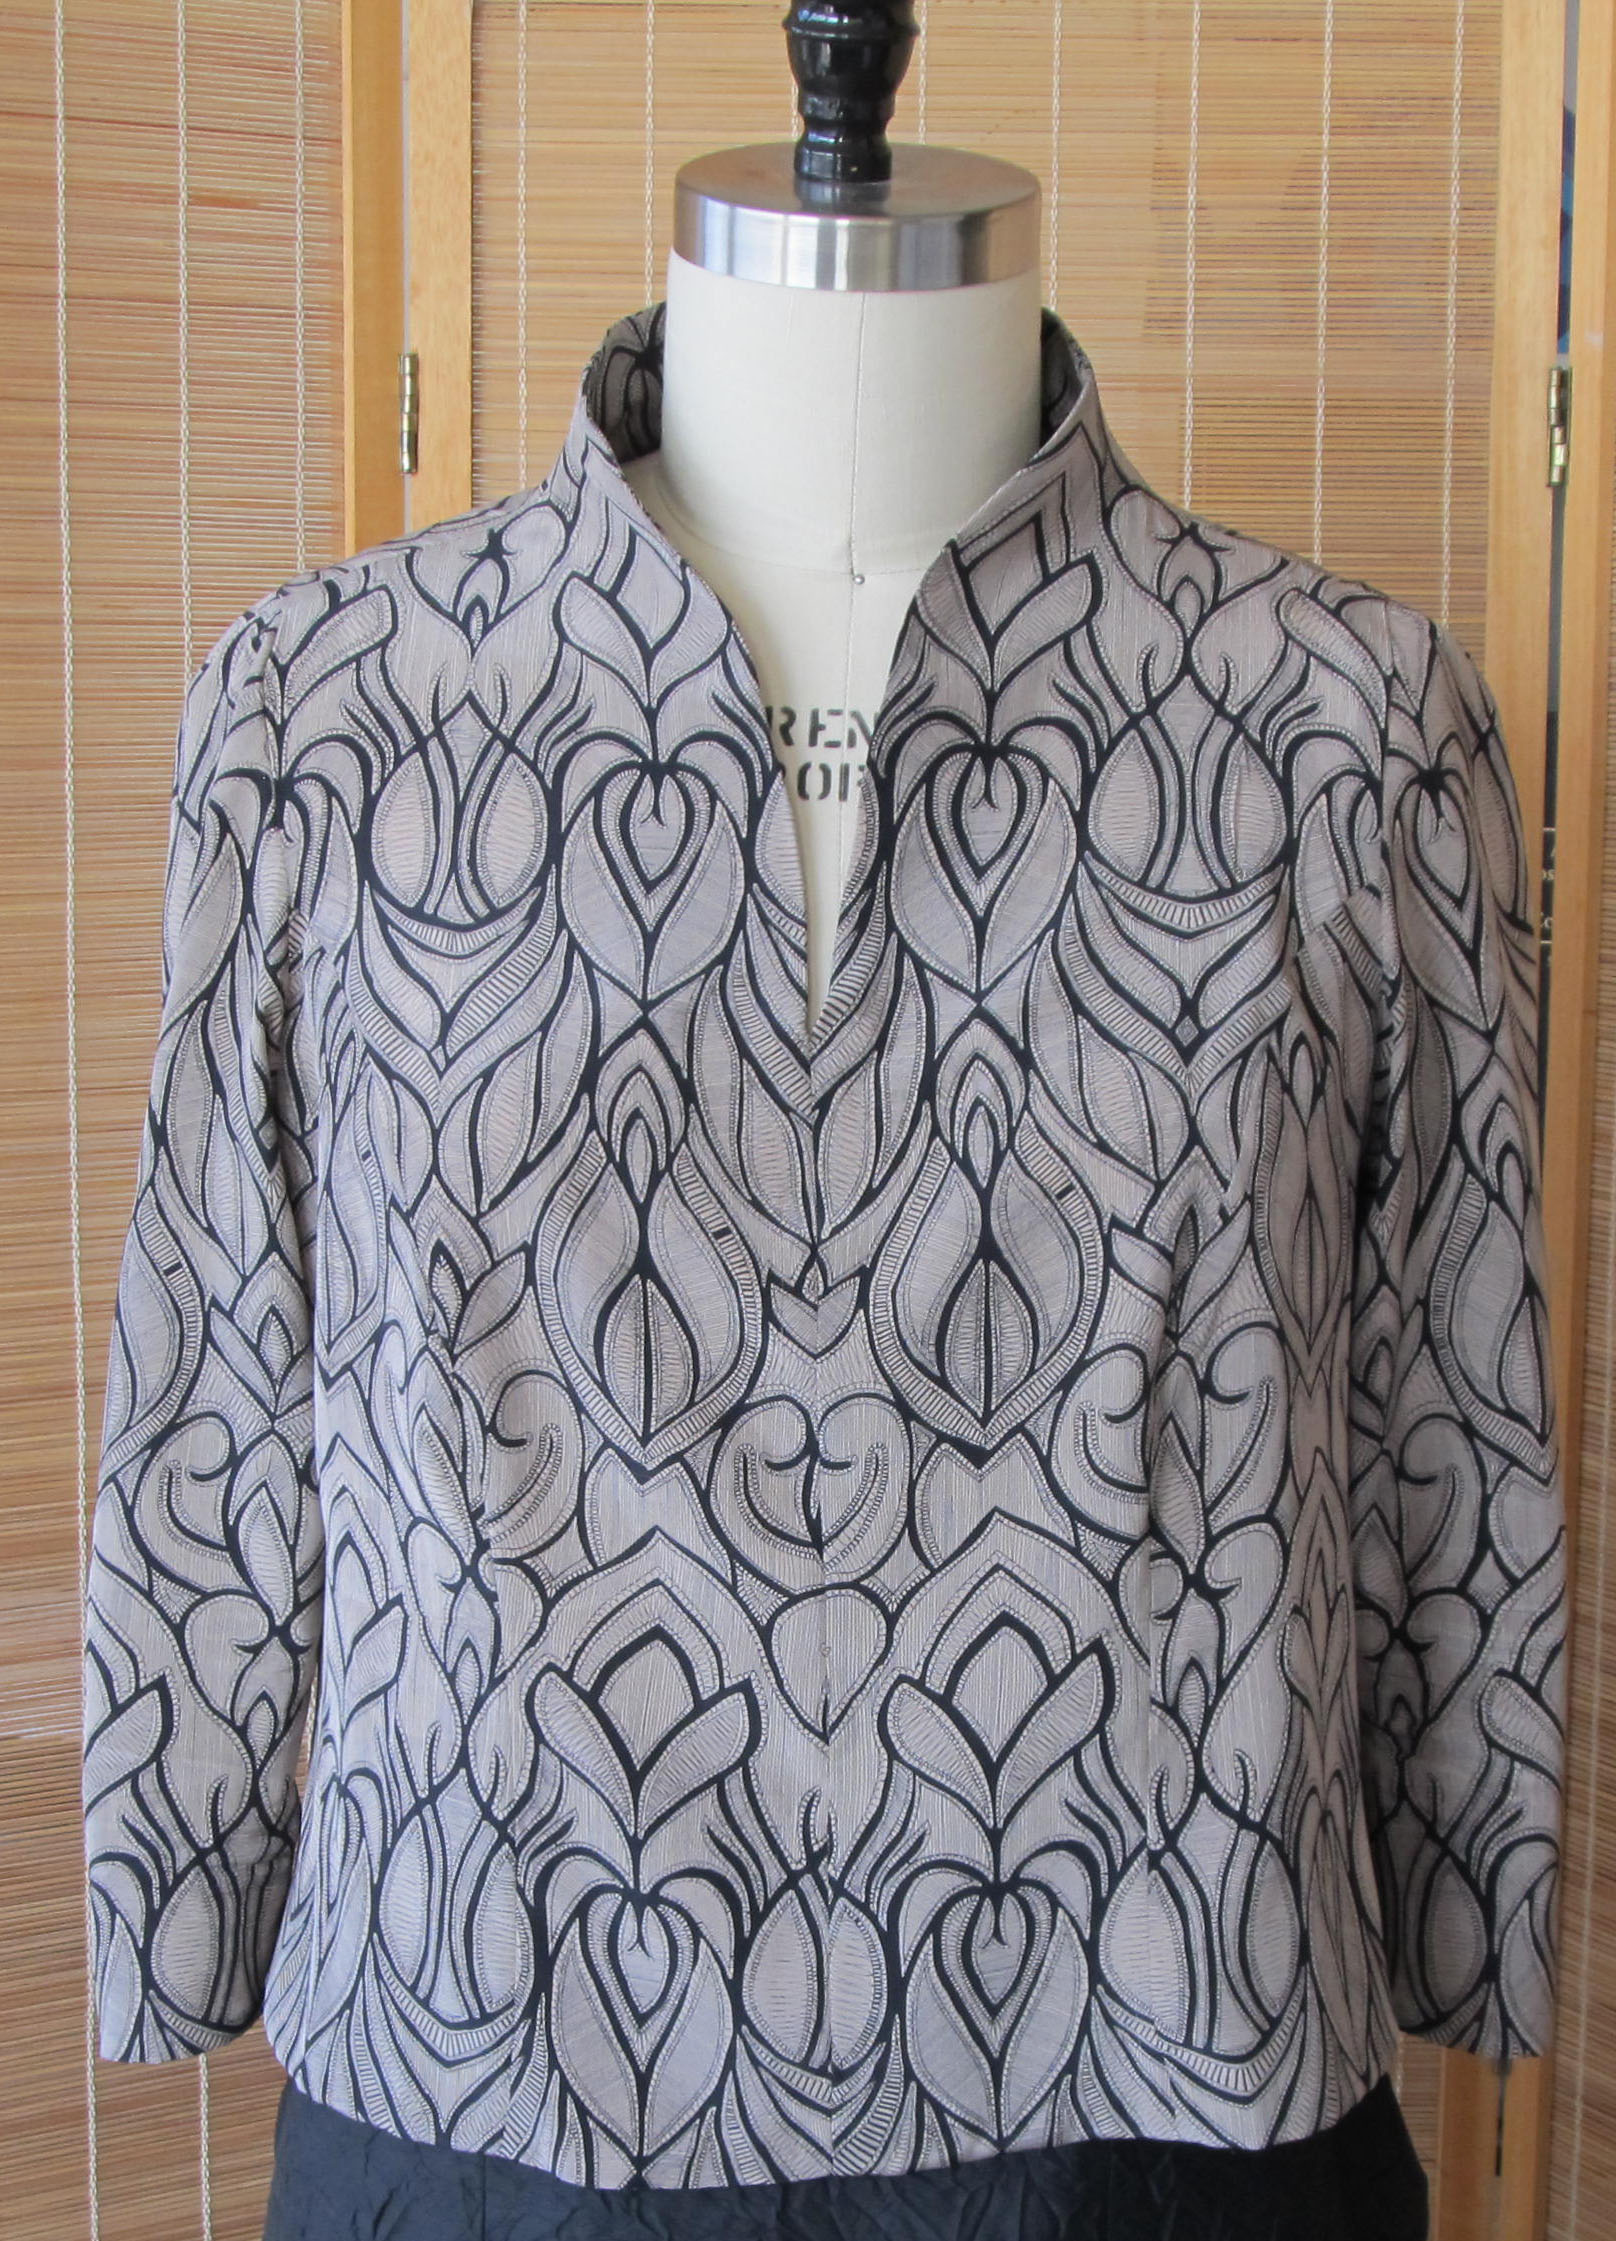
I ordered 5 yards of rayon challis from Stone Mountain & Daughter so I would have plenty to work with for the bias pieces. As it turned out, I have 1¾ yards left over.

The print made me glad I’m not prone to vertigo!

img_1413

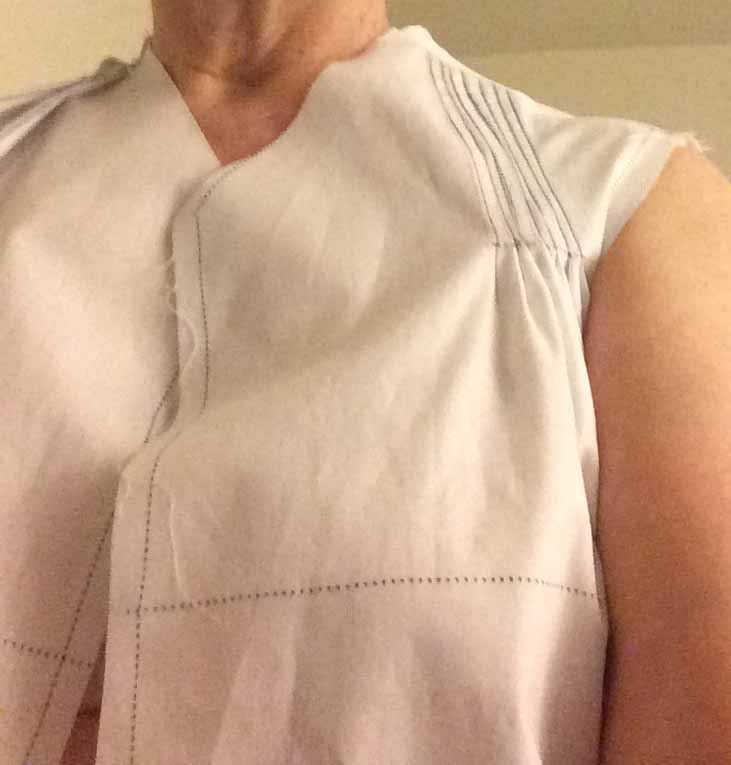
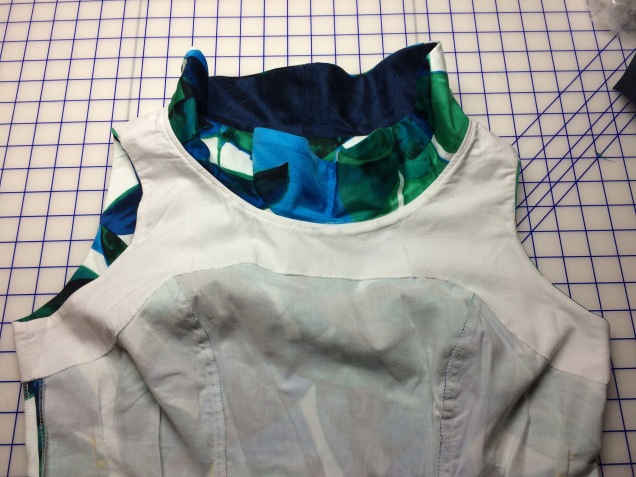
Construction went smoothly and the method I used for setting the invisible zipper was so easy I worried that I had done something wrong. One fun thing I was able to do in constructing this dress was use the method of attaching the all-in-one facing that makes me feel like I’m doing a magic trick. I’ve gone through the details of the other cool method for attaching an all-in-one facing entirely by machine, which involves sewing in a tunnel. The method I used for this dress can only be used if you have an opening at center front or center back. I had planned to use a center back zipper for the bodice of this dress, so this was my chance to use the method in something other than a half-scale sample.

This has to be done before that center back (or center front) seam and side seams have been sewn.

IMG_1415

After the bodice and the facing pieces are connected at the shoulders and the shoulder seams are pressed open, you attach the facing at the neck, press as sewn, clip the curves press the seam open and then turn the facing to the inside of the bodice and press the seam, favoring it so the seam is visible only from the inside of the bodice. The next step is to understitch, which goes very easily because the garment is still flat. I have a new machine and I found that using the stitch in the ditch foot with the needle position moved away from the seam worked very well.

IMG_1419

The next step is to sew the armscye seams, following the same steps used for the neck seam. The only difference is that the understitching cannot be done all the way to the shoulder unless you do the tunnel stitching, but on this dress I got pretty close. The thing is, as long as you cut your facing pattern pieces ¼” shy of the fashion fabric pieces at the shoulder on the armscye side and taper out to the original bodice pattern piece about mid-way down, the seam will naturally roll toward the facing in the area that’s difficult to reach for understitching so you are okay.

IMG_1425

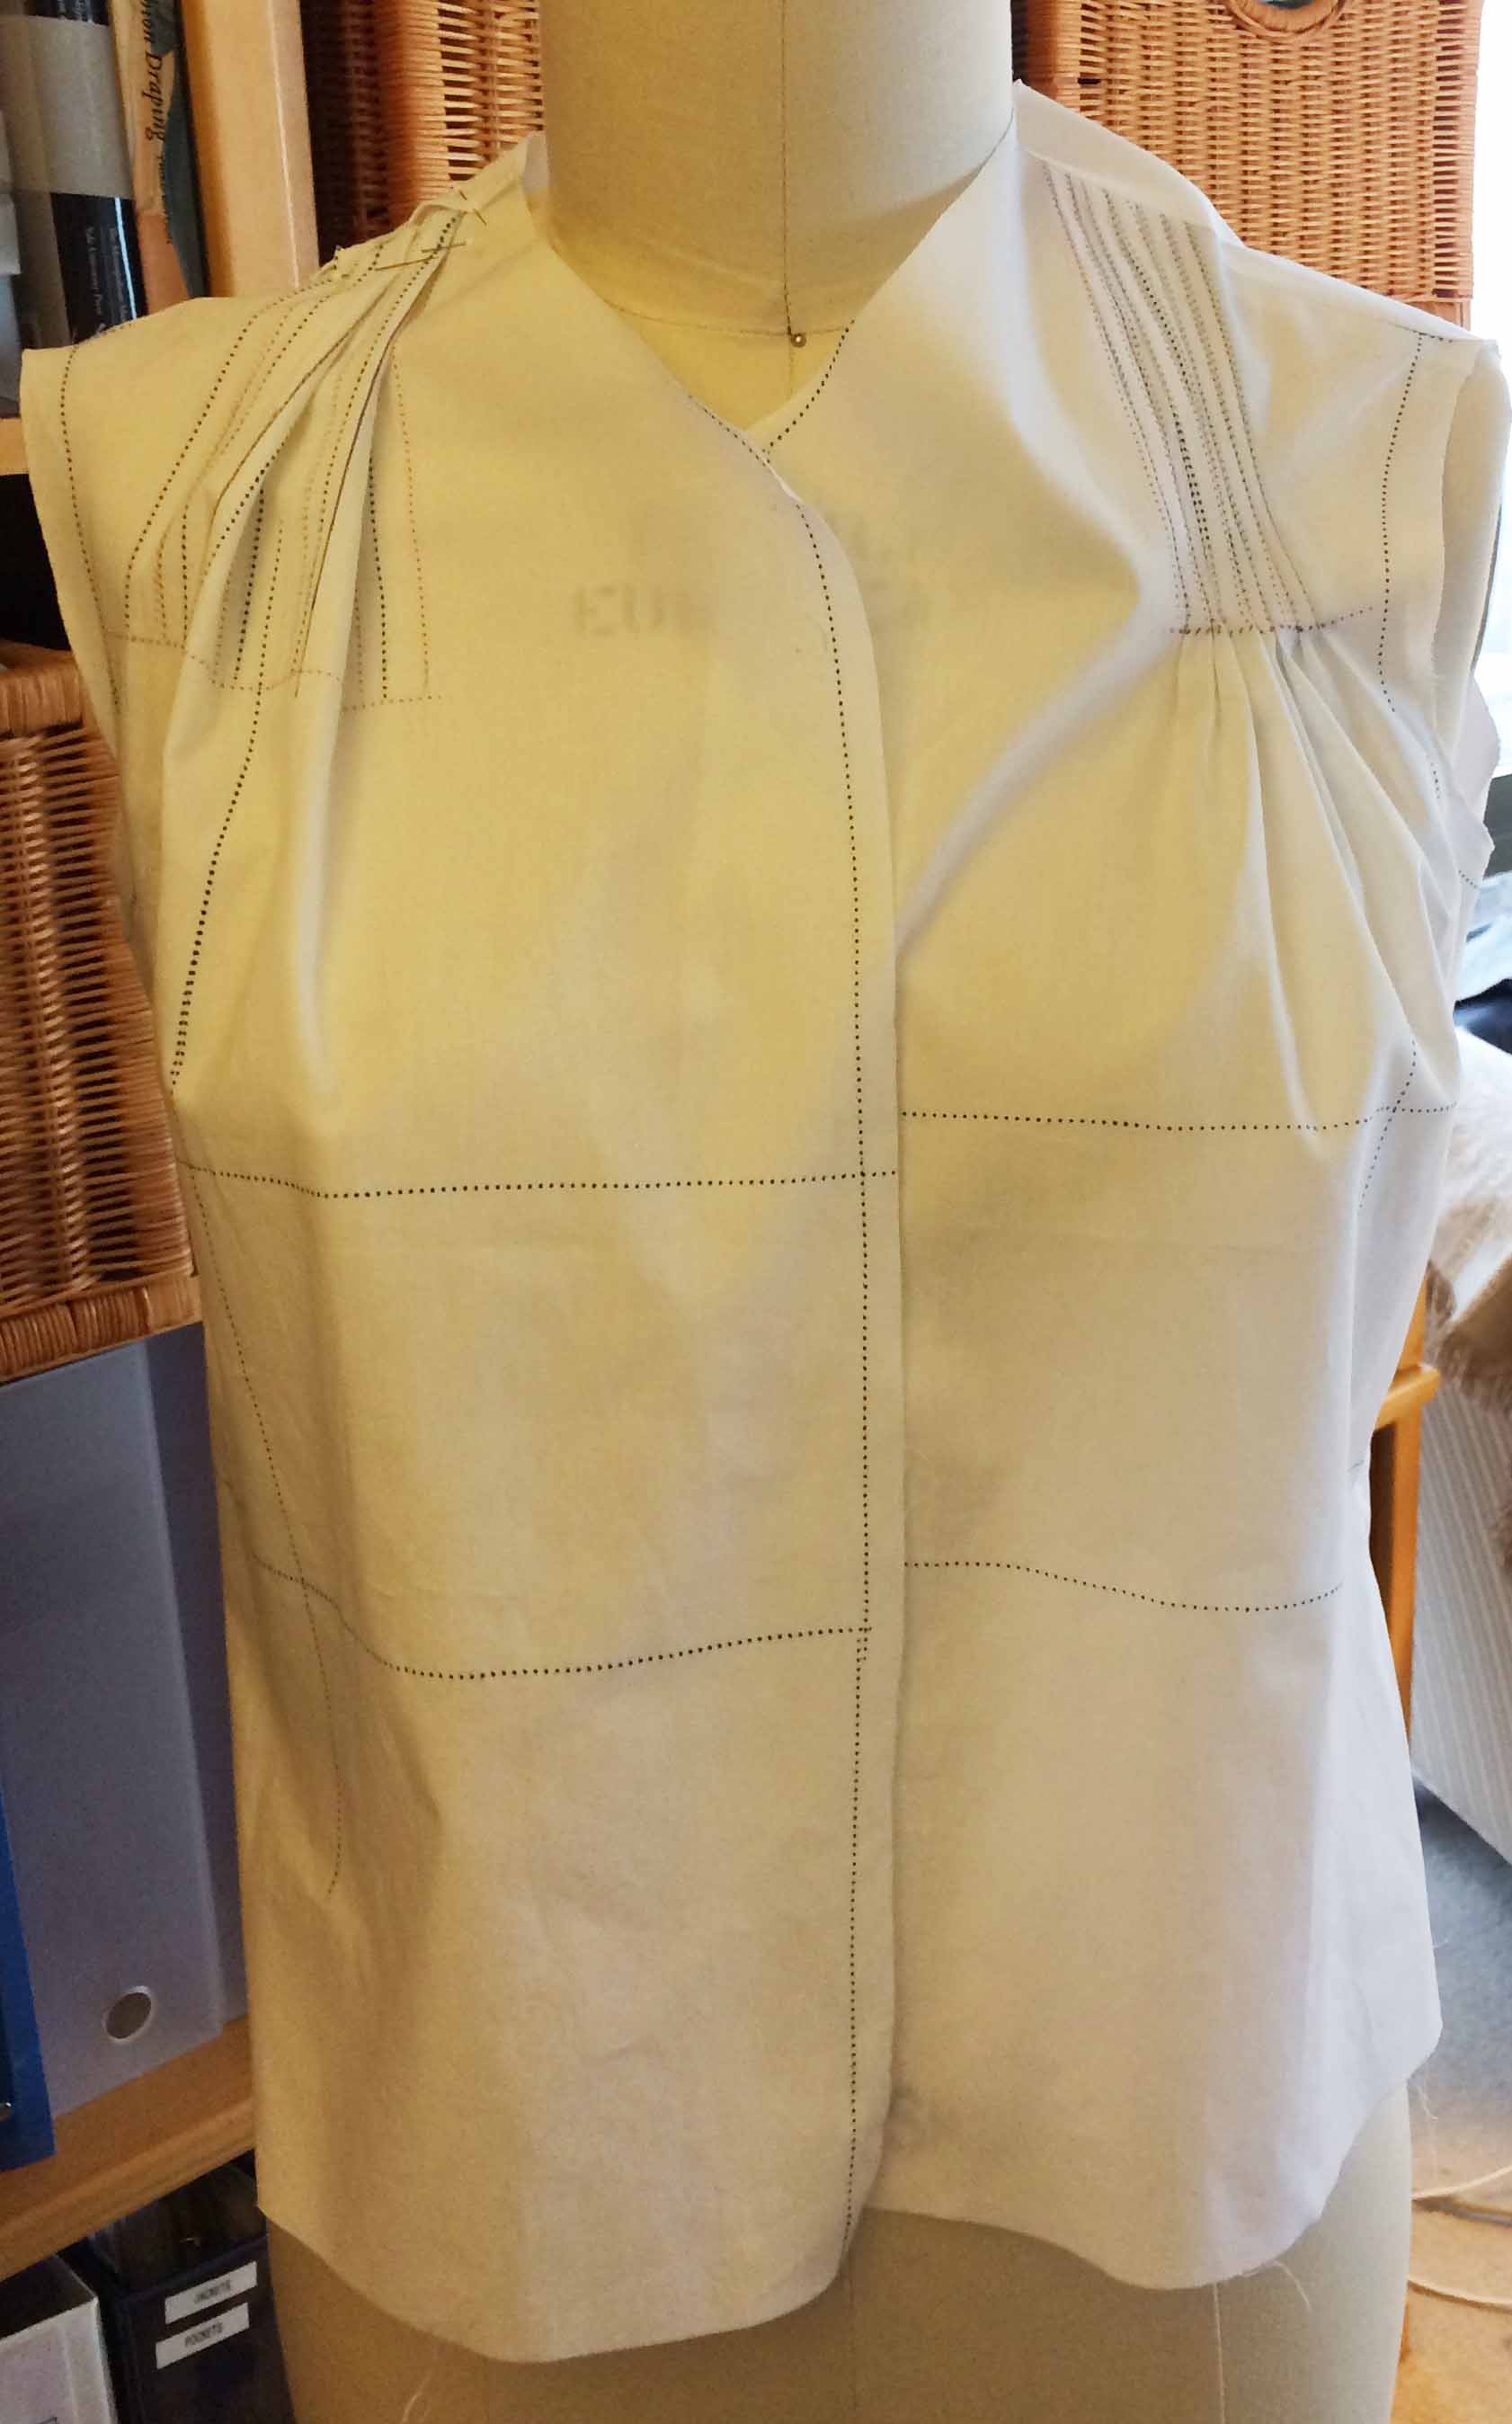
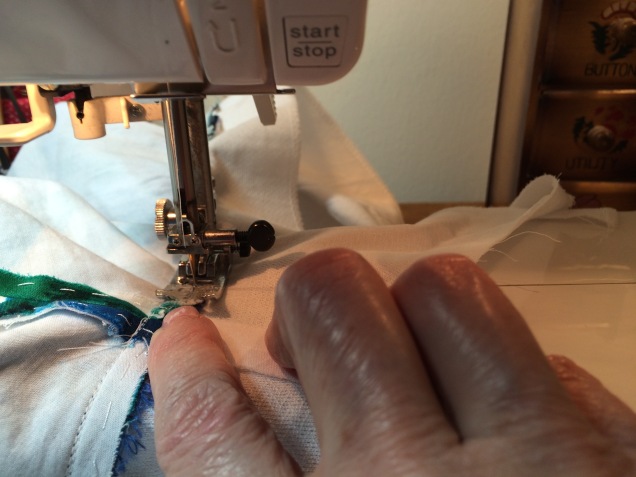
Now we’ve come to the fun part. Other sewists have included videos in their tutorials and you might want to watch them if this sounds confusing. What I’ve found is that it sounds a lot more complicated than it actually is. Just follow the steps and once you’ve done it, you will be able to use the technique from memory.

What you want to do is reach into the space between the fashion fabric and the facing from the side that doesn’t have an opening with two fingers extending past the shoulder seam. In the case of this dress, I reached from the front toward the back.

You then use your other hand to pass one half of the back of the bodice and facing unit to those waiting fingers. Then you simply pull the fabric through until it is right side out.

Repeat on the other side and you’re done.

IMG_1436

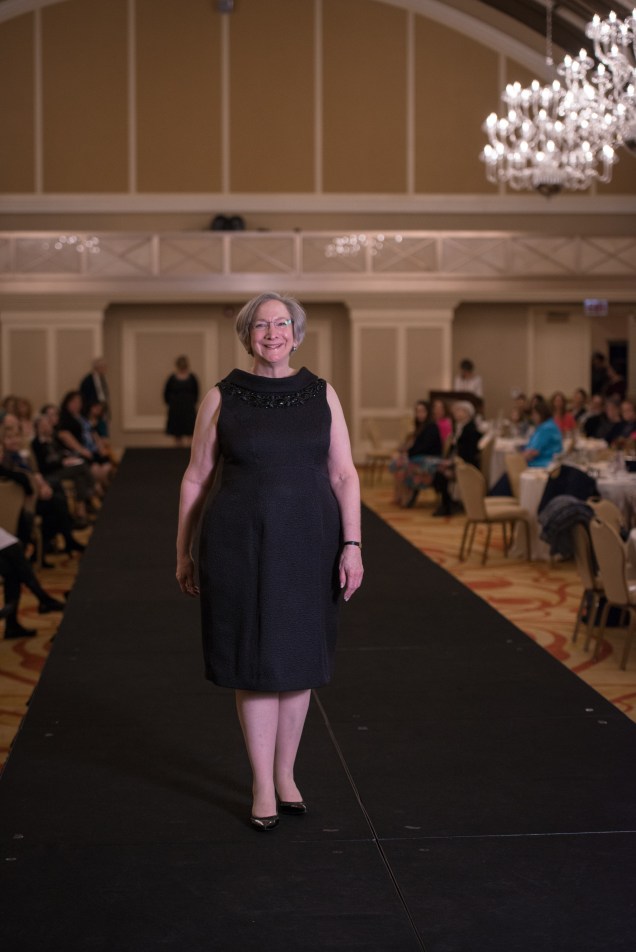
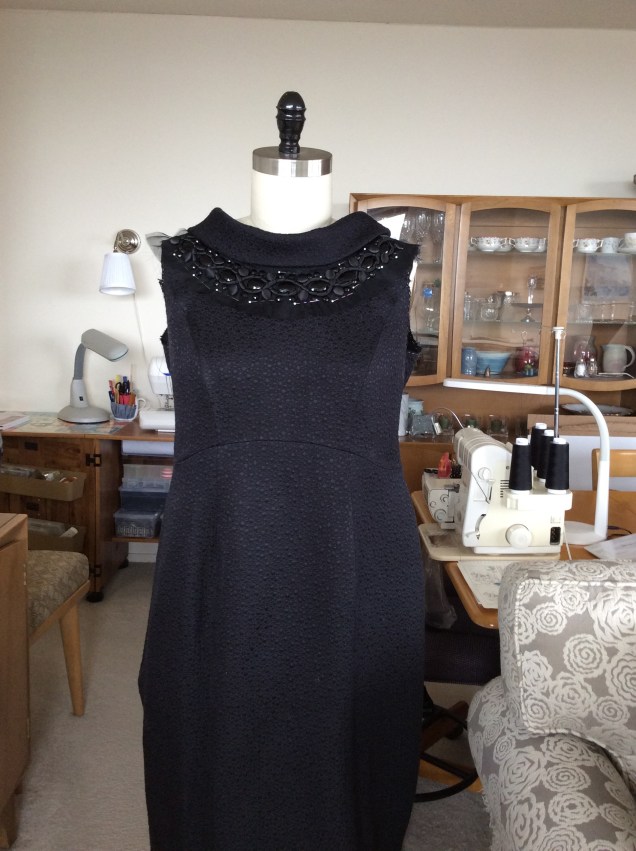
After construction was completed, I put the dress on Dottie (my dress form), marveled at the way the skirt seems to be in motion even when it’s perfectly still and hoped there would be none of those unpleasant surprises I encountered with the skirt.

IMG_1440

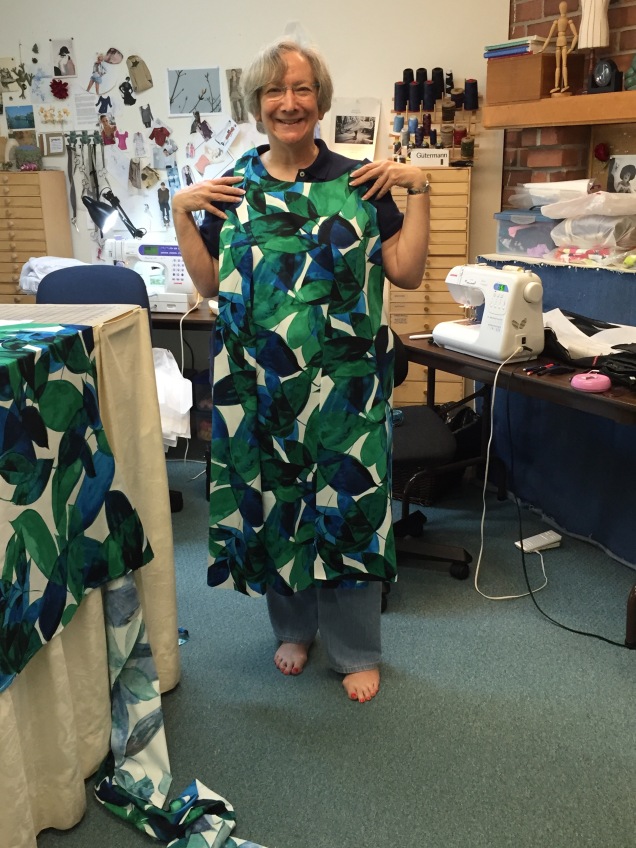
When disaster didn’t strike after three days on Dottie (two would have been sufficient), I tried on the dress and the only issue that needed to be dealt with was the hem. The back was considerably shorter than the front. At first I thought this was due to the bias, but in taking the pictures of the pattern pieces I see it was a mistake in patternmaking. I don’t understand how that happened when I walked all the seamlines, but it did. With help from my dear friend Stephanie King I was able to sort out the hem length and finish the dress in time for the runway show.

One issue I noticed is some crumpling above the princess seams in the front. I thought it was a pressing issue, but pressing didn’t resolve it. And it’s not a question of posture.

IMG_1601

I sent a picture and asked Sarah Veblen about it in a mentoring session. She thinks the bodice is too snug around the apex, at least for a fabric with the qualities of this rayon challis. That would explain why I haven’t encountered this problem when using my master pattern with more stable fabrics. I think this theory is probably correct. It doesn’t help that I’ve regained the weight I’ve lost repeatedly and regained again over the past couple of years. I’ll work on tweaking the fit before I try a version of this dress again.

Overall, I think this was a successful experiment. I’m happy that I found a solution to my bias problem in time to join in on the group challenge and I’m very happy that I have this dress.

A Big, Bold Departure from My Norm

IMG_1399

This is a dress that really surprised me. After the Haute Couture Club of Chicago fashion show I was mentally and physically exhausted, but I still had another huge project ahead of me. I had taken on the task of designing and editing a cookbook for a bride-to-be and co-hosting her bridal shower, which was six days after the show in New York. I was feeling good about the fact that my dress for the wedding was pretty much done and really looking forward to sewing without a deadline for a while when I learned I was going to be invited to the rehearsal dinner. I don’t mean to sound ungrateful, but the only thing I could think of was that I had no idea what to sew and was fresh out of inspiration.

Not that it matters, but I didn’t want to wear the same silhouette to both events. Then there was the question of fabric. I didn’t really want to do black again, although I have a very nice black eyelet that would have been perfectly fine for a summer evening dinner party on the patio of a hip Brooklyn bistro. With all those negatives floating around in my head, is it any wonder I was uninspired?

The one thought that did develop was that I wanted a print in silk or linen, but I couldn’t find anything that appealed to me.  Clearly, I needed a mentoring session with Sarah Veblen to get me on track. Over FaceTime, I went through a pile of fabrics I have in my collection that could work, and we discussed each one. Most of the fabrics I have that could be made into cocktail or evening wear would work in any season other than summer. Other fabrics failed to spark any enthusiasm.

In discussing other possibilities I mentioned how much I liked this blue and green leaf print from Sawyer Brook and then quickly explained that I’d dismissed it because it was a large scale print with bold colors which brought it outside my comfort zone and the fabrication was wrong  —cotton sateen with stretch. Cotton can be a perfectly lovely fabric for a summer dress that’s a little bit dressy, but I’m not a fan of Lycra in woven fabrics. It interferes with the drape and makes the fabric overly heavy. It also makes the fabric uncomfortably warm, destroying its ability to breathe.

Once Sarah saw the print, she insisted that I order the fabric. Her answer to the fabrication objections was that I should underline the dress in cotton batiste and not line it.

With the fabric selected, it was time to develop a pattern. I wanted a full skirt, which was achieved by slashing and spreading copies of my basic armscye princess dress pattern pieces. Instead of a waist seam that would cut me in half and add bulk where I’m plenty bulky enough, I wanted to achieve the transition from a fitted bodice to the full skirt with fairly generous release pleats. I also wanted a wide, gently curved neckline and a rolled collar that had overlapping ends on one shoulder.

I was scheduled to share a day with my friend Steph King from Siouxigirl Designs working privately with Sarah Veblen before attending her class Exploring Fashion Design—Design I in mid-May. Steph brought several muslins and I had planned to do the same when we originally scheduled the session. But, with the leaf print dress project that needed to be completed before June 10, that became the only thing I was going to have time to work on that day. Grouse, grouse grouse!

Before flying to Baltimore, I drafted the pattern and mocked it up in muslin. I left the release pleats for Sarah to place and drape on me. We decided the dress needed a third pleat on each side at the front princess seam. That required angling the princess seam outward from above the waist to the hem. It also required some working out of the construction process, which ended up to be sewing the princess seam first and then pressing and clean finishing the seam allowances. The next step was to sew the release pleat, which started at the seam and branched out below.

We took a critical look at the collar and ultimately decided to eliminate the overlap at the shoulder. Instead, I connected it at center back. Sarah suggested a silk dupioni undercollar, which I interfaced with soft stretch fusible. The upper collar is underlined like the rest of the dress.

Sarah had told me to bring the fabric with me so she could help me lay out the pattern. Because of the scale and complexity of the print, I ordered lots of extra fabric. Ordinarily, I order three yards of fabric for a dress and I have plenty left over. I ordered five yards and don’t have much of anything usable left over. I knew that strategic placement of the pattern would require full pattern pieces for the front and back as well as the collar, because each piece had to be laid out on a single layer of fabric.

Sarah walked me through her thought process in placing pattern pieces. One of the primary goals was to break up the white areas. Next, it was important to avoid having the print march across the dress. This is not a print where we wanted to match motifs at seamlines, but we wanted transitions that weren’t jarring. If I had been left to my own devices on this step, I would have spent a lot of time wondering and questioning my decisions. Instead, Sarah guided me in placing each piece. She left me to pin and cut and then come up with an idea of where the adjacent piece should be placed while she worked with Steph or did something else.  I’m pretty sure all the placements I suggested were changed, but each time the reason for the adjustment made sense.

IMG_5613

The last decision to make was where to place the collar. We rejected having black at center front and knew we wanted to avoid white there. We opted for that pretty blue and found an orientation that worked. It took hours to get this thing placed and cut!

After hand basting the batiste to the fashion fabric, construction was fairly straightforward. I mentioned the process we worked out for the princess seam release pleat earlier. The other four release pleats (two on each side front panel) start and stop in the middle of the fabric with the starting points staggered. For these, I started with a locking stitch, then sewed for about an inch with very short stitches (1.1 on my machine). I then switched to a regular stitch length, returning to the short stitches an inch before the end. At the end, I used a locking stitch, stopped with needle down, raised the presser foot and pivoted then stitched over the last inch with the same short stitches.

The cotton batiste underlining really makes this dress work. It controls the stretch in the fashion fabric, which was the primary reason for adding it, but it also makes the skirt in the area below the release pleats fall in nice soft folds.

This is the first garment I’ve made in a long time that isn’t lined. Because it’s a summer dress and it already has that extra layer of underlining, Sarah advised me to not line it. The seam allowances are serge-finished. The side seams are pressed open and were serged before stitching. The princess seams were serged together after stitching, pressing and clipping the curves where necessary. Those seam allowances are pressed toward the center.

When working on the design, Sarah advised me to make a facing with the cotton batiste I used for underlining. I drafted an all-in-one facing for the neck and armholes and interfaced the batiste with soft stretch fusible. In drafting the facing, I was overly timid about its depth. For next time, I’ll draft a facing pattern that is more generous. In this one, I made sure I anchored the bottom edges by hand sewing them to the underlining. I also anchored the pleat intake the same way.

IMG_1618

I was able to attach the facing to the neck seam and armscyes completely by machine. I first attached the facing at the neck on the outside of the dress, with the collar sandwiched in between. With the underlined fashion fabric, interfaced undercollar and interfaced facing, there was a pretty hefty stack of layers to deal with and even more when sewing over the shoulder seams.

After stitching, pressing and clipping the curves where needed, I understitched all around. The key to understitching is to make sure the seam allowance and facing (or lining) are flat on the bed of the sewing machine and any clips to allow for curves are spread out so they can do their job. And it’s really important to make sure that the only things under the presser foot are the seam allowances and facing. In another project, I kept catching bits of the collar and decided I needed to take a break.

IMG_1352

To attach the collar, attach the facing and understitch, I used directional stitching. That is, I started at the shoulder seam and sewed to the center front, then sewed from the opposite shoulder to center front and repeated the process in the back.

The facings are drafted with ¼ inch subtracted at the armscye from the shoulder, tapering back to the original seamline at the princess seams. This encourages the facing to stay hidden. To attach the facing at the armscyes, the facing is already turned to the inside of the dress, but by doing this step before the side seams were sewn, I was able to attach the lower part of the facing to the lower parts of the arsmscyes without any fancy gymnastics.


IMG_1354

Things get pretty weird looking when you get toward the shoulder seams. You have to reach in between the fashion fabric and facing and pull the work down through the opening at the bottom of the facing to pin and sew the rest of the seam. The way to avoid having to redo this step is to make sure that anything that isn’t supposed to be sewn stays tucked into the tube and the only layers under the presser foot are the underlined fashion fabric and the interfaced facing. Frequent stops with the needle down to feel for that ridge of excess fabric and readjust as needed prevents having to spend quality time with the seam ripper.

The way to make this process go smoothly is to pin and sew one side (front or back) to the shoulder seam, then pin and sew the opposite side. When pinning the second side, the work can slide out easily and because it’s sewn in place it stays where it belongs and creates a path that shows where the new stitching is supposed to end up.

When done, it looks like a fabric sausage.

After turning it out, it had to be pressed with favoring so the facing remains hidden. I understitched as far as possible and pressed again.

Every sewing project gives me grief at one point or another and this time it was the zipper. It’s an invisible zipper at the side seam, which I’ve done before and shouldn’t have been a big deal.

As much as I love the print and enjoy wearing the finished product, I’m still not a fan of stretch wovens. When the fabric arrived, it had some stubborn creases that resisted steaming and pressing and could only be removed with a vinegar and water solution and additional thorough pressing. The finished dress also developed quite a few creases in my suitcase and required thorough pressing before I could wear it. It’s pretty difficult to avoid woven fabrics with stretch these days, so I may just have to learn to live with these annoyances.

In the end, I think that overcoming the lack of inspiration, lack of enthusiasm for the fabrication and hesitation about wearing a big, bold print turned out to be worthwhile. I love the swishiness of the skirt and will keep this silhouette in my repertoire.

IMG_1466

My Little Black Dress

IMG_0230
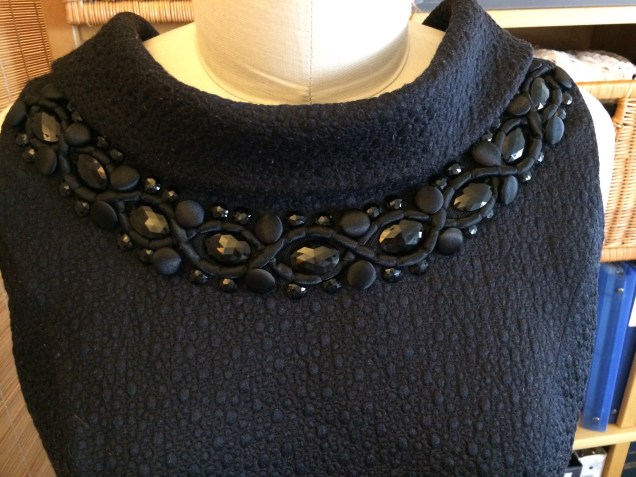
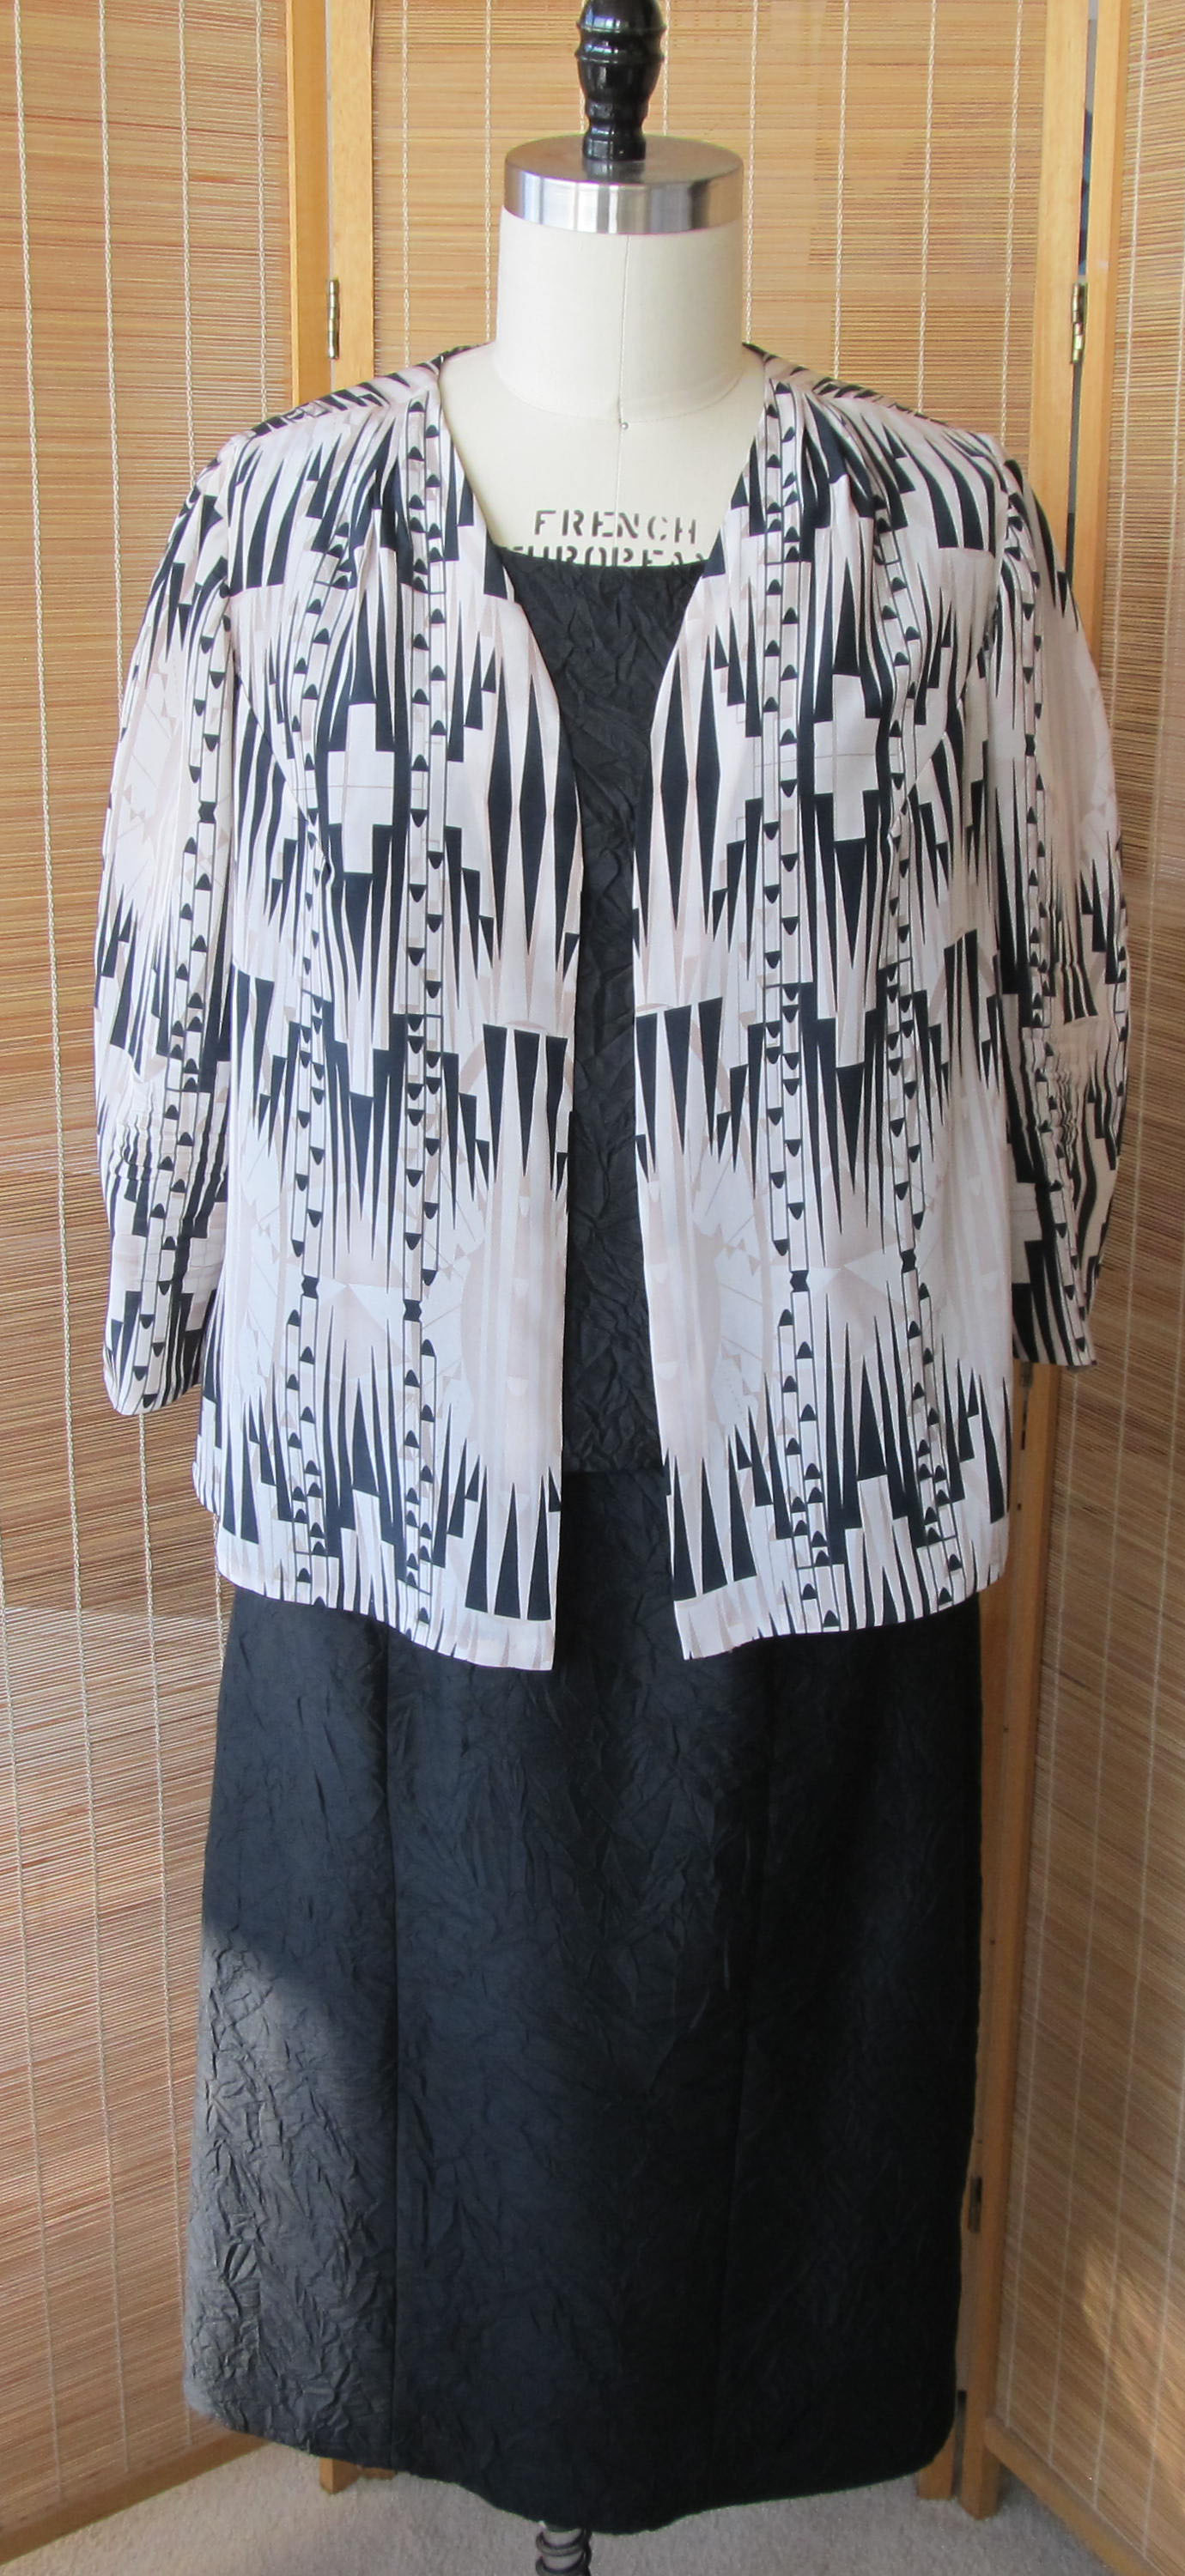
I needed a dress for an evening wedding in New York this month and, for once, I started early.  I brought a muslin, the fabric I wanted to use and the embellishment I was thinking of using to the You Choose Your Focus workshop Sarah Veblen taught here in Chicago in February.  The details of that workshop and the design of the dress are here.

With the pattern work done, the next step was to cut and then hand baste the silk organza underlining to the black silk and wool matelassé fashion fabric. This step seemed to take forever. The fashion fabric was pretty wiggly and underlining was still a new process for me. I found myself pulling out stitches and repinning organza to fashion fabric until I thought I’d lose my mind. It didn’t help that the clock was ticking on the fashion show I was co-chairing and work got really crazy. What I now know can be a relaxing, almost meditative part of sewing was none of the above for this project.

In addition to the underlining, the bias collar is supported by soft stretch fusible interfacing, which I fused to the silk organza before basting it to the fashion fabric. The dress is lined to the edge in silk charmeuse, so I also fused interfacing to the  the area around the neck and armscyes in the shape of what would have been a facing.

Once the fabric was underlined, I loved the hand of the combination and the way it behaved. The princess seams in the bodice went together beautifully. Once those were done, I was sure the skirt seams would be a breeze. I was wrong. More about that in a bit.

The collar/neckline seam always requires directional stitching and on this dress I was concerned about getting the point at center back right. This was a bit more challenging than usual because there is no center back seam in the dress. I followed Sarah’s instructions that included careful marking of the point and machine basting then checking the placement. Once I was satisfied that things were where they needed to be, I went back over the machine basting with a normal 2.5 stitch length. After checking it again to be sure it was right, the final step was to sew at 1.1 stitch length from about an inch away from the point, stop with the needle down and pivot and then continue for about an inch on the other side.

IMG_0228

With the part I was worried about behind me, I proceeded to sew the skirt pieces together. That’s when the trouble began. The first seam was off by more than 1/4″ by the time I got to the end, so I unstitched, steamed the pieces and made sure they matched when I repinned them. I stitched again after adjusting the tension on my machine and the same thing happened. I knew that if I couldn’t get the vertical seams to match there was no way I was going to be able to get the four-way intersections of vertical seams and Empire seams to come together. I was in a panic. All I could think to do was hand baste the seams before sewing them on the machine. I did this with one seam, saw that it worked and called it a night.

A couple of people suggested using a walking foot and Sarah confirmed that that should solve the problem. I’ve used a walking foot before and I don’t know why I resisted at first. Turns out that was the perfect solution. The walking foot is my new best friend. Here is how those four-way intersecting seams turned out.

IMG_1262

This made me think about those new machines that have built-in even feed and I had to push those thoughts out of my head! This is not the year for a new machine

The next dilemma was the zipper. You can’t install an invisible zipper with a walking foot. That’s where hand basting was necessary. I sewed the first side of the zipper into the side seam as usual with the invisible zipper foot. I then hand basted the second side and made sure the Empire seam was aligned before sewing that side on the machine.  Here is the result.

IMG_1260

Whew!

The next step was to attach the lovely trim from Soutache. Sarah had demonstrated how to clip the net backing until it fit the shape of the neckline seam. I clipped the rest of the netting and pinned the embellishment on the dress form so the placement would conform to the dress with a body inside instead of a flat surface.

IMG_1261

There are a LOT of beads and buttons in this trim!  I tried to sew each one before the fashion show, but I ran out of time. That’s why I needed my friends to rescue me with hemming and temporary stitching of the lining at the neck seam. After the show, I finished stitching every bead and every button to the dress and trimmed away the last of the stray netting at the edges. I then reattached the lining at the neck edge and understitched.

The dress is now ready to wear to the wedding. I’m also going to get another chance to model it in the ASG National Conference fashion show. This will be my first time in a fashion show at Conference. It should be fun.

PTPE.Haute Couture Fashion Show.2016-290

Princess Seams – A Curvy Body’s Best Friend

There’s no getting around the fact that princess seams are the key to garments that flatter a curvy figure. Darts and tucks and gathers are fine, but they have their limitations. Even in combination, the silhouette they produce is boxy in comparison to the silhouette that princess seams can achieve. 

Okay, so there are shaping darts in addition to princess seams in the bodice on the right, but you get the idea.

The reason for these differences is easy to see in the patterns. Here is a standard darted bodice. The one on the right has the dart intakes cut out and the one on the left has the dart legs meeting the way they would in fabric. 

IMG_0856

As you can see, there is only one place the darts can create three-dimensional shaping. Darts point to the fullness they allow the fabric to make room for, and that one place in most bodices is the bust. That’s fine if your body only curves in that one place and everything else is pretty straight, but how many women are built like that? I never was. 

Here is what the front and side front pieces of the jacket I’m working on look like when they’re flat.

IMG_0831

The negative space between the two pieces runs from the armscye almost all the way to the hem and the side front piece makes quite a number of turns as it is joined to the front. That allows for a fair amount of contouring in very specific areas. 

Here is an edge view of what the pieces look like when pinned together.  It’s impossible for them to lay flat on the table for almost the entire length of the seam. 

IMG_0857

Now that you’re convinced that princess seams are the best option for a flattering fit (I hope), let’s talk about construction. I know a lot of sewists shy away from princess seams because they seem intimidating. But now that I’ve had a lot of practice sewing them, I don’t think they’re difficult to deal with.

There are a lot of methods out there for sewing princess seams and there really is no wrong way to do it. If it works and it feels comfortable, then it’s the “right” way to go about it.

First, a word about patterns. My patterns were developed under the guidance of Sarah Veblen, who doesn’t build ease into her princess seams. Commercial patterns almost always have ease and so if you are using one that does, you need to allow for that. The part of the seam that has ease is usually marked with dots and so it’s easy to figure out where the seamline is supposed to match up.

I don’t usually use many pins in my sewing, but I’ve discovered that having a fair number of pins in a princess seam is very helpful. How does it help? It helps me avoid spending quality time with my seam ripper. Whatever adjustments need to be made can be made by moving pins, not unstitching. I think of it as sort of a dress rehearsal. By the time I get to the machine, it’s smooth sailing.

I start the pinning at both ends. At the cut edge of the hem, the cut edges go together just like a front and back go together at a side seam. No big deal.

IMG_0836

At the top of an armscye princess seam, things are more interesting.

IMG_0835

The picture above shows how the front and side front fit together at the top when the side front has been trued. You know exactly where to place the pieces at this end. Below are two side front pattern pieces, one for the fashion fabric (on the right) and one for the lining. Notice that I had forgotten to true the lining piece. 

IMG_0844Commercial patterns leave that point on the pattern piece, so when you pin your fabric together a little tail of the side panel sticks out and you never know how much of a tail is supposed to be left hanging. There are two ways to deal with this issue.

My preferred fix is to correct the pattern. Sarah taught me that to do this, you simply pin the pieces together as sewn and cut off the tail.

The first step is to mark the seamlines if that hasn’t been done already.

IMG_0845

  Here are the pieces laid out on top of one another. Notice that the pin goes into the intersection of the princess seam and the armscye seam. This is the end result we’re going for. 

IMG_0846

Here are the pieces pinned as they will be sewn. Notice the tail where the point of the side front is folded at the seamline. 

IMG_0847

When the tail is cut off, the pieces go together as they should. No guesswork needed.


If you’d rather not change your pattern, there is another solution. It’s one that has to be used every time you use the pattern, but it works fine.

Mark the intersection of the princess seam and armscye seam on both adjoining pieces. I’ve used a Chalkoner to do that here. 

Insert a pin at that intersecting point on both pieces. Now the pieces are positioned correctly at the top. 

IMG_0854

Once I’ve established the proper placement of the top and bottom of the seam and have pinned the pieces together there, I work my way into the middle.

If I’m left with places that are going to pucker, I take out one or two pins and pat the fabric into place to see where it needs to go. The curvy areas are on the bias and so the fabric has a tendency to shift. A little extra handling is usually all that’s needed to find how the two pieces fit together. I know they will fit together because I walked the seams in the pattern and I cut as accurately as possible. 

If the fabric still doesn’t settle into the right spots, I check the edges to make sure they are aligned exactly. Small corrections in alignment will often help the fabric find its place. If nothing is working and it looks like I have a ton of extra fabric in one piece, I double check to make sure I’m not trying to attach a side front to a back piece or a side back to a front. That would explain the problem. 

Once the pins are in and I’m satisfied that the pieces are where they need to be, it’s off to the sewing machine. I like sewing with a 3/8″ seam allowance most of the time and I find it especially helpful when I’m sewing curvy princess seams. I can tell you that sewing princess seams in stiff muslin with 1″ seam allowances is no fun at all, but after a little practice, sewing natural fiber fashion fabric that has some drape in it with 3/8″ seam allowances is a piece of cake. I just sew slowly and keep my eye on the guideline directly across from the needle, not ahead of it. I sew with the machine set to stop with the needle down so if I need to stop to readjust, the needle is anchoring the fabric. 

I also like to sew from the hem up. That means on one side the curvy side panel will be against the feed dogs and on the other side they will be on top. That doesn’t matter as long as I have the pins in place and I’m using my hands to guide the fabric. 

After pressing the princess seams as sewn (but only with the tip of the iron not going much beyond the stitching line), my favorite way of setting in the shaping is to use a June Tailor Board along with an iron that gives plenty of steam.

The seam allowances on this wool fashion fabric, which I’ve underlined with silk organza, pressed open and stayed that way without requiring any clipping. When the seam is on the curved part of the tailor board, if I see ruffles in the seam allowance after pressing, I use that as a guide for clipping.

After the seam allowances are pressed open, I press on the right side over a ham and use a silk organza press cloth.

IMG_0862

With the princess seams done, my project is transformed from flat fabric to a three-dimensional object that holds the promise of becoming a garment I will love wearing.


The No-Close Topper That Plays Well With Curves

Silk TopperYou may be wondering whether all of my sewing projects start out looking simple and end up being way more involved than I bargained for. A lot of them do, and those are the ones that teach me the most. My seemingly simple project to create a no-close topper to go over a knit tank or sleeveless shell is another example.

I started this project thinking I could take my basic bodice sloper, change the neckline, add seam allowances at center front, draft a front facing, set in my basic sloper sleeves and have a nice layering piece that isn’t a jacket. When I did that, I quickly discovered that, even though the garment would have fit just fine as a blouse with a closure, when left to its own devices the front automatically traveled outward. Not just a little, either. The two front pieces wanted to settle out near my arms. It hadn’t occurred to me that a pattern designed to accommodate my particular bust shape and size would resist staying put. So that’s why RTW makes these pieces so oversized, I said to myself. But if I want to wear oversized, shapeless clothes I don’t have to go to the trouble of sewing them.

At this point, I sewed my first attempt together at center front, called it a blouse and put this project on the list for my next video consultation with Sarah Veblen.

Silk Tulip Top

We discussed a number of solutions and I tried a few in a mock-up, but I still wasn’t getting the look I was after.

After more discussion, we came up with an approach that turned this into a redesign project. The idea was to convert my armscye princess bodice sloper pattern into a pattern that transferred the bust shaping to tucks at the shoulders. This involved dart rotation, a really educational patternmaking exercise.

Patternmaking books tell you that you have to rotate darts (or in this case, princess seams, which are dart equivalents) at the apex. Turns out that’s one of those rules that can be broken. In my case, I needed more fullness at the apex than the princess seams give me, because I wanted the fabric to hang straight over the bust on its own. That meant the dart rotation had to take place below the apex. Here is what that looked like.

Front Convert PrincessAs you can see, the Apex is off to the right and the pivot point is about 1.5 inches below it.

This picture also shows something that I found nerve wracking. I knew that moving away from princess seams was going to mean giving up the great curve-hugging fit I’d worked so hard to achieve with Sarah. I didn’t know whether I was going to like the final product, but this was a test and nothing ventured, nothing gained. The thing that set me back on my heels was the amount of distortion that took place in the shoulder seam. Seeing that dredged up all the missteps and wrong turns I’d taken when trying to make pattern adjustments. I had to remind myself that this was just an experiment and the worst thing that could happen would be I wouldn’t have this type of garment in my repertoire. So, I filled in all the gaps with paper, drew a line from the neck edge to the shoulder point and kept going.

Of course, the overlapping you see at the hem has to be added back in somewhere to provide the correct circumference. For my first muslin test, I put almost all of that into extra fabric at the shoulder that became pleat intake. The rest I added to the side seams.

Here is one of the bodice pieces cut and marked in muslin.

All rotated to shoulderI was pretty sure I wanted pleats, as opposed to just tucks, at least for the woven version. One thing I had to work out was how far down I wanted them stitched. As I worked on this it also occurred to me that a variation with a yoke might be nice, but first I had to get the concept to work.

Skewed pleats and splayedAs you can see, the first test did not turn out well. Although the pleats were marked on grain, they pointed outward on the body.

The next picture shows my experiments with tucks versus pleats stitched almost to the bust.

Muslin Test1_2After trying it out in rayon to mimic the drapiness of the fabric I was planning to use, I still wasn’t happy. I ended up splitting the bust shaping between shoulder pleats and an armscye dart. Here is what that looks like on the pattern.

Front FinalThe back was a more straightforward conversion. Here is what it looked like in development.

Back DevHere is the final pattern piece. All of the intake was rotated to pleats at center back. The center pleat is the deepest.

Back FinalAnd here is the final product on me. The fabric is silk crepe de chine. I love the fabric and I like the topper. It’s completely boxy and oversized, but it isn’t as flattering as the fitted pieces with princess seams. Still, I’m glad I added this to my repertoire.

Topper Modeled