Welcome to In the Sketchbook, a monthly look at fashion design sketches that we are working on for ourselves. Sketching garments on a personal croquis is a great way for the individual couture enthusiast to move beyond the use of commercial patterns and into a world of personalized design! It can be intimidating at first, but with a little bit of practice it becomes something you look forward to. Join us for a look of what we have going on In the Sketchbook! Brought to you by Wendy Grossman of Couture Counsellor and Steph King from Siouxzeegirl Designs.
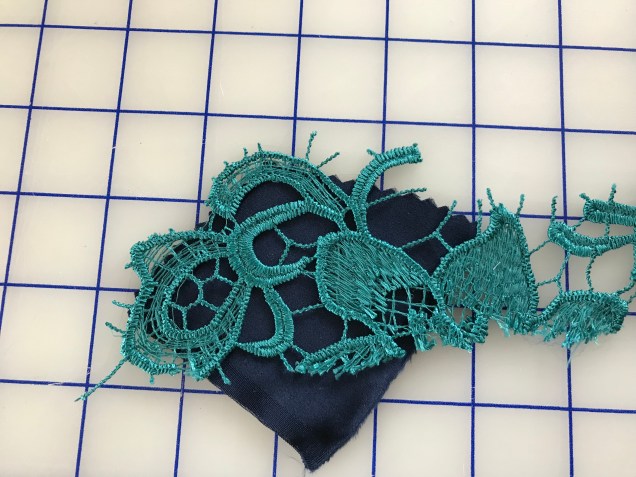
This month, I’ve been trying to work out a plan for some stunning guipure lace I found last winter. My dear friend Steph and I have challenged ourselves to making guipure lace dresses for the final opera in our season subscription in February. The first task, finding just the right color of silk charmeuse to use as a foundation for the dress, took over 8 months. I did manage to find the winning combination at the end of an action-packed business trip to New York in the fall.
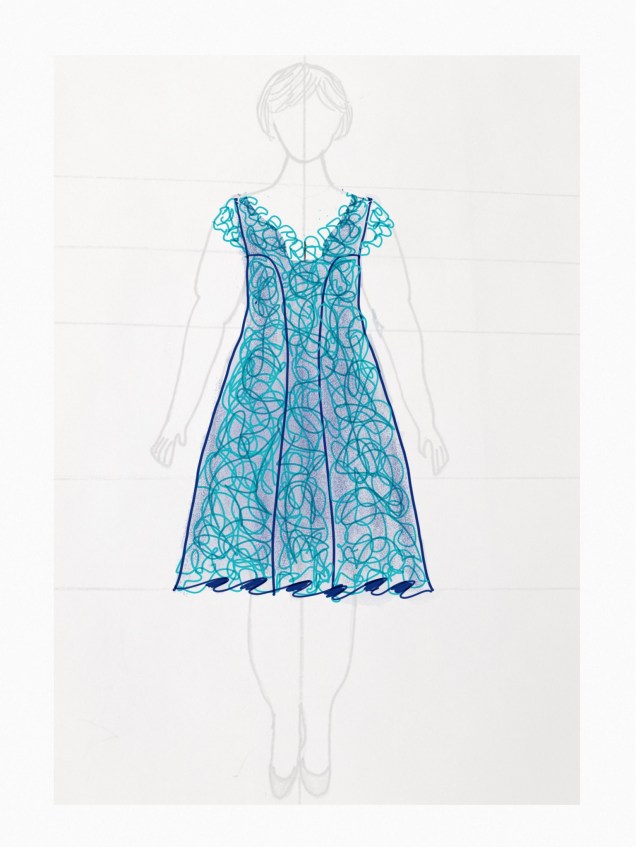
When I bought the lace, I had in mind a simple sheath dress, or maybe a sheath with cap sleeves. But earlier this month when I was on the El, I saw a young woman wearing a pretty embroidered lace dress with a full skirt and it made me reconsider the silhouette.
My sketching skills absolutely do not do these fabrics any justice, but here goes.
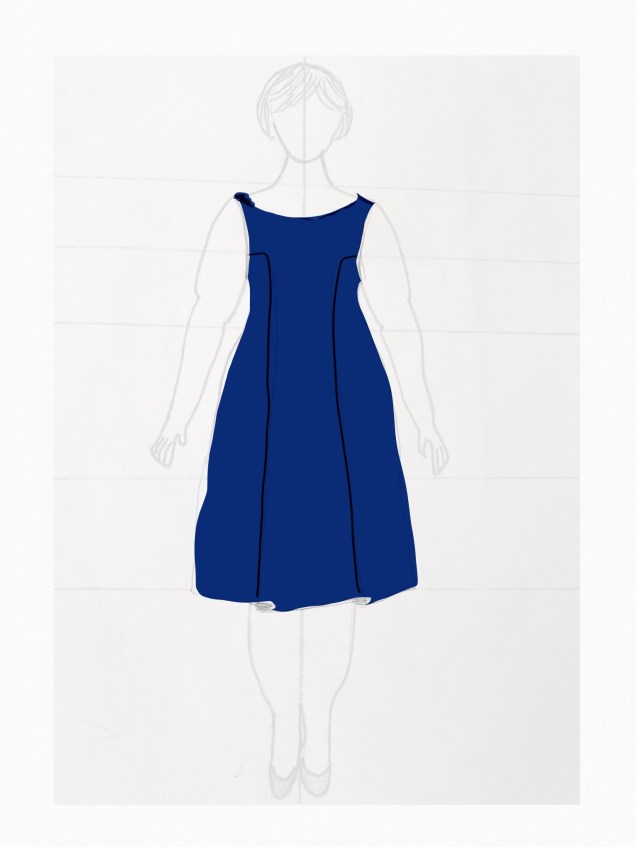
Then I wondered whether a high boat neck in the front and a dip in the back might be appealing.
Then I thought about the weight of the lace and decided it would be better to reign in the fullness of the skirt. Something like this.
The next thought that popped into my head was managing the zipper. That will require a review of Susan Khaljie’s Craftsy class on the guipure lace skirt. Then it will be time to get to work on the pattern and mock-up!
Be sure to check out what fabulous designs my dear friend Stephanie King of Siouxzeegirl Designs is showing at 10 Sewing Machines & a Serger. We’d love to see and hear about what you’re sketching, so please leave a comment.
For this year’s ASG Chicago Chapter fashion show, my neighborhood group, Sew Chicago, challenged ourselves to create a garment that has at least 50% of the visible area sewn on the bias.
Four members of Sew Chicago met the challenge to “Show Your Bias” on the runway
Before embarking on this challenge, my experience with bias had been limited to bias bindings for necklines and armholes and using a single bias panel in the Decades of Style Stardust Skirt. So, of course I did a ton of research on the subject and shared what I had learned with the Sew Chicago Neighborhood Group.
My plan for the challenge project had been simple, or so I thought. I copied my master skirt pattern, which is for a slightly pegged pencil skirt with princess seams. I used the slash and spread method to swing out the seams at the side, side front and side back, kept the center back seam as it was in the original and added a center front seam. I then converted the grainline on each piece to bias.
I decided to test first with a wearable muslin, which turned out to be a very good call. I was planning to make the skirt in rayon challis so I tested in a less expensive rayon challis I had bought on sale. The skirt sewed like a dream and I was very excited about having a wearable muslin I actually wanted to wear. When I tried on the skirt I really liked the way it looked and moved. I then put the skirt on my dress form so the bias could relax overnight. When I put the skirt on to show Sarah Veblen in a mentoring session I discovered that the seams had developed waves just below the waistband and those wavy seams made the fabric in between pooch out. Sarah had me try various methods to address the problem, but it just got worse and later showed up at center back. I didn’t keep any of the pictures because I was so fed up with the whole project.
In thinking through what had happened, I came to the conclusion that the problem was showing up in the curved sections of the seams. My master pattern follows my curves and I had preserved those curves in the bias pattern, whereas most bias skirt patterns only have side seams and they tend to be straight. The message I thought the fabric might be sending me was “I like to curve when I’m on the bias, but I want to do it on my own terms, not in a way that’s dictated by a pattern.” It’s not any different from the messages my cat gives me, which is that whatever she does, she wants it to be her idea, not mine. I know I overthink everything, but this made sense to me. Cats and bias are both pretty finicky.
Having identified what I thought might be the problem, the next thought that popped into my head was a possible solution. The dress I had developed for the Sew Chicago Spoonflower Fabric Challenge has a fitted bodice, a curved Empire seam and a skirt portion with a relaxed fit. What if I took those skirt pattern pieces, eliminated all of the curves from the vertical seamlines and flared out the pieces straight from where they attach to the Empire seam?
I could cut the bodice on straight of grain and, for some extra insurance, place a zipper at center back but stop it at the Empire seam so there would be no zipper in any part of a bias seam. Sarah thought this might work, so that’s what I did.
I ordered 5 yards of rayon challis from Stone Mountain & Daughter so I would have plenty to work with for the bias pieces. As it turned out, I have 1¾ yards left over.
The print made me glad I’m not prone to vertigo!
Construction went smoothly and the method I used for setting the invisible zipper was so easy I worried that I had done something wrong. One fun thing I was able to do in constructing this dress was use the method of attaching the all-in-one facing that makes me feel like I’m doing a magic trick. I’ve gone through the details of the other cool method for attaching an all-in-one facing entirely by machine, which involves sewing in a tunnel. The method I used for this dress can only be used if you have an opening at center front or center back. I had planned to use a center back zipper for the bodice of this dress, so this was my chance to use the method in something other than a half-scale sample.
This has to be done before that center back (or center front) seam and side seams have been sewn.
After the bodice and the facing pieces are connected at the shoulders and the shoulder seams are pressed open, you attach the facing at the neck, press as sewn, clip the curves press the seam open and then turn the facing to the inside of the bodice and press the seam, favoring it so the seam is visible only from the inside of the bodice. The next step is to understitch, which goes very easily because the garment is still flat. I have a new machine and I found that using the stitch in the ditch foot with the needle position moved away from the seam worked very well.
The next step is to sew the armscye seams, following the same steps used for the neck seam. The only difference is that the understitching cannot be done all the way to the shoulder unless you do the tunnel stitching, but on this dress I got pretty close. The thing is, as long as you cut your facing pattern pieces ¼” shy of the fashion fabric pieces at the shoulder on the armscye side and taper out to the original bodice pattern piece about mid-way down, the seam will naturally roll toward the facing in the area that’s difficult to reach for understitching so you are okay.
Now we’ve come to the fun part. Other sewists have included videos in their tutorials and you might want to watch them if this sounds confusing. What I’ve found is that it sounds a lot more complicated than it actually is. Just follow the steps and once you’ve done it, you will be able to use the technique from memory.
What you want to do is reach into the space between the fashion fabric and the facing from the side that doesn’t have an opening with two fingers extending past the shoulder seam. In the case of this dress, I reached from the front toward the back.
You then use your other hand to pass one half of the back of the bodice and facing unit to those waiting fingers. Then you simply pull the fabric through until it is right side out.
Repeat on the other side and you’re done.
After construction was completed, I put the dress on Dottie (my dress form), marveled at the way the skirt seems to be in motion even when it’s perfectly still and hoped there would be none of those unpleasant surprises I encountered with the skirt.
When disaster didn’t strike after three days on Dottie (two would have been sufficient), I tried on the dress and the only issue that needed to be dealt with was the hem. The back was considerably shorter than the front. At first I thought this was due to the bias, but in taking the pictures of the pattern pieces I see it was a mistake in patternmaking. I don’t understand how that happened when I walked all the seamlines, but it did. With help from my dear friend Stephanie King I was able to sort out the hem length and finish the dress in time for the runway show.
One issue I noticed is some crumpling above the princess seams in the front. I thought it was a pressing issue, but pressing didn’t resolve it. And it’s not a question of posture.
I sent a picture and asked Sarah Veblen about it in a mentoring session. She thinks the bodice is too snug around the apex, at least for a fabric with the qualities of this rayon challis. That would explain why I haven’t encountered this problem when using my master pattern with more stable fabrics. I think this theory is probably correct. It doesn’t help that I’ve regained the weight I’ve lost repeatedly and regained again over the past couple of years. I’ll work on tweaking the fit before I try a version of this dress again.
Overall, I think this was a successful experiment. I’m happy that I found a solution to my bias problem in time to join in on the group challenge and I’m very happy that I have this dress.
Welcome to In the Sketchbook, a monthly look at fashion design sketches that we are working on for ourselves. Sketching garments on a personal croquis is a great way for the individual couture enthusiast to move beyond the use of commercial patterns and into a world of personalized design! It can be intimidating at first, but with a little bit of practice it becomes something you look forward to. Join us for a look of what we have going on In the Sketchbook! Brought to you by Wendy Grossman of Couture Counsellor and Steph King from Siouxzeegirl Designs.
I’ve been remiss in blogging in general and it’s been a few months since I’ve posted what is in my sketchbook, so here I am trying to get back in the swing of things.
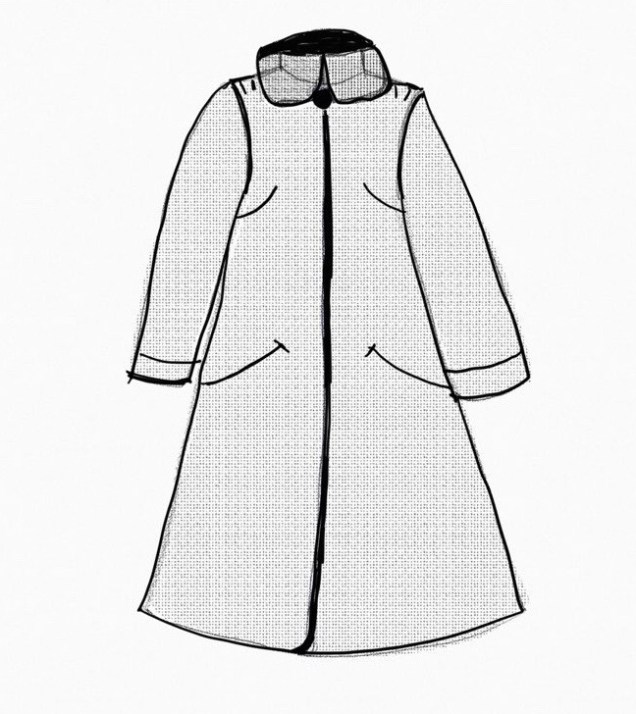
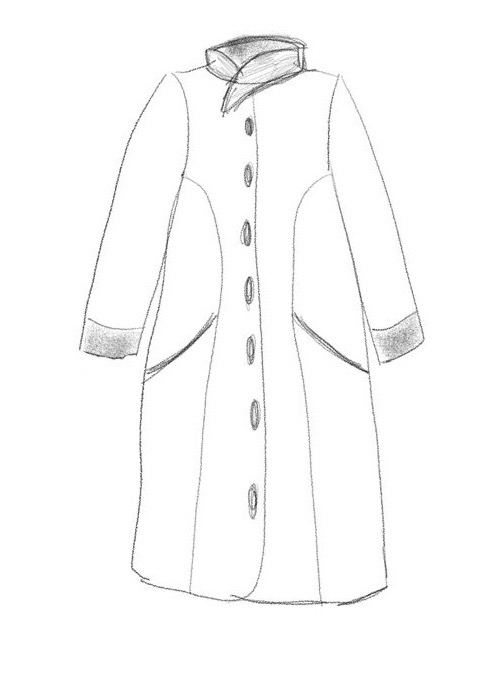
I’ve decided it’s time I tried making a coat and a warm raincoat for late fall/early spring is what I’m aiming for in my first attempt. The thing is, I’m having a lot of difficulty figuring out the neckline and collar. I prefer open necklines and with a coat that is supposed to keep you warm or dry or both that just isn’t practical. The thing is, every time I tried to sketch something with a higher neck, it seemed out of proportion to me. I’m still trying to find a good balance on this and it will take some more work before I’ve settled on something I’m happy with. Here is what I have so far.
If this one were made up, you wouldn’t see the collar stand underneath. I was just playing with an idea. The coat would have a single statement button and hidden placket and maybe French darts and curved welt pockets.
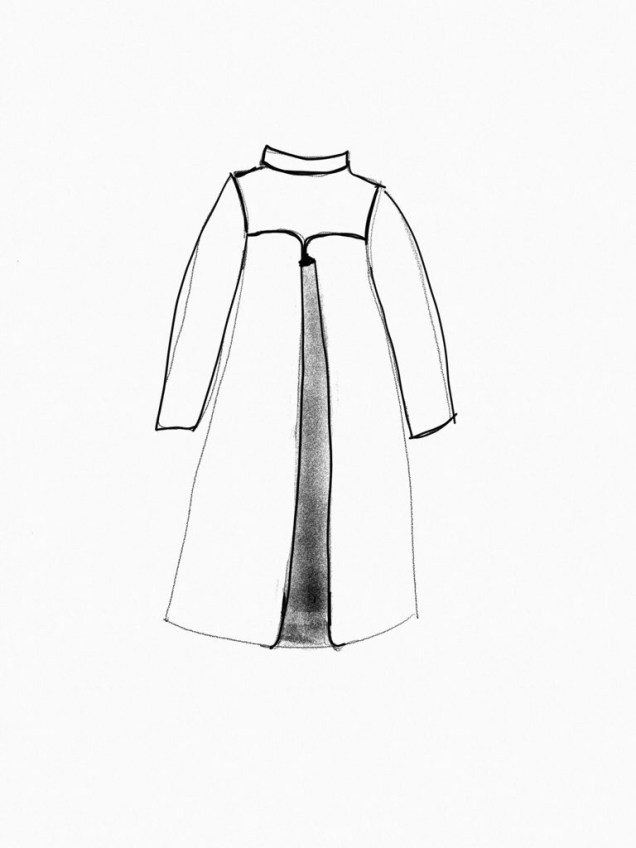
This may or may not be the back of the first sketch. I thought a Swing pleat with a yoke might add some interest.
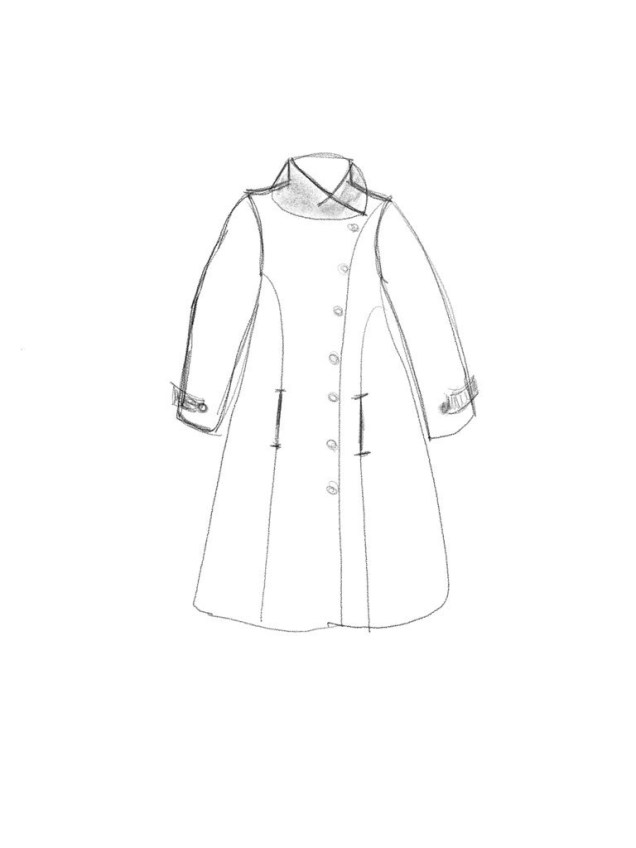
Here’s an attempt at a wrap-over collar with princess seams, vertical welt pockets in the princess seams and button tab detail on the sleeves. This is a knock-off of a Vogue pattern I’ve seen and I think I’d like it better in a wool melton.
Another attempt at a wrap collar, princess seams, curved welt pockets. This time with buttons showing.
As I said, I’m still not there on a coat, but at least I have a start.
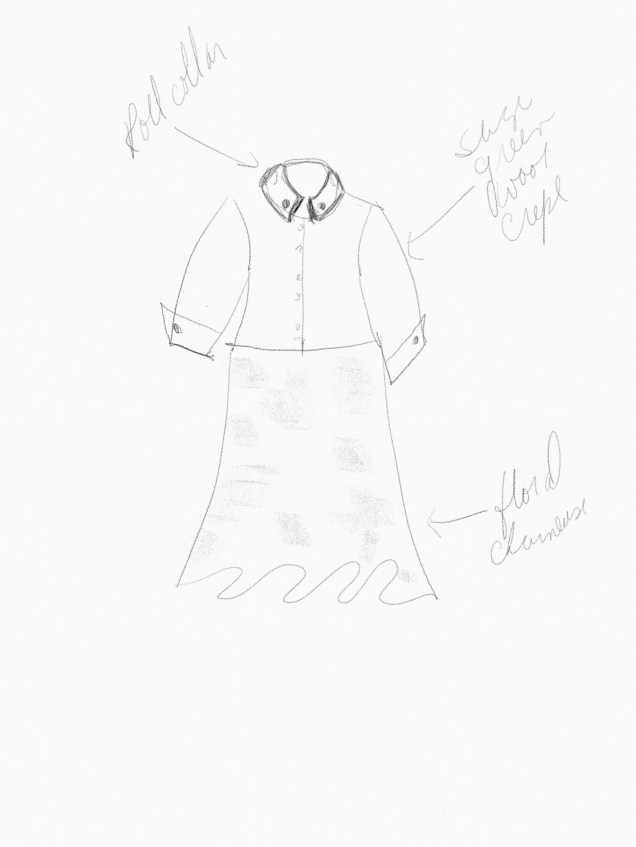
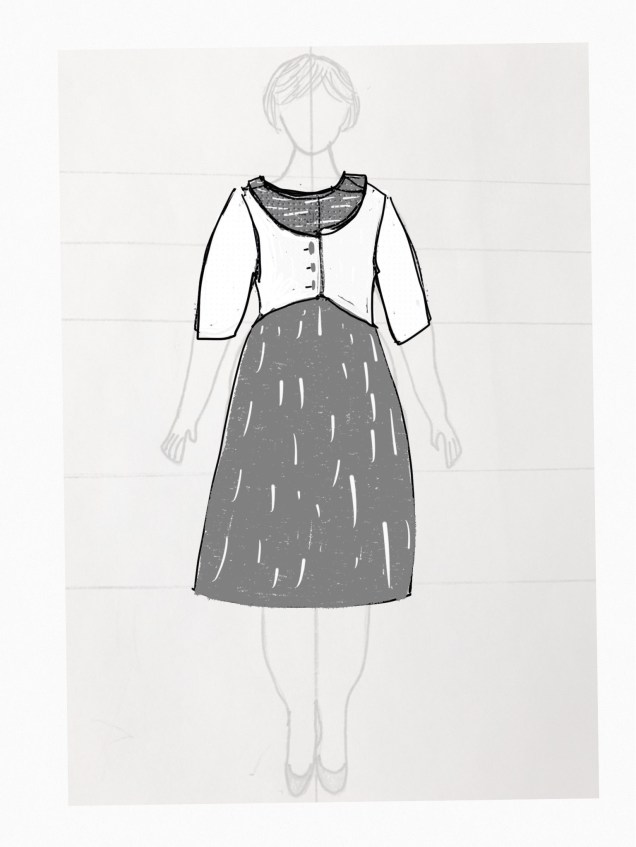
The very rough sketch of the jacket and skirt below came to me in a flash one day. I’d like to take that 60’s rolled collar that I’ve used in two-piece dresses and my LBD, turn it around so it opens in the front and maybe anchor it with a button on either side.
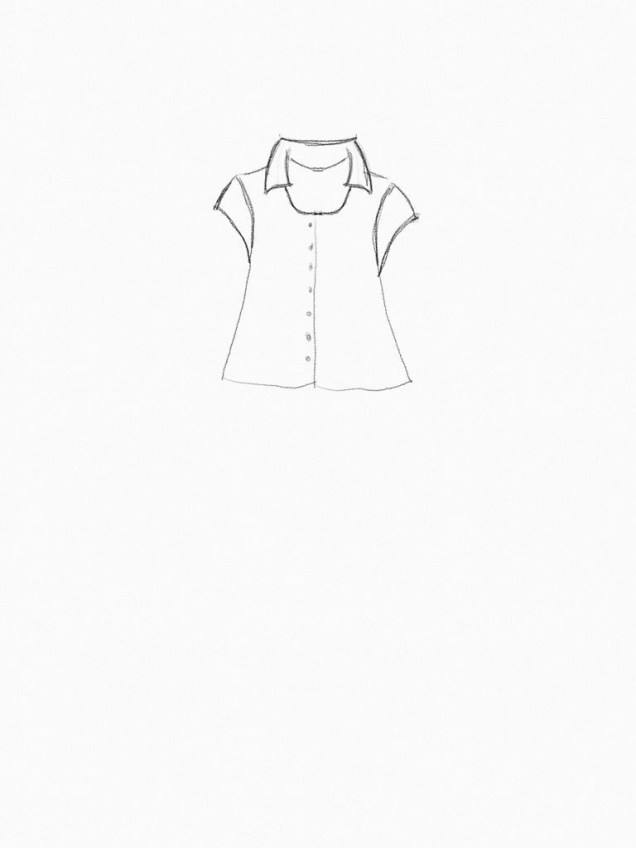
Finally, I’ve been noodling about partial rolled collars (this time, the ones that look almost like tailored shirt collars. I’m mocking up some tests, but this is the general idea of where that’s going.
That’s what I have for this month. I think my friend Stephanie King of 10 Sewing Machines & a Serger is taking a break from In the Sketchbook this month. Check back with both of us next month. Meanwhile, we’d love to see and hear about what you’re sketching, so please leave a comment.
I’ve really missed blogging, but I’ve learned I have to accept that there are just so many things I can stuff into a day and sometimes work and Life simply demand all of my time and energy. It’s not that I haven’t been sewing at all recently, but I have had some misadventures in sewing. More about that in a minute.
For now, I’d like to share my latest completed project.
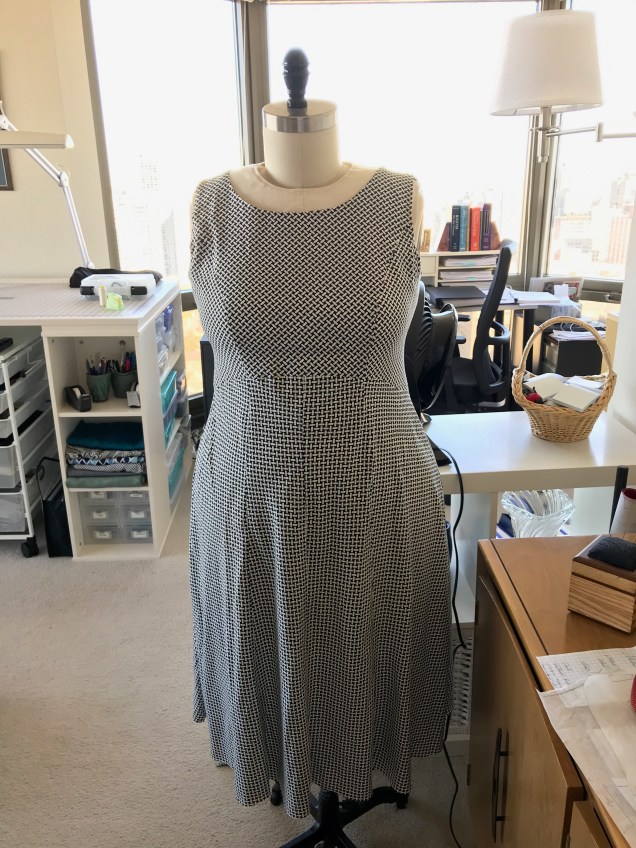
It’s the tucked linen top that was inspired by the workshop with Mary Ray that I took through ASG Chicago in January. You may remember this fabric combination from my post about my complicated relationship with color.
This top is almost what I had planned.
The bodice came out just as I had envisioned. I put the top two ¼” tucks in my fabric before cutting out the center front panel. Here is a picture of how this was done when I was using the fabric that I encountered problems with:
I sprayed a bit of Mary Ellen’s Best Press on the linen and pressed in a crease, then stitched at ¼” using my blind hem foot.
It’s had to tell on from these pictures, but the tuck that goes all the way across the front panel just below the neckline is drawn in the pattern and trued at the princess seams.
I was all set to make a neck facing, but Sarah Veblen suggested I line the top in washed China silk, which I did. I also made faced hems for the bodice and sleeves, because I’ve had a problem with linen blouses “cracking” at the hem. It’s this curling thing that happens and no matter how many times you press the darn thing it rolls up again like a window shade. Very annoying! Faced hems are the way to avoid that problem.
For the sleeves, I wanted to convert my usual two-piece sleeve to a one-piece sleeve so I could have a tuck that is not interrupted by a seam (and the problem of getting it to match). Here is the sketch of the design, which I posted several months ago.
On me, a one-piece sleeve that’s not a knit requires the tucks you see in the picture because of all the excess fabric in the sleeve cap.
I was in a tizzy when I got to the sleeves and didn’t pay attention to lining up the sleeve tucks with the blouse tucks, even though that’s the way Sarah draped the sleeve muslin on me. As you can see, I got one side right. Dumb luck!
In the course of this project, I tried to avoid this whole tucks in the sleeve cap issue by developing a sleeve with a crescent-shaped inset at the top, using Sarah’s instructions in Threads Magazine (Vo.192, Sep. 2017 pp.44-45). The mock-up showed me this is a design that does not work on me. Sigh.
But that’s not the only reason I was in a tizzy when I set in the sleeves. The other reason is that I completely forgot to put the tuck in the fabric before I cut out the sleeve. That’s why there is no tuck across the sleeve in the pictures. Another sigh. And a head shake.
After I finished the blouse, I got another idea for a sleeve that might work. Actually, two ideas. They’re variations on the second inset sleeve design in Sarah’s Threads article:
One of these just might work.
I’m crazy about the skirt. It’s rayon challis from Stone Mountain & Daughter Fabrics. I took my master pattern for a pencil skirt, which is a six-panel princess and extended each of the seams to make the skirt swishy.
Originally, this skirt was going to be cut on the bias. That was another misadventure I had this summer. The wearable mock-up I made out of another rayon challis was absolutely not wearable. It looked adorable when I tried it on right after I sewed it, but when I left it hanging on my dress form so I could let it relax before hemming, it developed some nasty waves and pouched out in all the wrong places. The lesson from this is that bias does not play well with seams shaped to fit my curves. So, I went back to the drawing board for bias. I have to come up with something for the ASG Chicago Chapter Fashion Show next month, because the Sew Chicago Neighborhood Group Challenge is “Show Your Bias.” I’m working on Plan B this week.
Meanwhile, I have a fun new swishy skirt on the straight of grain and at least another week of warm weather to wear it with my linen top.
It’s pretty obvious to anyone who reads this blog or has known me for any length of time that I gravitate toward a muted color palette.
A few years back I treated myself to a color analysis. Afterwards, I was reminded of something the organization development guru Peter Block said in a lecture: Most people go to therapy, not to change, but hoping they will get confirmation. The result of my color analysis was definitely confirmation.
I get a lot of unsolicited advice about branching out to more vibrant colors. Much of this leaves me grumbling about “the color police” and wondering why it matters to people I barely know what I choose to wear. It’s different when I ask for an opinion. Or at least I think so.
It’s been just over a year since I attended Sarah Veblen’s six-day workshop, Exploring Fashion Design: Design 1. That was a wonderful, but difficult experience for me. I was full of anxiety going in and I reached anxiety overload mid-way through the week. What got to me most wasn’t the stuff I was concerned about before I started (which was sketching and developing a personal croquis with everyone weighing in on the process). Instead, it was the exercises having to do with putting colors together. I just don’t feel I do it well and I’m amazed when other sewists combine colors, patterns and textures with great results. This is the sort of thing that, in the wrong hands can go horribly wrong and I’m convinced that any attempt I make at it will fall into that second category.
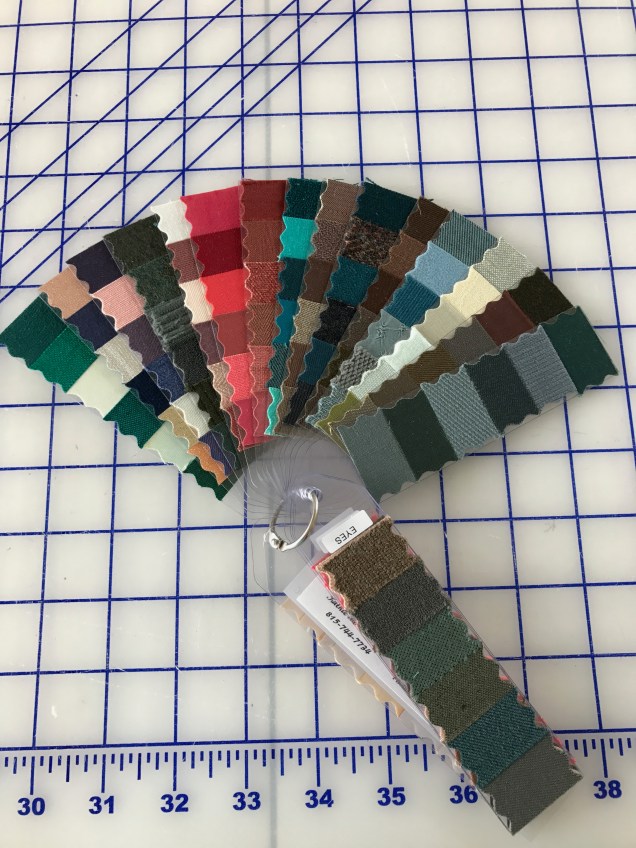
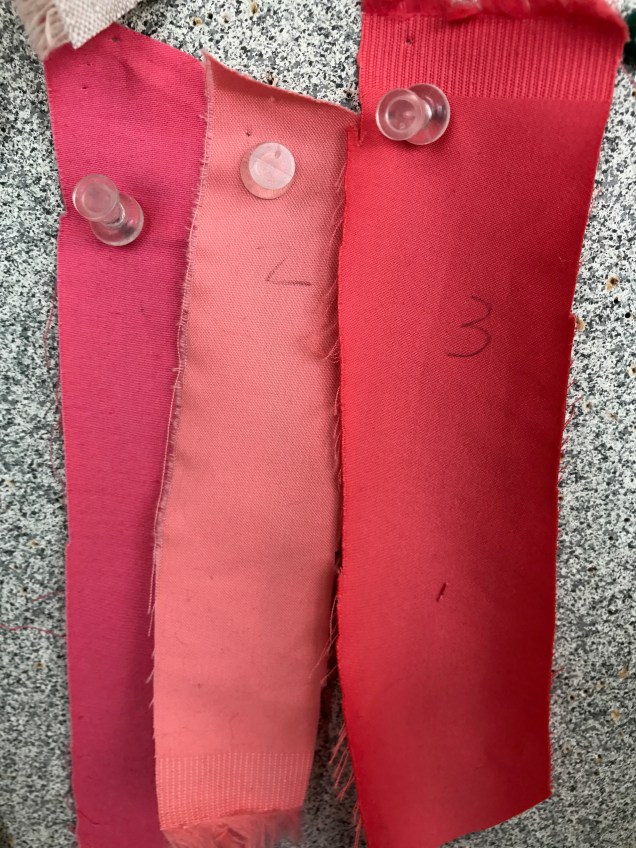
Of course, one of the reasons Sarah is such a gifted teacher is because she can zero in on the things her students are unsure about and challenge them to push those limits in a way that is not completely overwhelming. So, one of the exercises she gave me was to find fabrics I like in a color she has long believed would look good on me but I never wear. She calls it salmon. I call it coral. She gave me this assignment on the day we spent at the fabulous store, A Fabric Place. We selected fabrics for our exercises, Sarah cut swatches of them and we presented our assignments to the rest of the group at lunch and at the end of the day (after time for actual shopping, of course). Here is what I came up with for this particular exercise:
These were the top three swatches once everyone looked them draped over my blouse so they could see them close to my face. (I can’t find that picture. Sorry.) At my request, Sarah and the class ranked them in order of preference so I could use them as a guide.
Since then I’ve bought fabrics in that general color – and sometimes beyond – but I’ve yet to do anything with them.
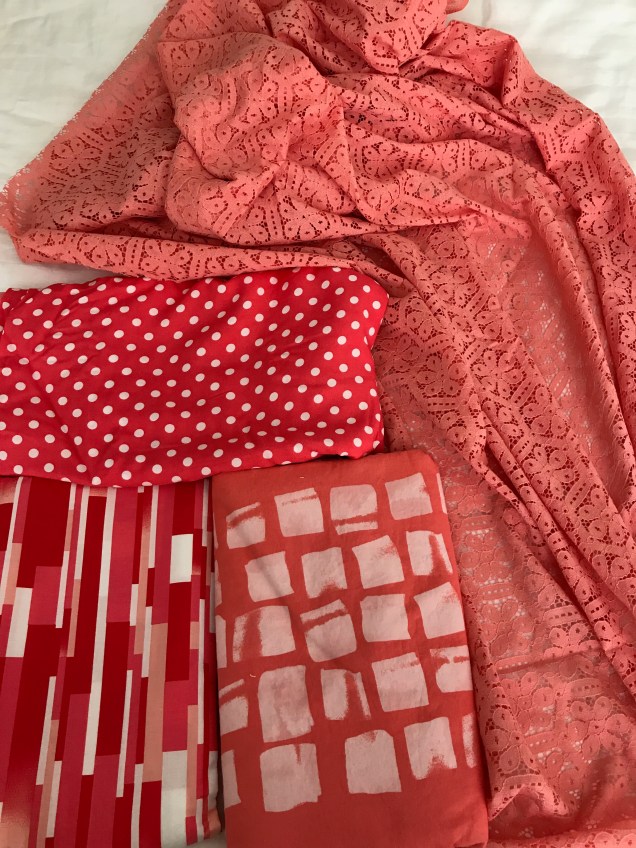
I have plans for this lovely cotton I bought from Louise Cutting’s Cutting Line Designs last summer at the ASG National Conference (bottom center in the picture). I know I want to make another “campish” shirt out of it, but I didn’t get to it last summer. I’m hoping I’l get to it this summer.
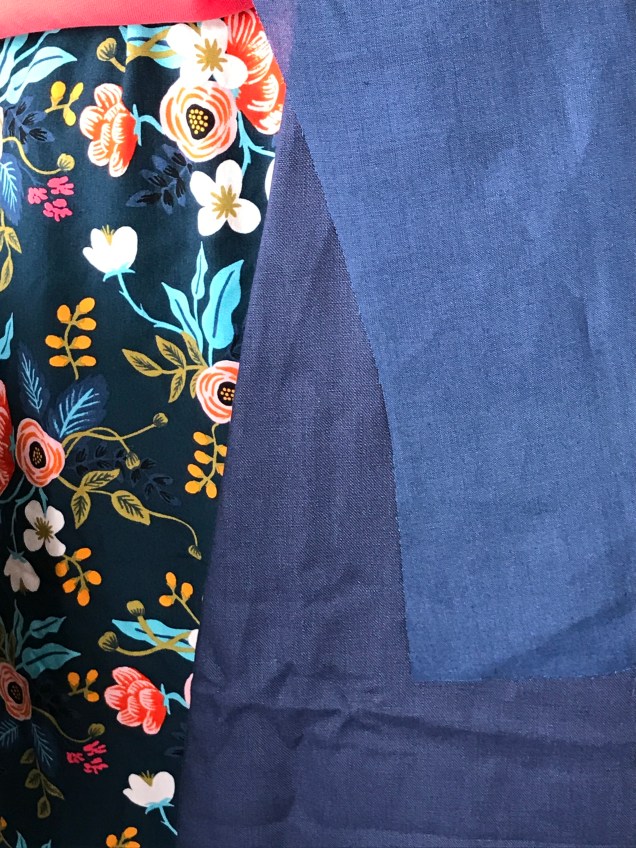
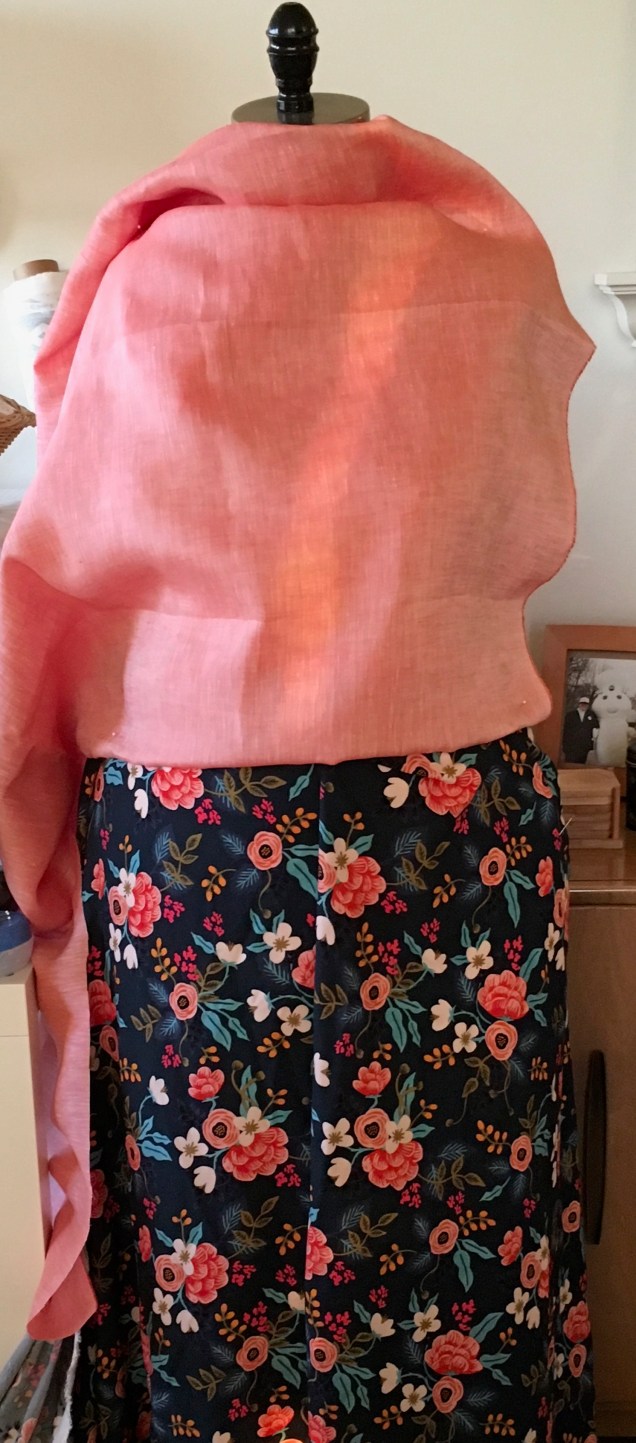
This subject came into focus recently when I was working on a linen blouse to go with a bias skirt I’m going to make out of this pretty rayon challis from Stone Mountain & Daughter.
The bright colors and high contrast are definitely unusual for me, but when it came to a color to wear near my face, I reverted to my usual blue.
Unfortunately, I discovered some flaws in the blue linen when I was pressing it before sewing. There are streaks and little splotches that are quite a bit lighter than the rest of the fabric, as if the dye didn’t “take” in this spots. It isn’t a question of fading, because the swatch I tested and retested in very hot water and with a hot iron remained colorfast. I looked at the rest of the blouse-weight linen I have, but I felt that none of them would work as well. You know how you just get an image in your head for a project and can’t let it go? So, I took a risk and laid out my pattern pieces to avoid the problem areas, or so I thought. After pre-tucking in the places that needed it, cutting everything out and putting in the final tuck, I started to assemble. In my next pressing, I noticed another streak.
That started a search for another linen I could be excited about for this skirt. Of course, getting the right color online is a tricky proposition. Not everyone goes to the trouble of giving us Pantone colors the way Linda Podietz does on her site, EmmaOneSock.com (thank you Linda!). The result is that I now have an extra supply of linen for future projects. All are very nice, but none of the blues sang out to me. It was the disappointment over the one that didn’t work out, I’m sure, because this one is perfectly fine.
But you can see that it’s darker than the fabric I wanted to use.
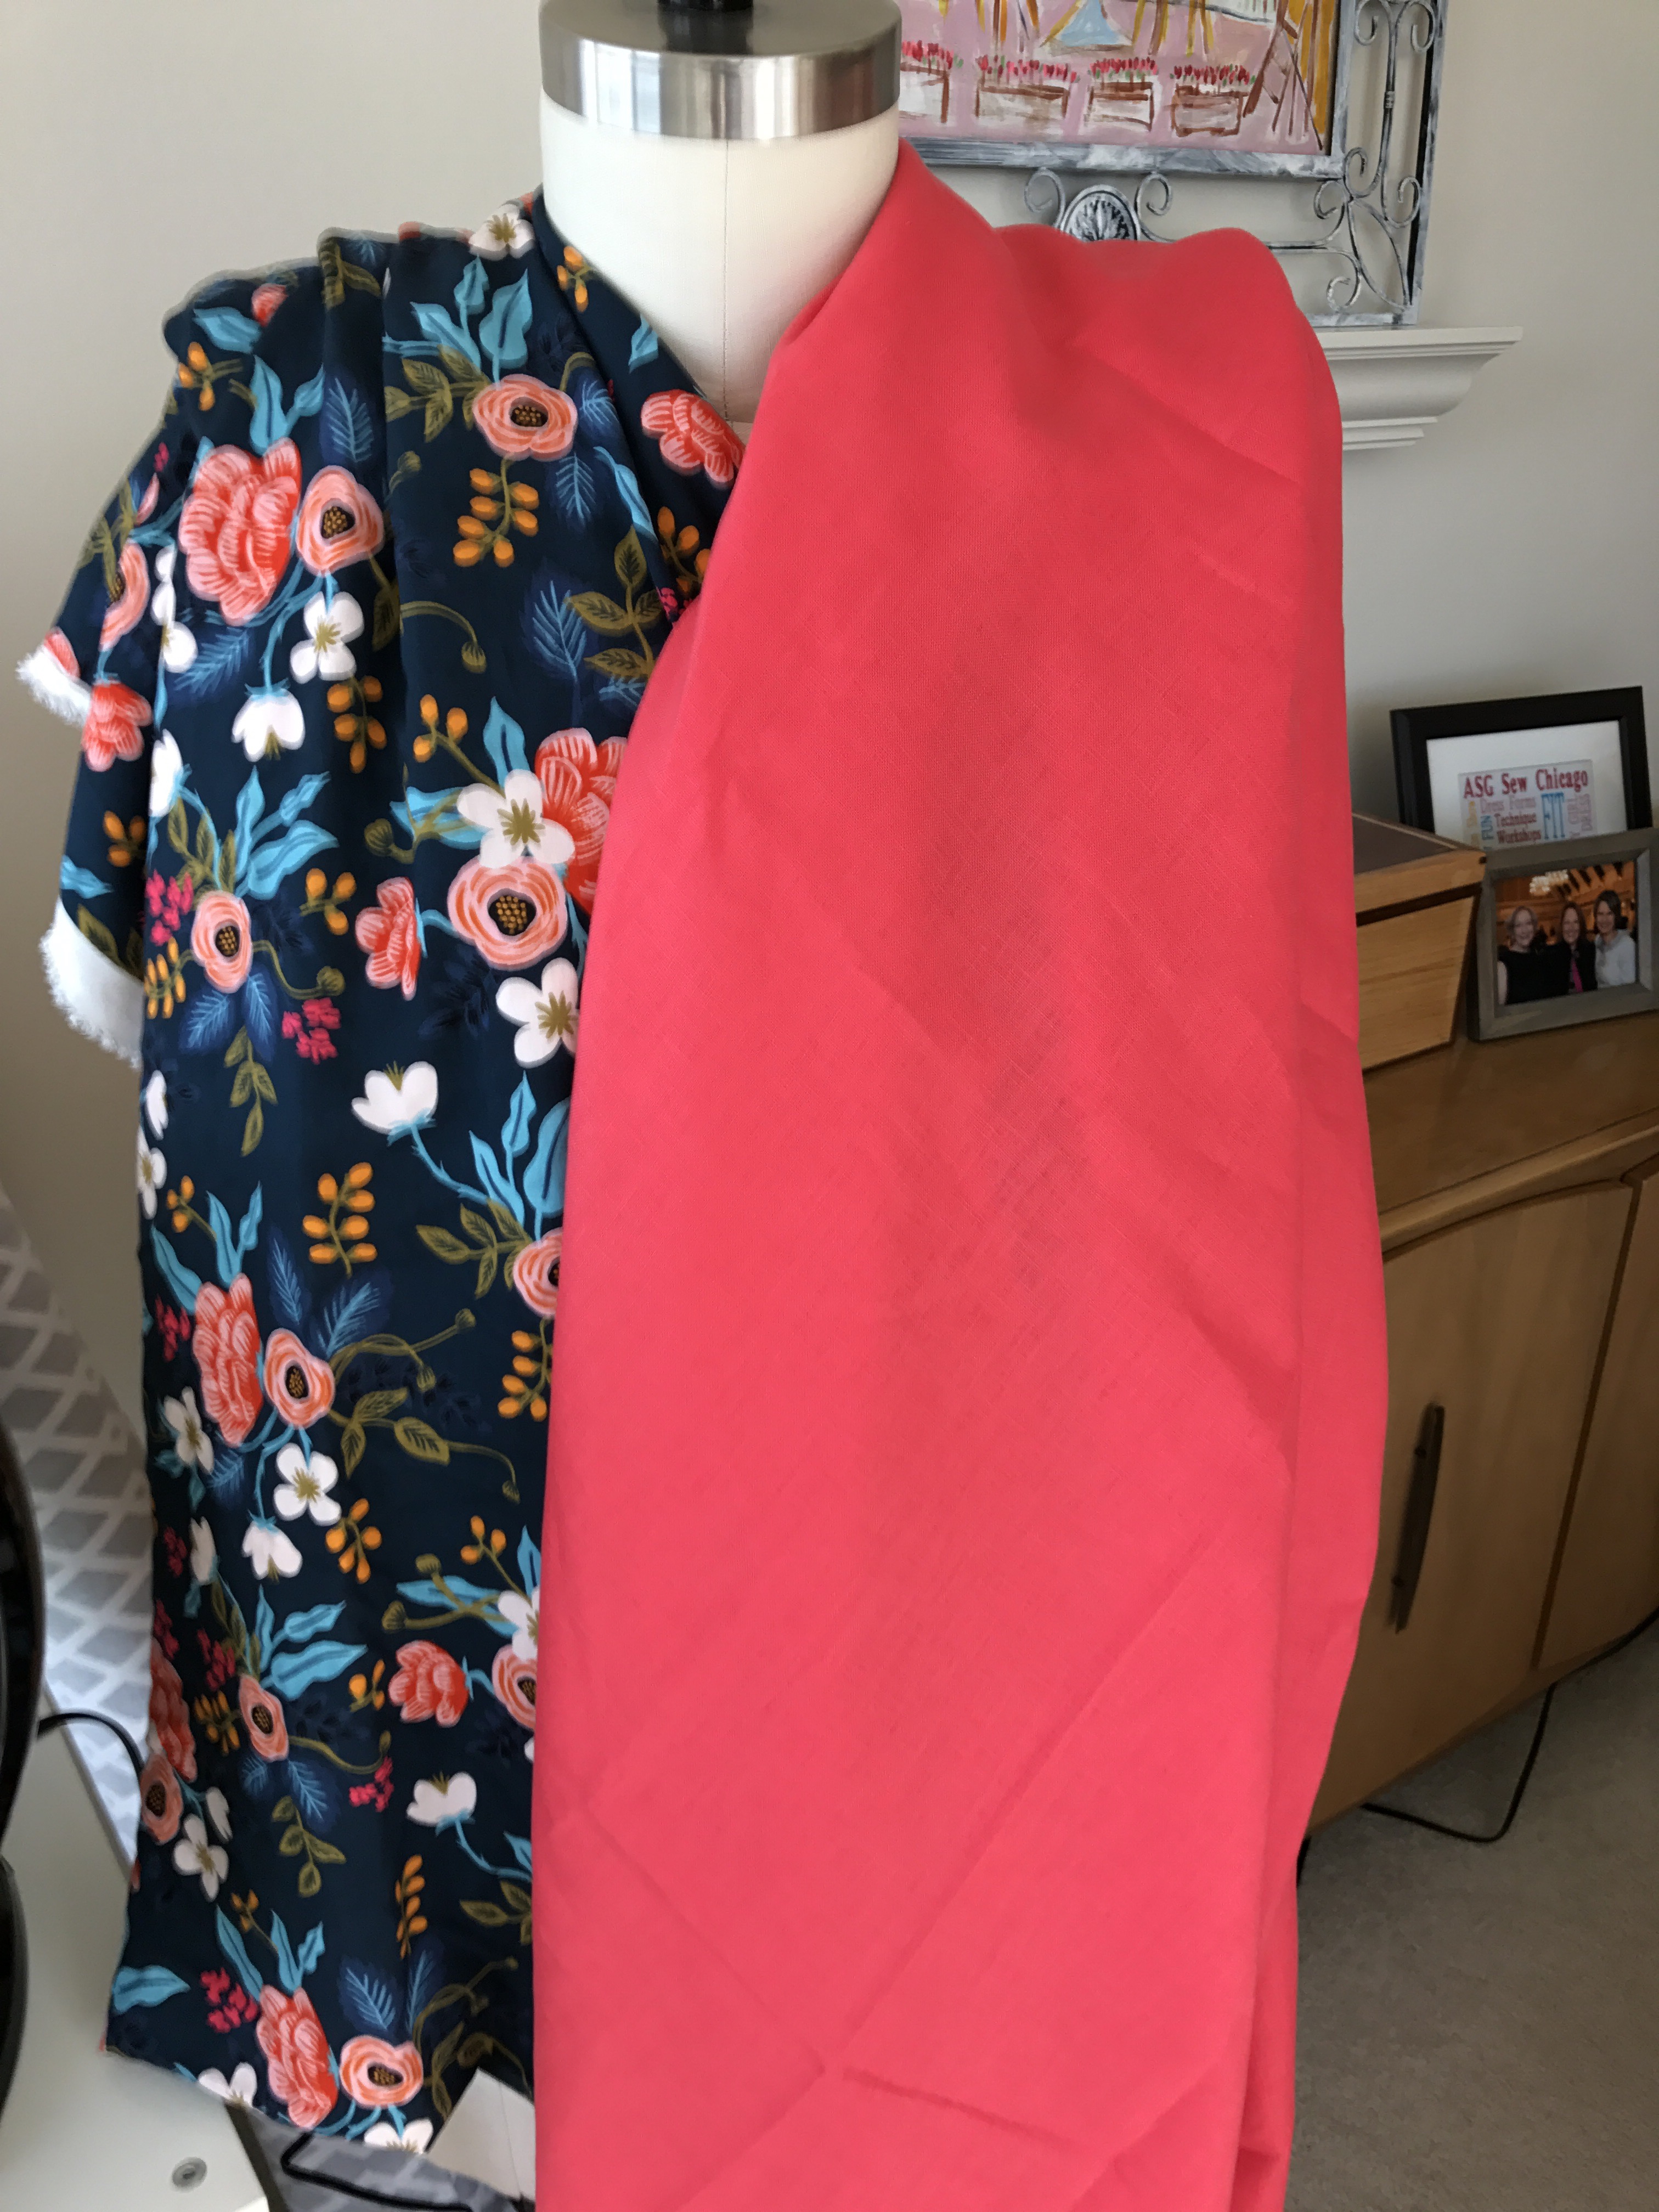
So I tried branching out into the coral area. At first I thought a bright coral might work because the flowers in the skirt are bright, but that didn’t quite cut it. Besides, it’s a medium weight and more suited to a jacket.
Then I found this cross-dye linen in just the right weight.
This was my Goldilocks moment.
I can’t wait to cut into both of these fabrics and get this project back on track.
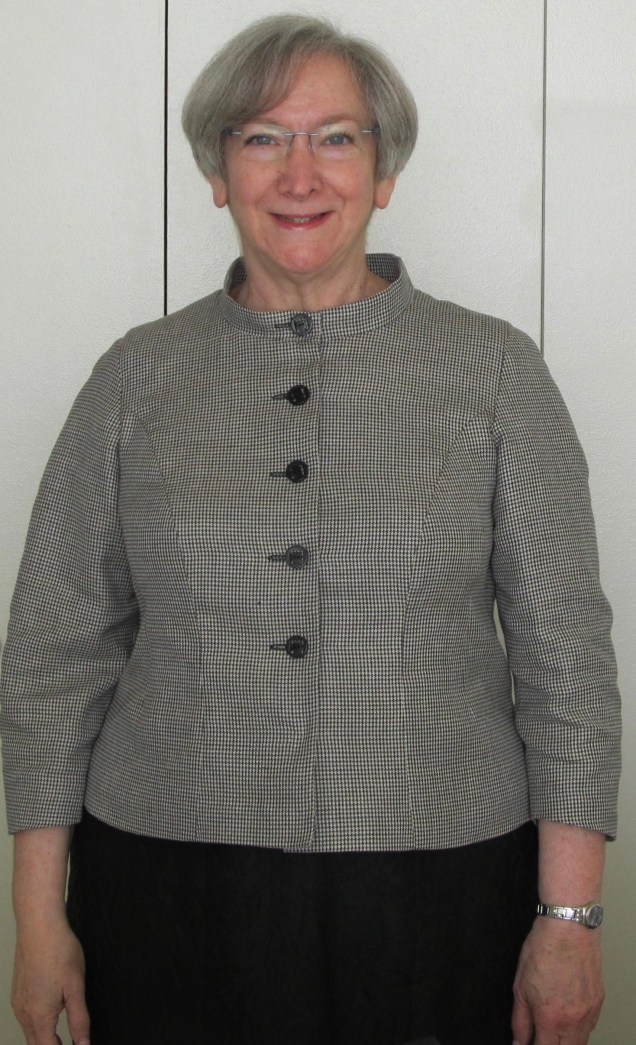
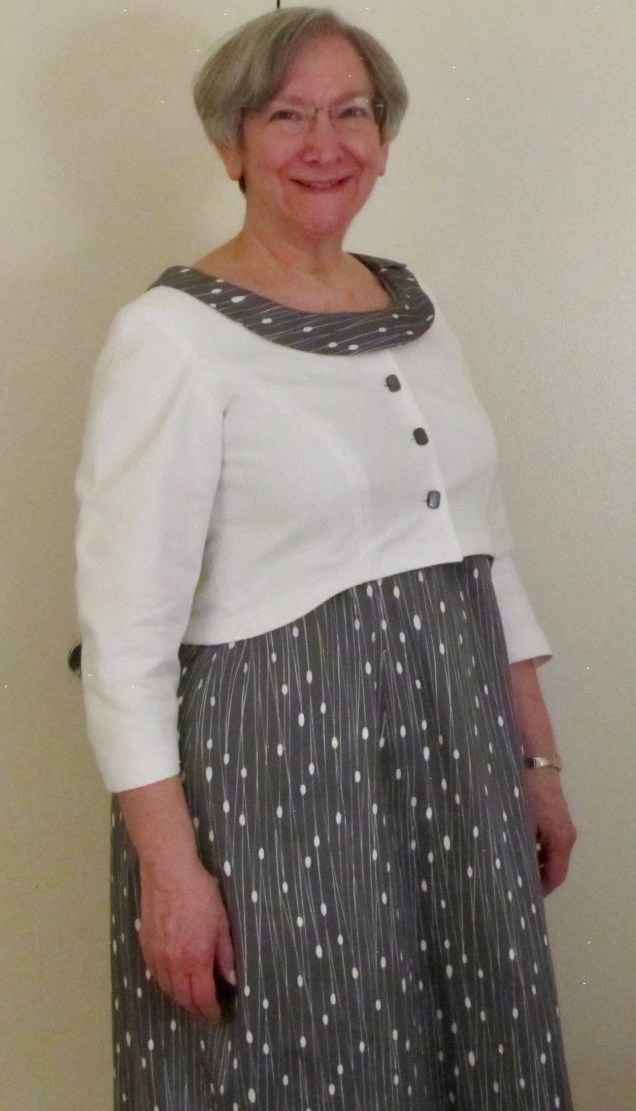
It’s been way too long since I’ve posted on this blog and it seems like forever since I’ve finished a garment to blog about. So, let’s get down to business with the jacket that I was going to wear on a trip to Brazil that has since been cancelled.
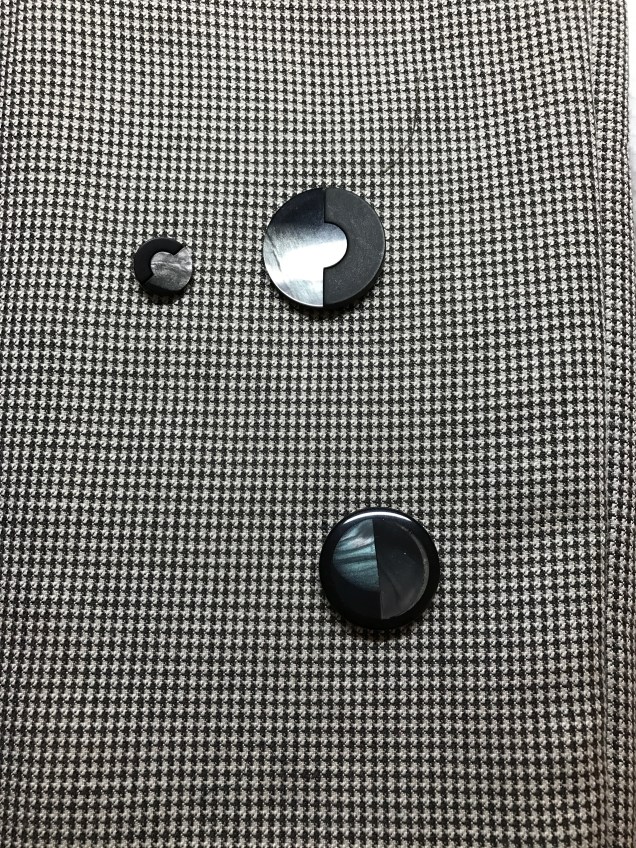
Except for the wrinkles, you would never know that this is linen. It has the look and texture of wool. The fabric is Armani (it says so in the selvage), which I bought from Marcy Titlon’s web site possibly two years ago. The pattern is one of those things that’s hard for cameras to capture accurately. It’s tiny houndstooth checks in black, taupe and beige. The buttons are from Soutache Ribbons and Trim and it is lined in Bemberg Ambiance.
I started with my basic armscye princess bodice and ¾ length two-piece sleeves. I knew I wanted to do a Mandarin collar and at first I thought I might want the jacket to be asymmetrical, similar to this sketch I had made earlier (the one on the left).
After looking at circles of paper the size of my buttons arranged on my dress form, I decided to drop the idea of asymmetry. Having the buttons at center front looked just fine. I also decided I didn’t need the curve in the front overlap/underlap and cuffs or buttons on the sleeves could be eliminated as well. Work had been getting increasingly busy and I needed to get this project done.
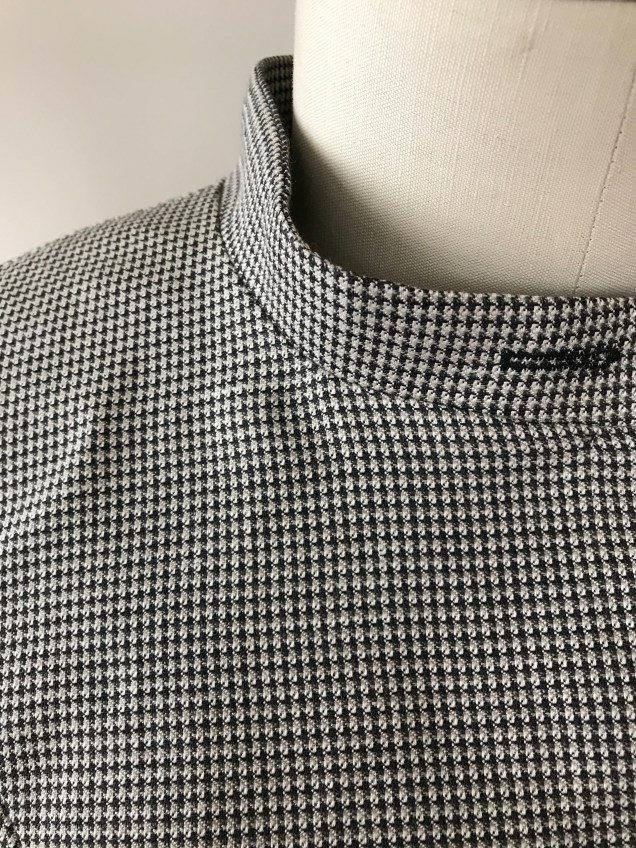
In a mentoring session, Sarah Veblen told me I could just mock up the collar once I got the body of the jacket constructed, but I was unsure about the neckline so I did a muslin of a part of the front, the back and the collar. Sarah made minor adjustments to the mockup during a You Choose Your Focus workshop here in Chicago in March. Her advice was to make the collar slightly shorter in the front, which I did.
The next issue I thought through was the button in the collar. I knew that trying for a functional buttonhole and button in that location was asking for trouble, particularly with the diminished amount of real estate that resulted from making the front of the collar dipping a bit lower than the rest of the collar. I knew a plastic snap behind a button would work, but that still meant taking a risk of running into all sorts of headaches with the buttonhole. My solution was to make the top buttonhole before assembling and attaching the collar. That gave the automatic buttonhole foot an unobstructed path to work with. The stitching is on the upper collar only and I never cut it open. I made several practice buttonholes, both before making the non-functioning one and before making the rest of them, just to make sure that nothing had shifted when I set the buttonhole foot aside to sew the rest of the jacket and to account for the differences between a single layer of fabric and a fashion fabric/interfaced facing sandwich with a seam connecting them. Except for some skipped stitches that had to be resewn by hand, that part of the process worked fine.
For this project, I made a complete checklist of all the construction steps in advance in an attempt to keep myself on track and help with time estimates. This is one of the suggestions Sarah has made to help me be more realistic about my expectations and chart my progress. Checklists, like shopping lists, are extremely helpful, but only if you read them! I was working merrily along without referring to my checklist when I realized that I worked the collar construction the way I do a rolled collar, assembling it before attaching it to the body, whereas I had wanted to use the method you use for a collar band on a tailored shirt. I caught my mistake too late and complained to Sarah that I was going to have to make a new collar. She pointed out that there is more than one way to approach this construction and, in fact, she never uses the tailored shirt method. I followed her advice and concluded that, for a lined jacket, both methods work just fine.
I did lose my momentum when my travel plans were changed and work got crazier. And, as you can see, I didn’t take a lot of pictures to document this project. My enthusiasm for this project dropped even more when I saw this bubble thing on one side:
The other side was perfectly smooth. Sarah tried to diagnose the problem by looking at pictures of what was going on inside.
After repeated pressings, extra clipping of the curve and general futzing, I remembered that I had needed to resort to spot steaming and some easing when sewing the neck seam. In all likelihood, one side got stretched out of shape in that process. Probably nobody would have noticed had I not pointed it out here, but I think it’s important to go over the pitfalls so we all can learn from them. Anyway, that close-up does show you my nice fake buttonhole.
The jacket is finally in my closet, and I might actually wear it if (1) I get the black linen skirt that goes with it sewn (right now all the pieces are cut out and only the back darts are sewn); and (2) I have a meeting that does not involve a video conference component (there is a reason nobody wears houndstooth prints on TV) on a day when the dew point isn’t in the stratosphere. Is that asking too much?
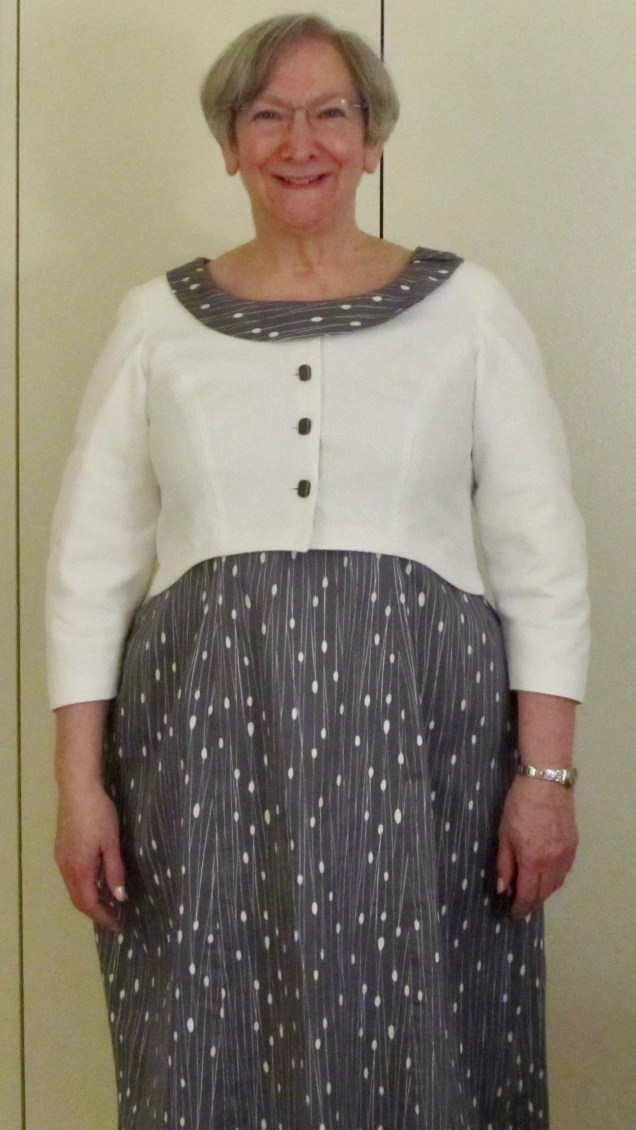
In a mentoring session with Sarah Veblen last month, we talked about a planned business trip to Brazil. I know the weather will be quite warm, but I need to look polished every day that I’m there. I simply don’t have enough warm weather clothes that fit the bill. One of the suggestions Sarah made was to make a white cotton jacket to wear over the dress I had made for the Spoonflower fabric challenge last summer. It just so happened that I had two different white piqués in my collection as well as some gray buttons with a white stripe that blend well with the print of the dress.
All I needed was some white Ambiance lining and I’d could get started, or so I thought.
The plan was to use the bodice pattern pieces for the Spoonflower dress to make the body of the jacket, with an adjustment at the shoulder to make room for a pair of very thin shoulder pads called “Angel Wings.” The sleeves could be made from either my master jacket pattern or my master blouse pattern, whichever worked. Both are two-piece sleeves. However, I discovered that I no longer had all the pattern pieces for the Spoonflower dress. I started the dress to enter in the October 2015 ASG Chicago Chapter fashion show, but when I couldn’t finish it in time it remained unfinished until last summer. In the interim, I used the pattern as the starting point for my Little Black Dress that I wore in last spring’s Haute Couture Club of Chicago fashion show and to a wedding last June. I didn’t expect to like the Spoonflower dress as much as I do and so I didn’t think I’d want to make another dress from the pattern. So, instead of copying all the pattern pieces to make the modifications for the LBD, I made the changes on the existing pattern pieces. I’ve since decided that I do want to make new versions of the original dress again and I really regretted not taking the few extra minutes to copy all the pattern pieces when we were developing the LBD. That’s a mistake I won’t make again.
So, my first task was to reconstruct the original Spoonflower dress pattern, then copy the bodice pattern pieces adding an extra inch beyond the modified Empire seam of the dress. Because that seam is so curved, I needed to make a faced hem, which required new pattern pieces and interfacing.
I kept everything else very simple. The neckline is the same as the neckline of the dress so that it sits under the dress collar and the top button is hidden. I lined it to the edge and just made interfacing pattern pieces to interface the lining where facings might otherwise have gone, including at center front to support the buttons and buttonholes.
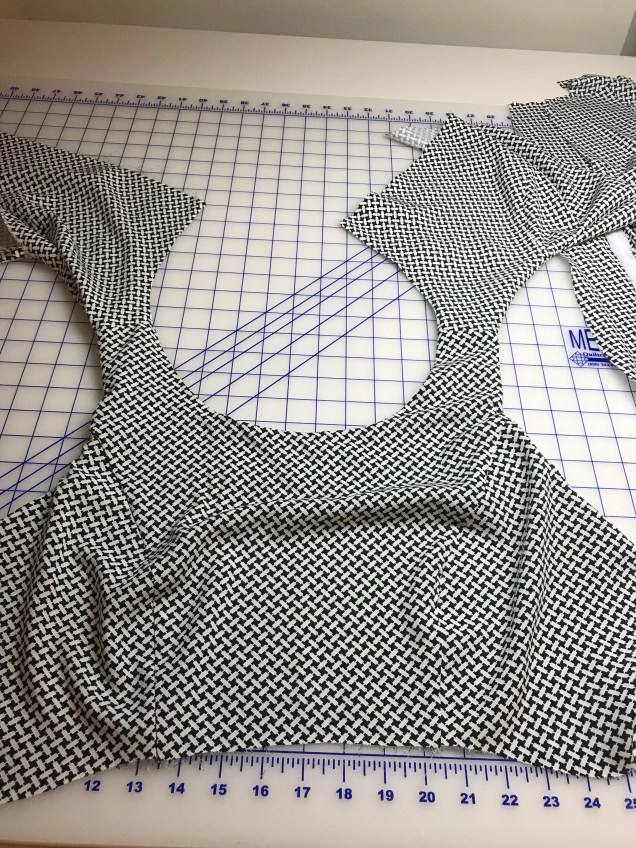
Of the two cuts of piqué that I had in my collection, the traditional birdseye weaves is a bright white and the less traditional one is a softer white. That’s the one that goes better with the dress. In looking at the weave, which looks like a honeycomb, I decided I wanted the elongated pattern to go in a vertical direction in the garment, even though that is the cross-grain.
In this picture of a sample buttonhole you can see the fabric’s directional honeycomb weave
I also decided that the fabric needed to be cut in a single layer to achieve some degree of consistency at the hemline of the adjacent pieces. That meant making a full pattern for the back piece and remembering to cut mirror images of the front, side and sleeve pieces. I ended up labeling each piece “left front”, “right front”, etc. I didn’t want to leave any room for error.
After doing the pattern work and cutting, I wanted to get sewing, so I put off cutting the lining . This turned out to be helpful, because when the jacket was constructed and I needed to attach the shoulder pads, I went ahead and did all the hand sewing that had to be done on the fashion fabric. That cut down on the amount of hand sewing I had to do at the end and made it less daunting.
After trying on the jacket and determining button placement, it was time to test the buttonholes. The buttonholes themselves were fine, but I was having trouble getting them placed exactly where they needed to be. With white fabric I didn’t want to take a chance on using a Frixion pen or even a chalk pencil and pin marking was hard to see. So I decided to try cutting painter’s tape to a width that matched the space from the finished edge of the jacket to exactly where I need to sink the needle at the start of the buttonhole.
I marked the horizontal lines in pen and attached the tape to the sample I was working with. I found I could sink the needle in so that it just brushed the edge of the tape and lined up exactly with the pen marking. I’m definitely going to use this technique again.
The other breakthrough in this project was that the lining jump hems didn’t trip me up. I serge finished and pressed under the cut edges, attached them to the serge finished edges of the fashion fabric hems (for the sleeves) and hem facings (for the body), hand stitched them in place and lightly steamed the lining. Done!
Welcome to In the Sketchbook, a monthly look at fashion design sketches that we are working on for ourselves. Sketching garments on a personal croquis is a great way for the individual couture enthusiast to move beyond the use of commercial patterns and into a world of personalized design! It can be intimidating at first, but with a little bit of practice it becomes something you look forward to. Join us for a look of what we have going on In the Sketchbook! Brought to you by Wendy Grossman of Couture Counsellor and Steph King from Siouxzeegirl Designs.
Another month has flown by and it’s time to see what’s in the Sketchbook. I promise I’m sewing and I’ll have a finished garment ready to show and discuss with you next week. In fact, there should be three in rapid succession. Please bear with me a little longer.
To start off I’d like to show you a sketch I did first thing Monday morning after attending another fabulous hands-on workshop with Sarah Veblen over the weekend.
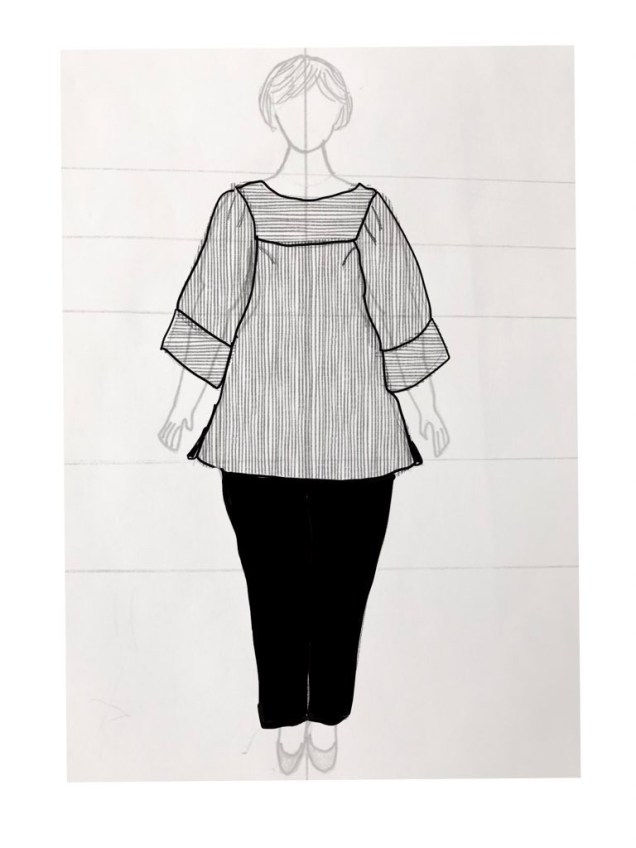
Sarah shared some inspiration pictures with us and when I was going over my class notes to solidify what I’d learned and compile a list of follow-up things I needed to do (a good habit I’m trying to cultivate), I found my copy of those pictures folded into my notebook. Looking at one of the pictures again, I immediately thought about making this casual tunic to wear with black pants.
Also during the workshop I happened to mention to Sarah that I’m struggling with sketching fullness at the hems of garments. She showed me her method step-by-step on a sticky note and I practiced it right away to get the hang of it.
Apart from sewing my business travel wardrobe this month, I have bias on the brain. Our ASG neighborhood group, Sew Chicago, has adopted “Show Your Bias” as the group challenge for next fall’s fashion show and Stephanie King and I are doing a bias presentation to the group in May.
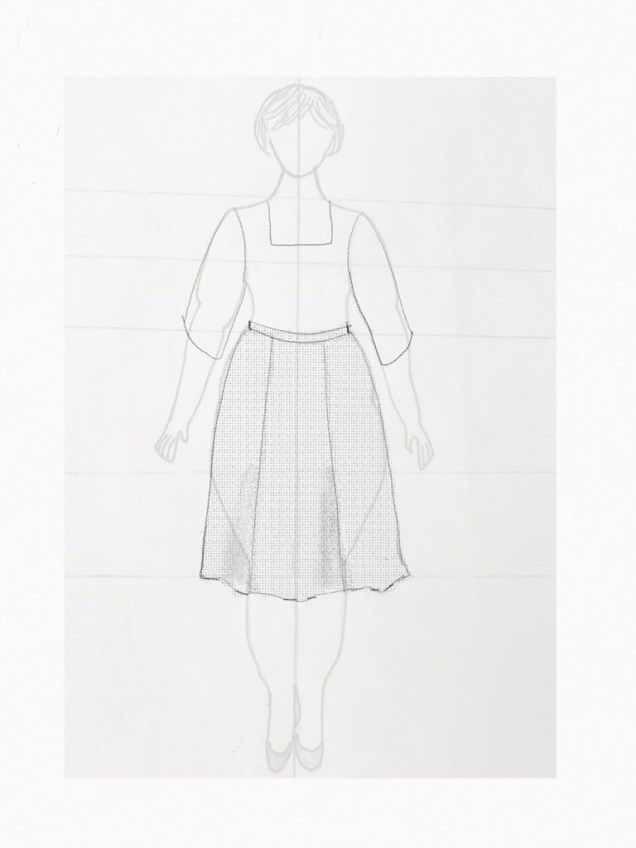
Ever since I saw the exhibit “Making Mainbocher” at the Chicago History Museum, I’ve been thinking about how skilled Mainbocher was at giving serious work suits and even uniforms a feminine flair. None of his skirts were restrictive pencil skirts and most, if not all of them, were cut on the bias. One tweed suit in particular caught my eye. I noticed that he not only made the skirt on the bias, but he also inserted godets. I’m not convinced I need godets to get the effect I’m after, so I sketched this skirt to make with a lovely gray tweed wool I found last month at Haberman’s Fabrics in Royal Oak, Michigan.
Then I started wondering where else I could use bias and whether just part of a garment on the bias would work. So I played around with this skirt and top combination.
I think it looks better with the skirt echoing the hem of the top.
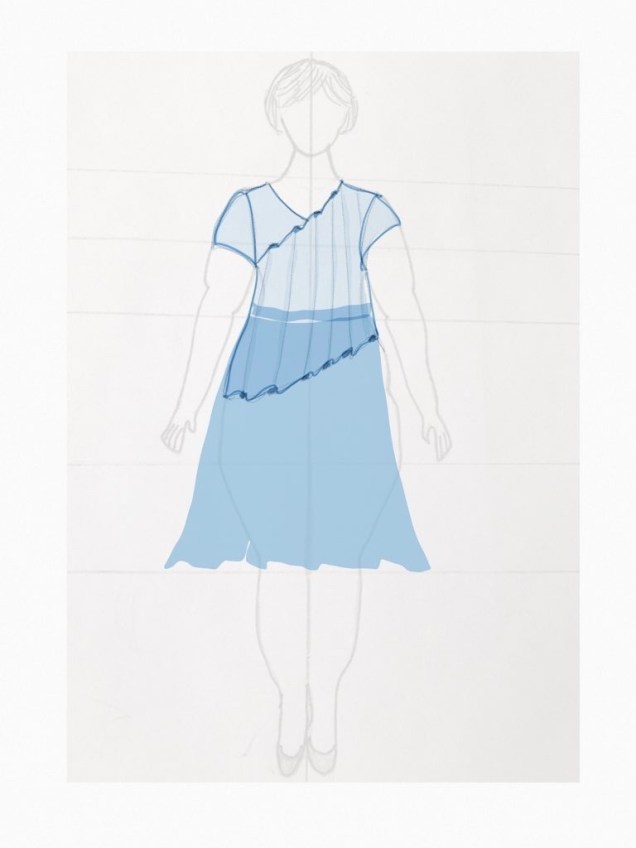
I tried this ensemble with a sheer on top, but the jury is still out on it.
That’s it for now. Be sure to check out what fabulous designs my dear friend Stephanie King of Siouxzeegirl Designs is showing at 10 Sewing Machines & a Serger. We’d love to see and hear about what you’re sketching, so please leave a comment.
Welcome to In the Sketchbook, a monthly look at fashion design sketches that we are working on for ourselves. Sketching garments on a personal croquis is a great way for the individual couture enthusiast to move beyond the use of commercial patterns and into a world of personalized design! It can be intimidating at first, but with a little bit of practice it becomes something you look forward to. Join us for a look of what we have going on In the Sketchbook! Brought to you by Wendy Grossman of Couture Counsellor and Steph King from Siouxzeegirl Designs.
I’m afraid I find myself running short of time and I’m a bit late in getting this posted. But, I reminded myself that this is my tenth post in this series, which is a nice accomplishment, right?
So, this month I’m working on a capsule wardrobe for a week-long business trip to a warm climate. I’m going to need to dress conservatively, so I definitely need to fill in with a few new pieces. In a mentoring session, Sarah Veblen made some suggestions I hadn’t even considered and I think it’s going to work.
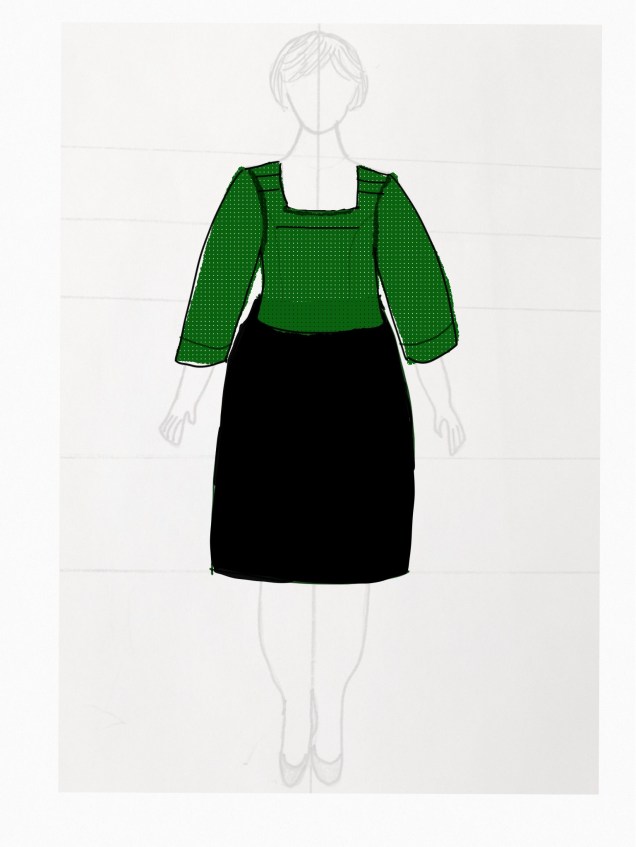
The first piece I started making a pattern for is a version of a tucked blouse inspired by the class I took recently with Mary Ray. Here was my original sketch, which I’ve shown you before.
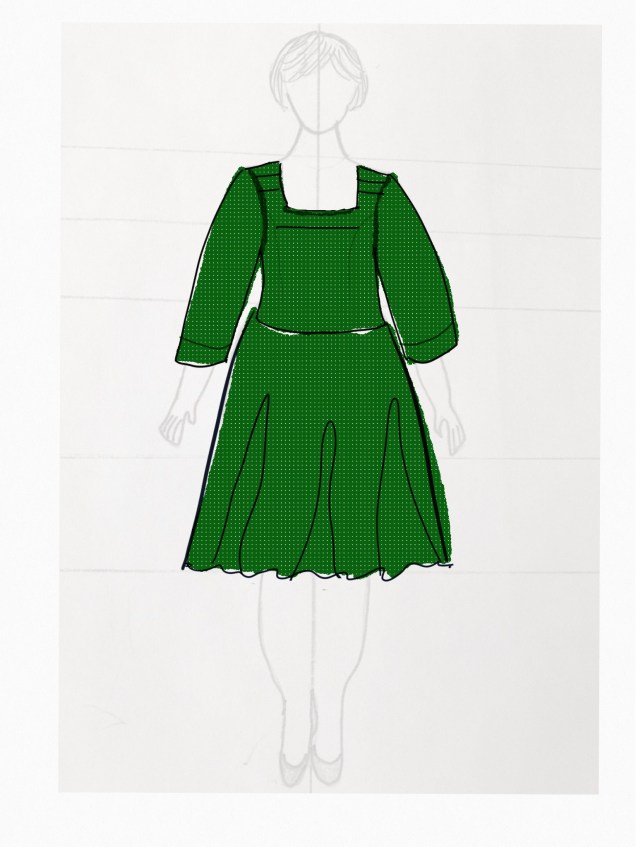
I chose the fabric and all was good, right? Well, not exactly. it turns out that the scale of this sketch is way off. My armscye princess seams actually come up higher than they are in this sketch and my most flattering square-ish neckline is lower, meaning there’s not enough real estate to fit in the number of tucks I’d planned or their placement. Here is a very rough sketch aimed at correcting those issues.
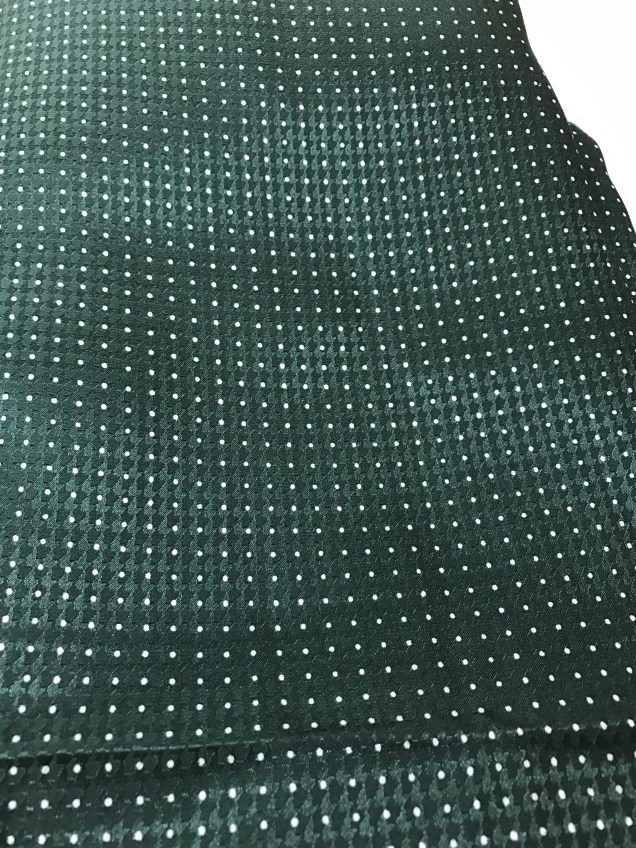
I think I’ll like it. The filler color was meant to represent this lovely silk that not only has tiny dots but a subtle houndstooth jacquard weave.
Fortunately, I have enough fabric to make a swingy skirt for a two-piece dress when I get back.
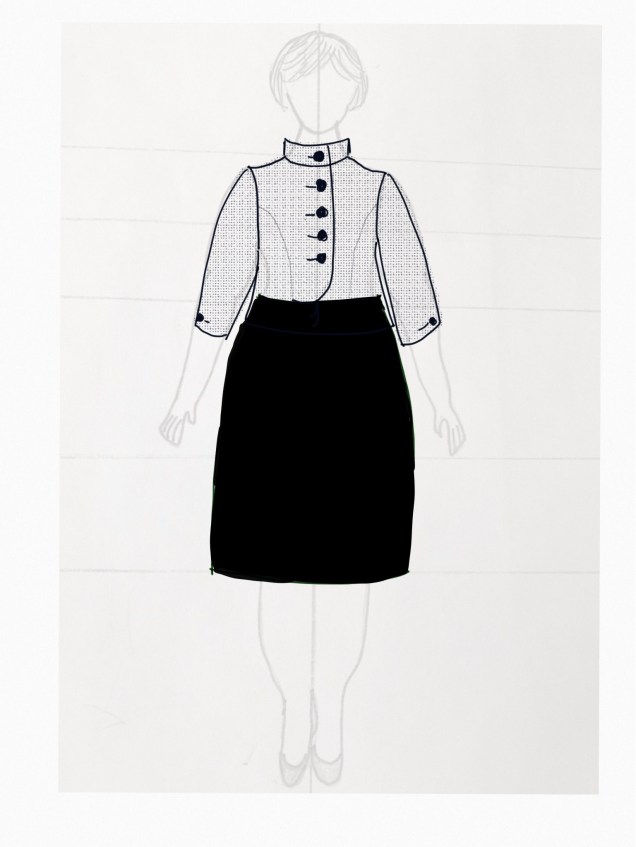
As you can see, I’m planning to wear the blouse with a black pencil skirt instead of the yet-to-be-developed trumpet skirt. This will be made from linen and also worn with this jacket.
If you think the jacket looks familiar, you’re right. I sketched it in blue last month.
The fabric for the jacket is a fabulous black, taupe and beige checked linen that looks like wool. I’m mulling over button choices at the moment.
When I spoke with Sarah, I was thinking I needed to make a jacket dress, but then she had me pull my Spoonflower dress out along with some fabric for a possible jacket to go with it. That’s how this idea came about.
I happened to have two different types of white cotton piqué for past summer projects that were planned but never implemented. And these perfect buttons were also in my collection.
That’s it for this month. Be sure to check out what fabulous designs my dear friend Steph King of Siouxzeegirl Designs is showing at 10 Sewing Machines & a Serger. We’d love to see and hear about what you’re sketching, so please leave a comment.
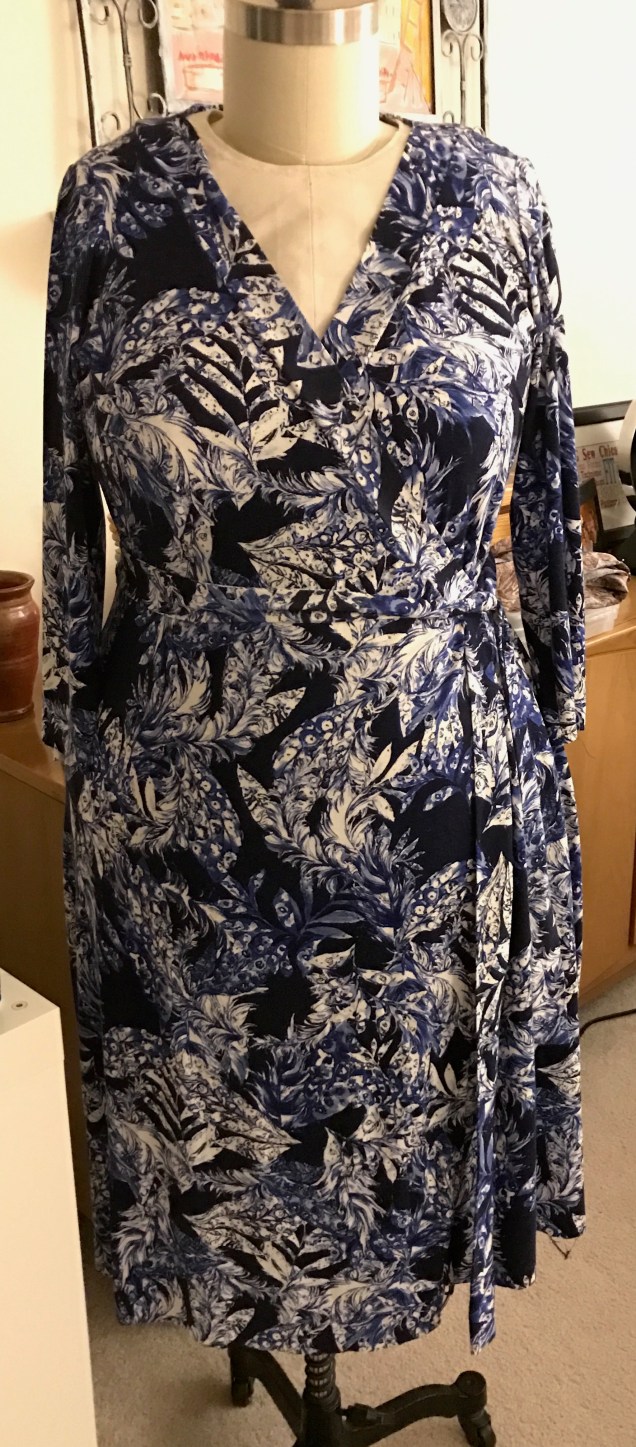
I was in college when Diane von Furstenberg’s wrap dress found its way into almost every woman’s closet, but when I tried it on the store I didn’t think it was for me. So, when Jenny Rushmore introduced her line of sewing patterns for curvy women, Cashmerette Patterns, with a curvy-friendly version of the wrap dress called Appleton, I bought a copy of the pattern but wasn’t sure I’d ever make one for myself. Then I saw how fabulous it looks on my lovely friend Stephanie King of Siouxzeegirl Designs and she let me try hers on. It looked really nice, so I decided to give it a try.
It may seem odd, but the biggest mental barrier I had to overcome besides my skepticism about how the dress would look on me was my past difficulties with starting from someone else’s pattern. I knew this is a very well-drafted pattern, but my experience has been that when I start with someone else’s pattern I have to make a ton of adjustments to get it to fit me. And I did have to grade across sizes to get the hips to fit without falling off my shoulders. I actually made two mock-ups and almost ended up making a third, which seems absurd for a knit dress, but I couldn’t help myself.
My job was made easier by the fact that my dress form is now padded to resemble my figure pretty closely. This was another thing I had resisted doing because i didn’t think I wanted to live with a reminder of the shape my body is in now. But, I agreed to participate in a pilot class on draping that Sarah Veblen was developing and so I made a basic dress sloper out of heavy weight muslin from my bodice and skirt master patterns for a workshop several months ago. Sarah draped out pretty the wearing ease until it was quite form-fitting. I installed a heavy-duty separating zipper down the back and had my new dress form cover. I then proceeded to stuff the space between the muslin and my dress form with foam pads from Fabulous Fit and batting. I got really frustrated in the draping class and convinced myself that I’m no good at draping and this entire exercise was a giant waste of time that would have been better spent sewing. Then when I was working on this project, after trying on the first mock-up, I put it on the dress form and the next thing I knew I was draping adjustments.
For the mock-ups, I used cotton interlock knit from Joann’s (with a coupon, of course). The first mock-up gapped at the bust and clung in all the wrong places, so those pictures will not be posted anywhere.
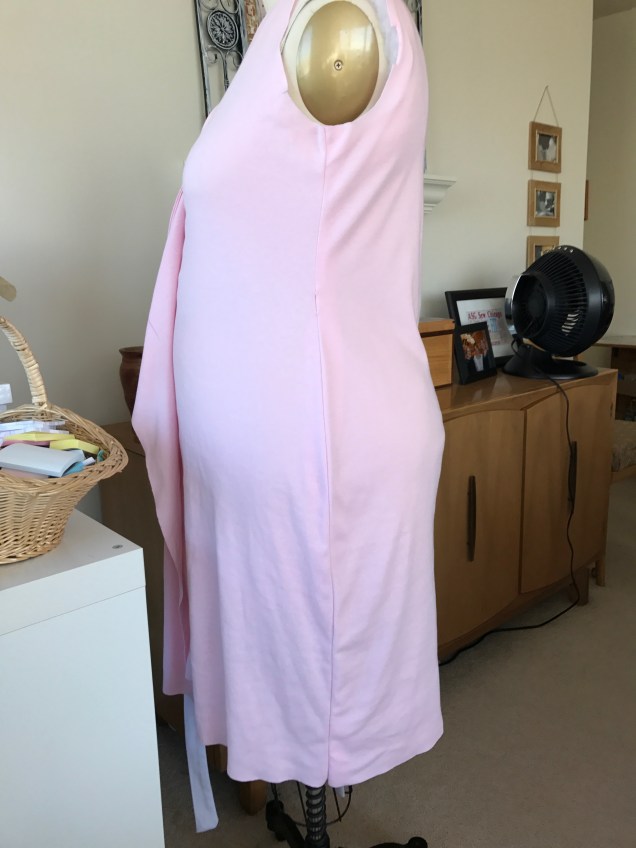
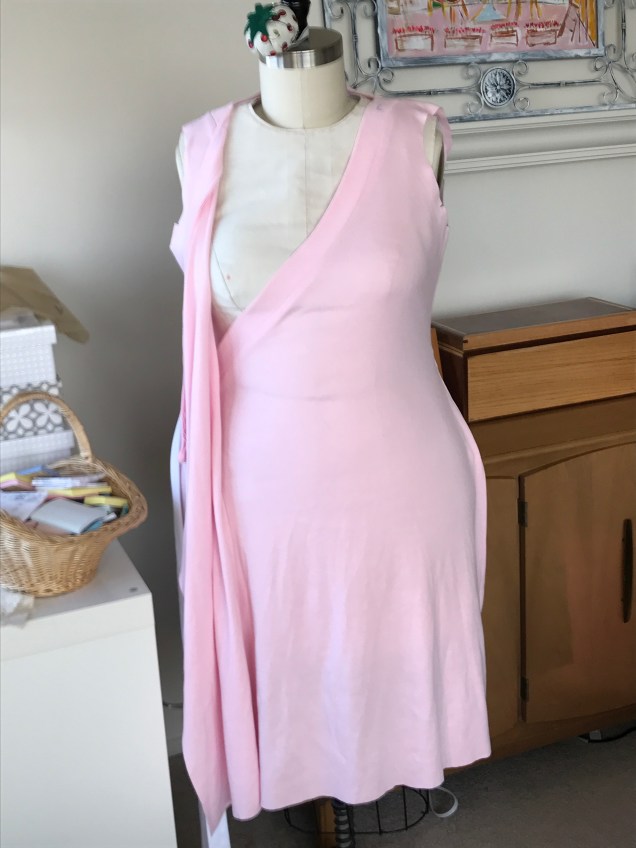
In the first mock-up, I noticed that the side seam was more toward the back than my master pattern’s side seam, plus it swung to the back at the hips. Because I needed to increase the circumference there, I decided to bring the side seam in line with the side seam on my master pattern so I could be sure the final version was hanging plumb. Here is a side view of muslin number 2.
That was all well and good, but I made a mistake that is typical for me, which is to add too much to the hips and taper below that and end up with what I refer to as the jodhpur effect. One of the suggestions Sarah Veblen made in a mentoring session was to have the skirt flare out a bit instead of dropping straight from the hip. That adjustment really helped.
As you can see, there is no center front marking and no horizontal balance lines. The pattern does not have center front marked, which makes sense because it’s different on different types of figures. I had marked horizontal balance lines on my first mock-up but Sarah told me that wasn’t necessary in this dress, which she had fitted on other students. Still, when I was working to adjust the first muslin it helped to work with the front and back independently so I could get them to be as level as possible.
Another thing that I did early on was lower the waist so that the ties went around my waist. The pattern is drafted so that the wrap is higher than the natural waist, almost Empire height. The problem with lowering the waist was that it created gaposis at the bust. So, I put the waist back where it wanted to go.
Sarah suggested that I might want to add shaping darts to the back. Darts were my nemesis during the draping class, but I could see how the fabric really “wanted” to have them added.
As you can see, I pinned the darts to the outside, which is not what I was supposed to do. It got the job done here, but I’m trying to learn to make my fingers manipulate the fabric so that the dart intake is toward the dress form. I’ll get there. Eventually.
I wanted to make this dress in an ITY knit, but the ones in my collection were in quantities suitable for knit tops, not a dress. I had trouble finding ITYs (only because I was looking for them!) and then I found this lovely rayon-Lycra knit from Stone Mountain & Daughter. I was hesitant, thinking that Rayon is too drapey and possibly clingy for a dress on me, but this fabric has a lovely dry hand and worked beautifully.
Next came the challenge of hemming. Again, I’m really spoiled by working with master patterns developed with Sarah Veblen because when the horizontal balance lines are parallel to the floor, so is the cut edge of the fabric at the bottom. Hemming is a straightforward process of turning up the fabric an even amount all the way around and stitching. Not so on a pattern that is not customized to a particular body.
I could have asked a sewing friend to pin the hem for me, or even paid my dry cleaner to do it, but I wanted to get this project finished and move on to what’s next. My first attempt was to use the contraption that stands on the floor and you squeeze a bulb so chalk dust spits out on your dress as you turn in place. That didn’t work at all. So, I resorted to the technique I’ve used for fitting myself or having Sarah analyze my fit issues long distance – setting up the tripod and camera and using a 10-second delay to take a series of pictures.
First I pinned where I thought the hem should be, then I looked at the pictures and saw where it was uneven. I made adjustments to the pinning and took more pictures. After two rounds of this, I got it to where I was satisfied.
For the actual pinning, I found it was much easier to mark a few reference points with pins on the dress form and then work on a flat surface. When I got it to where it looked straight to me, I trimmed where the hem allowance was deepest, pressed and stitched. I adjusted the pattern, but where the hem ends up on any individual dress will probably vary with the type of knit I’m using.
As you might be able to tell from this picture, I’m still shying away from having the ties go across my tummy. So, my solution is to tie them at the side so that they only go across the back. The other thing I debated was whether to add a hidden snap in the front to prevent unscheduled appearances of lingerie. I was worried that it might pull, but I tested it out with a small safety pin and discovered it’s not noticeable. So, I’m adding a small nylon snap for security.
The dress is incredibly comfortable to wear and, now that I’ve done the pattern work, will be pretty quick to sew again.


