
Both my Spoonflower dress and my bias challenge dress are sleeveless, so an extra layer to extend them into 3-season wear is nice to have. I filled this wish list item with a black rayon knit cardi that follows the curve of the Empire seam on the dress.


For the pattern, I used my no-closure topper. I thought I would use the pattern I had made for the white piqué jacket as a guide for the hemline, but I quickly learned that translating the princess seams pieces to a pattern that gets its shaping from pleats and darts is not a straightforward process. Then again, it wasn’t rocket science either. A little draping on my dress form got the job done.
As I said, the pattern uses pleats at the shoulders, along with darts for shaping. It also has pleats at center back where I rotated out the princess seams. So, getting pleats into the knit was my first construction challenge.
It occurred to me that I could hold the shoulder pleats in place and stabilize the shoulder seam in one fell swoop if I used fusible stay tape. (What did we do before all these fabulous fusible products came on the market?) My favorite brand is Design Plus. I used the straight version for the shoulder seams, then sewed the seams together. This had the added benefit of stabilizing the shoulder seams, which I probably should do all the time in knits but don’t. For the pleats in the center back at the neck, I used the bias version of the same product.


I used this project as an opportunity to get comfortable with the cover hem function of my new-to-me Babylock Evolution. I practiced on multiple samples, following tips from Gail Yellen’s Craftsy Class and Pamela Leggett’s Threads video and book.
I snipped the seam allowance at the point where the hem would turn under so I could have the hem allowance seam allowance face the opposite way from the garment seam allowance, thus reducing the number of layers the machine had to deal with when it crossed a seam. It also made the finished product look and feel nice and flat.
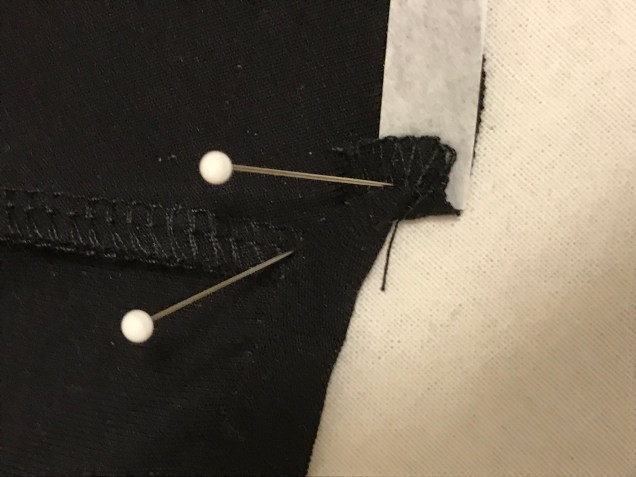
To stabilize the hem, I used Ultra Soft fusible web at the cut edge, first pressing what Gail Yellen calls a “memory crease” with the backing paper still on. The curves required lots of snips, pins and patience as I worked my way around the entire periphery of the garment.


The next steps were to remove the paper backing, pin where needed and press to glue the layers together. This ensured that I wouldn’t get any fabric creeping and bunching or twisting as I sewed the cover hem.


I’m glad I prepped multiple samples for the coverstitching because I found that things went great on the first sample and the left needle came unthreaded on the second. After rethreading the machine a few times and having the same issue, I found a more detailed threading diagram in the machine manual and discovered that I was missing one piece of the needle thread path. Problem solved.
Except that wasn’t my only problem. I made what all the serger teachers say is the most common mistake made on serger/coverstitch machines multiple times, which is stitching when the presser foot is in the up position. I kept forgetting that lifting up the presser foot to its highest position so I could position the fabric under the needles and then letting go still leaves it in the up position. The lever has to be lowered to get the foot all the way down. I got to the point where I said out loud “remember to put the presser foot all the way down” whenever I had to start a new line of stitching. My cat didn’t get annoyed and I got the job done on the entire body of the garment as well as the two sleeve hems.
So, now I’m not intimidated by the coverstitch function of my serger, plus I have a nice new layering piece to wear.
