Frankenpatterns – Cute Name, Wrong Vibe

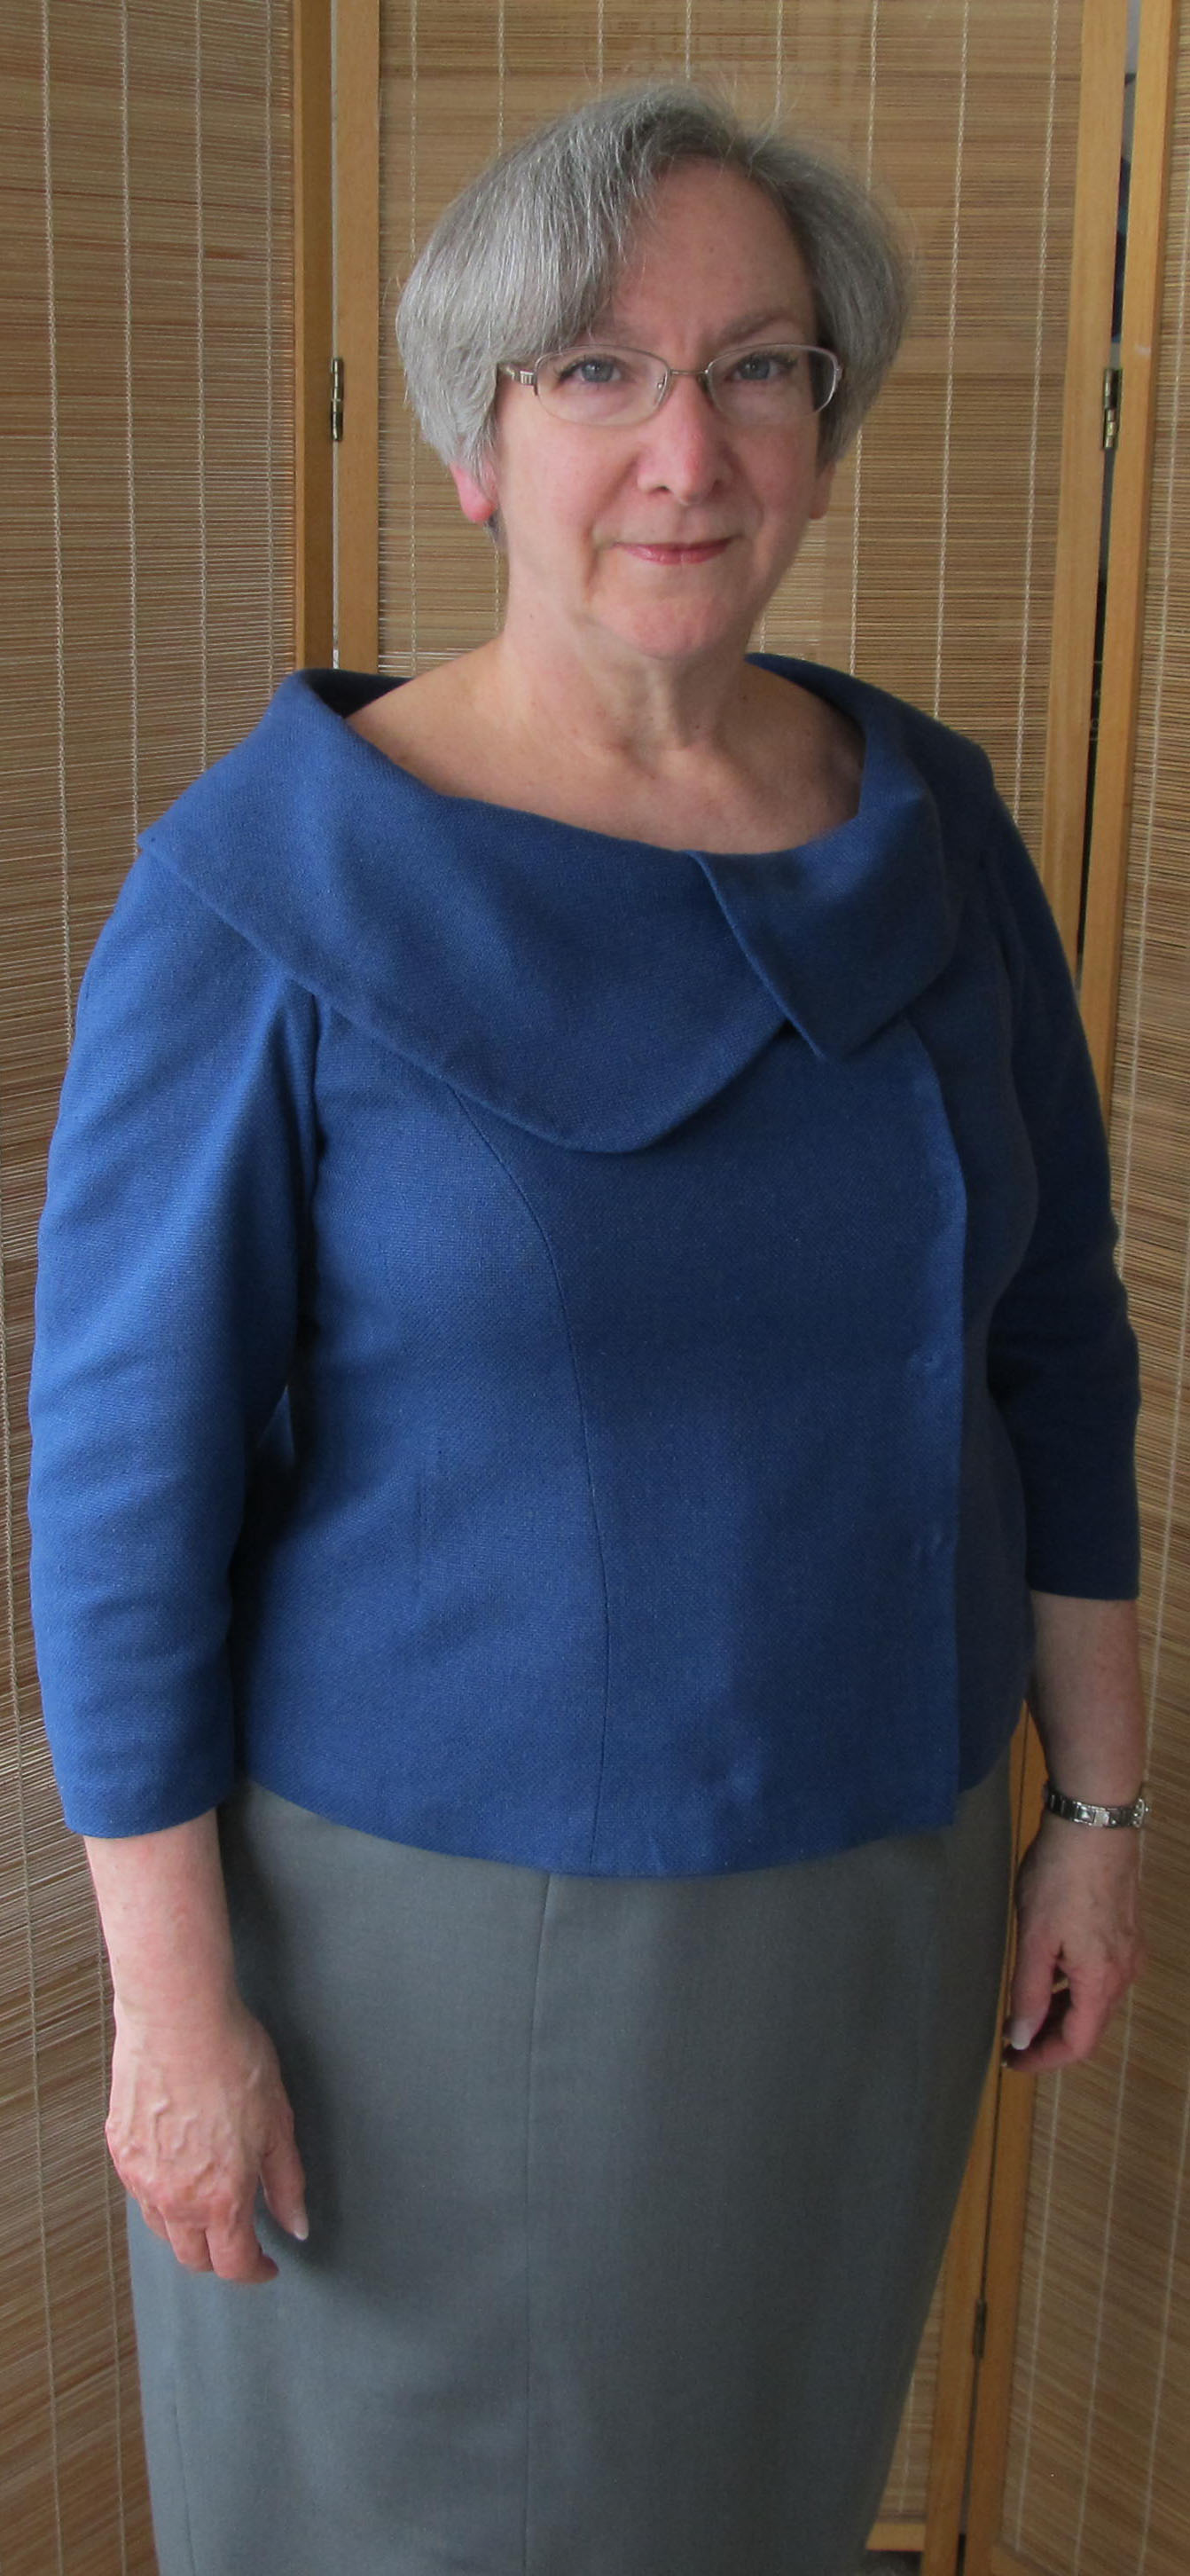
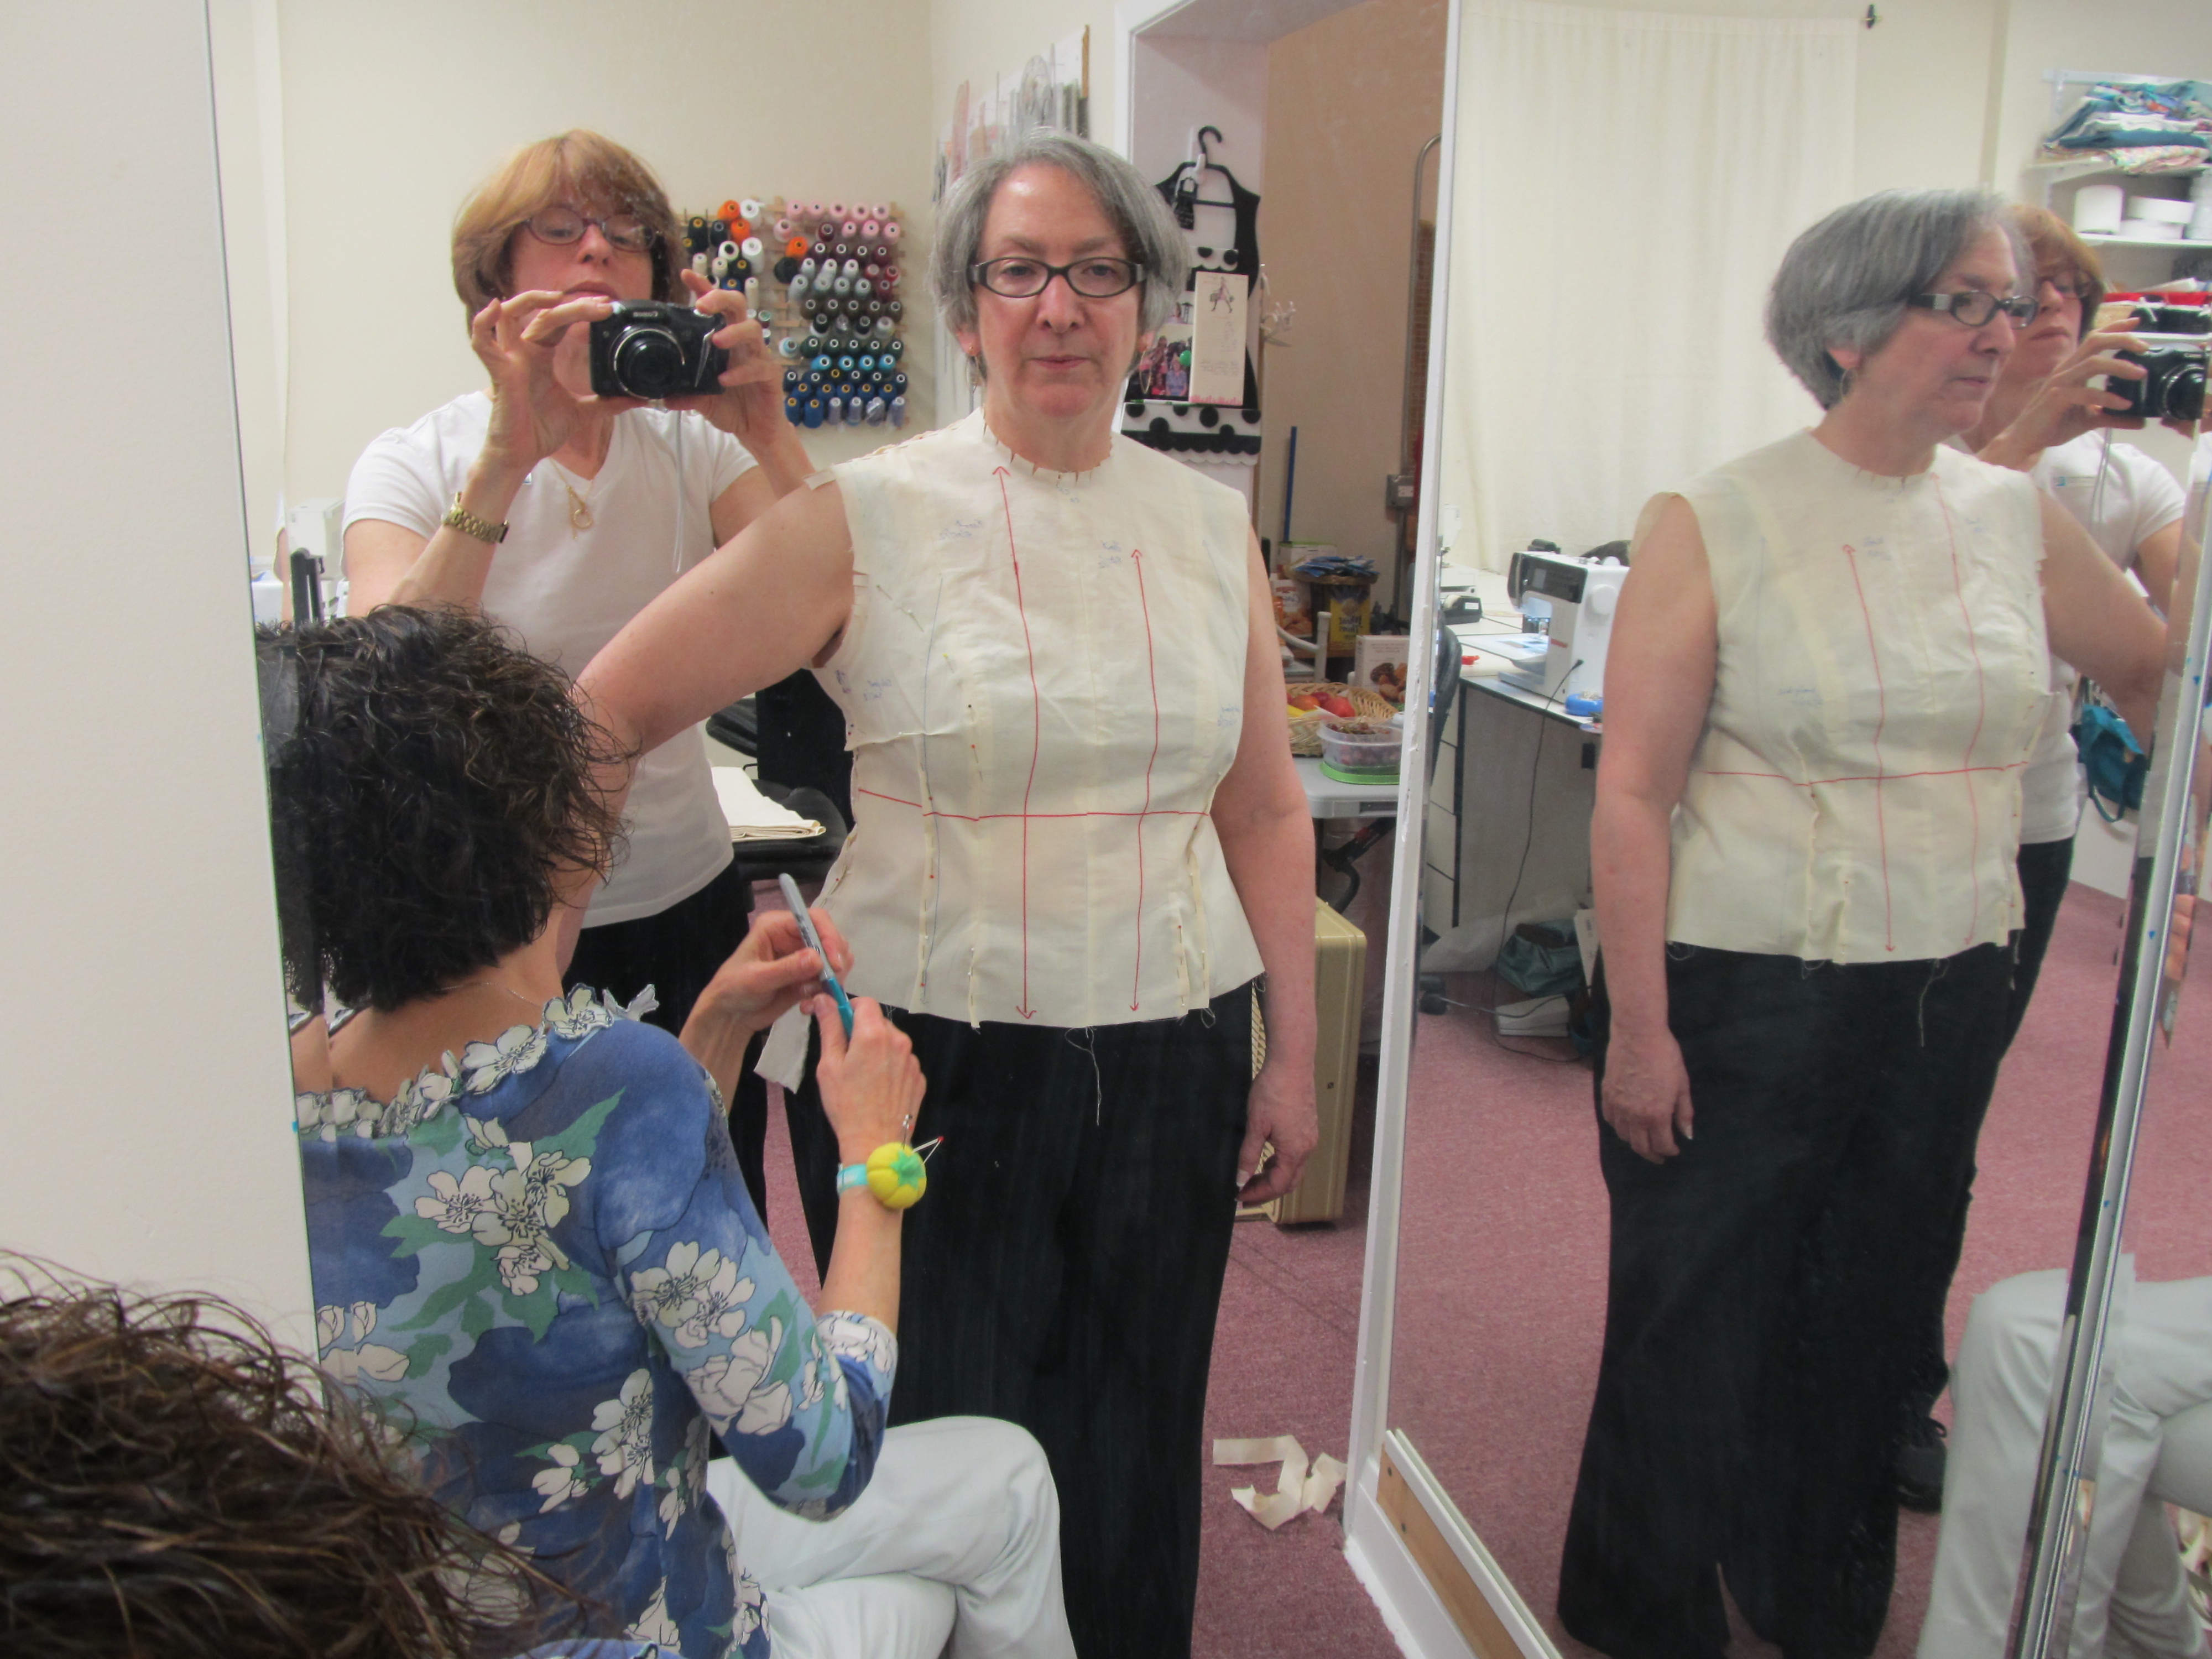
Frankenpatterns is a word that some sewists are using to describe projects they make by combining elements of two or more patterns. I have some issues with the term. First, this isn’t anything new. I know there are some experienced sewists who never deviate from a pattern, but many of us have been pulling details from one pattern and grafting them onto another without thinking we were doing anything out of the ordinary. A case in point is this two-piece dress that  I made by combining my sloper, or basic fit, bodice pattern and the neckline and collar from Vogue Pattern 8667. V8667, Misses'/Misses' Petite  Dress

IMG_0003FYI, the collar is just a rectangle cut on the bias. The pattern doesn’t say to interface it but I always interface my collars and I think it helped with this one.

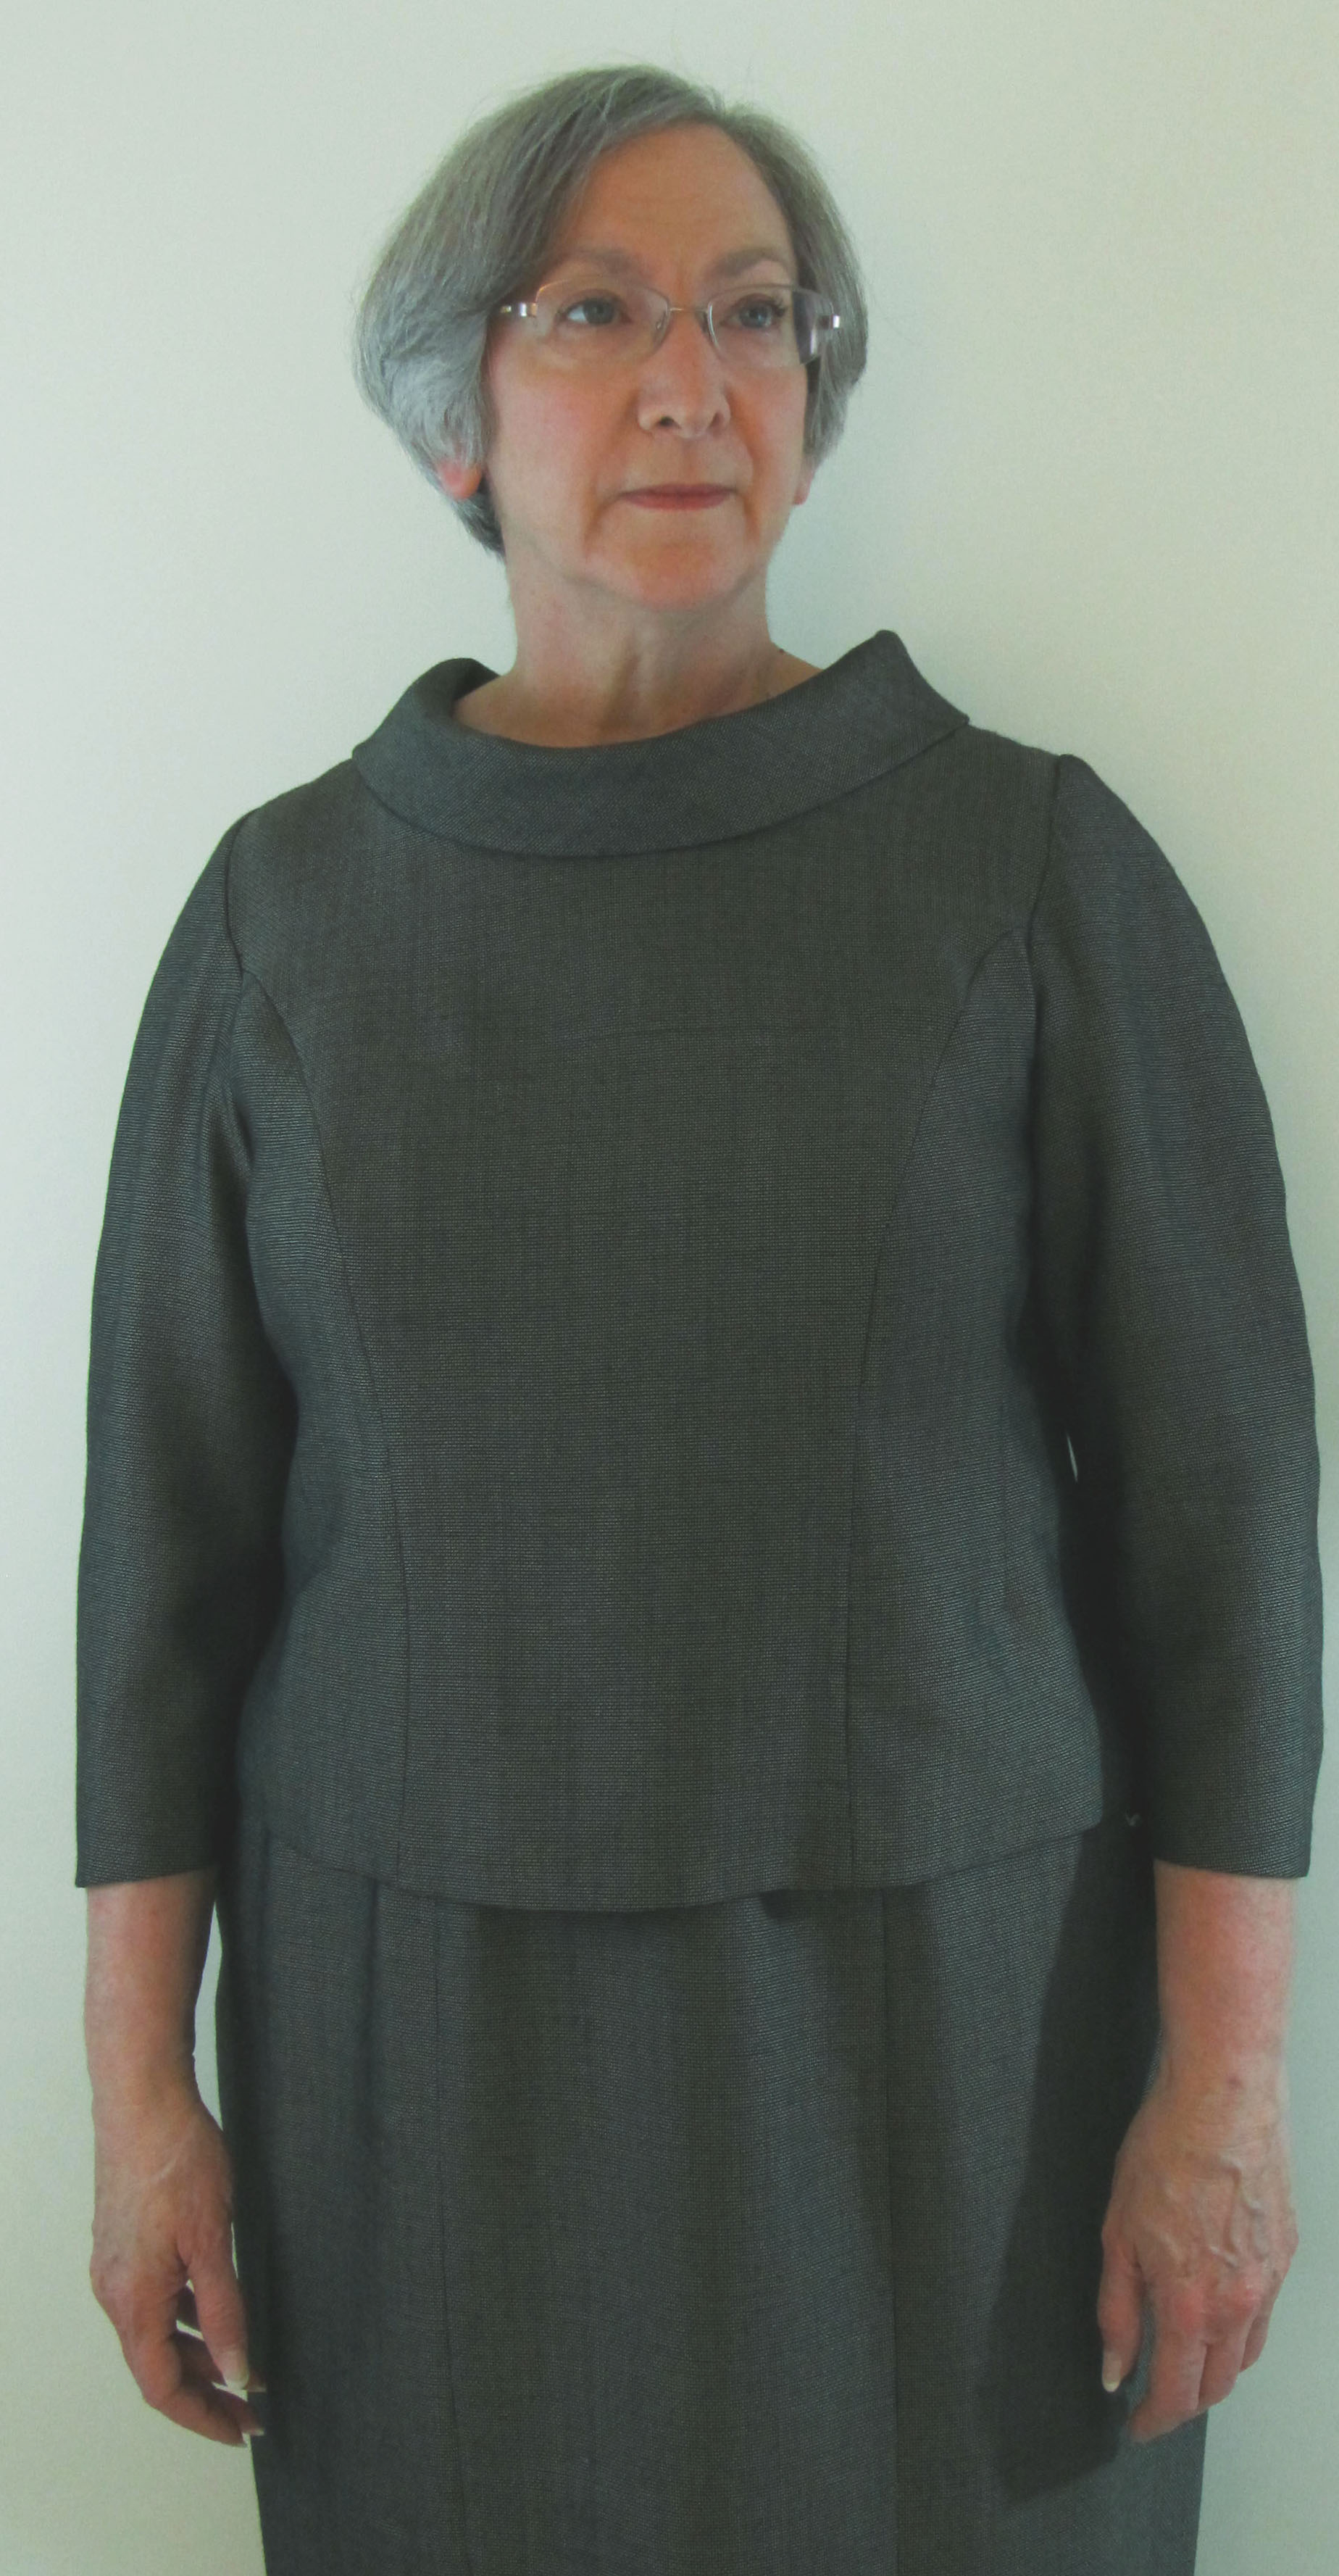
I also used the same neckline for a black silk two-piece dress with no sleeves and no collar. Black 2 pc dress

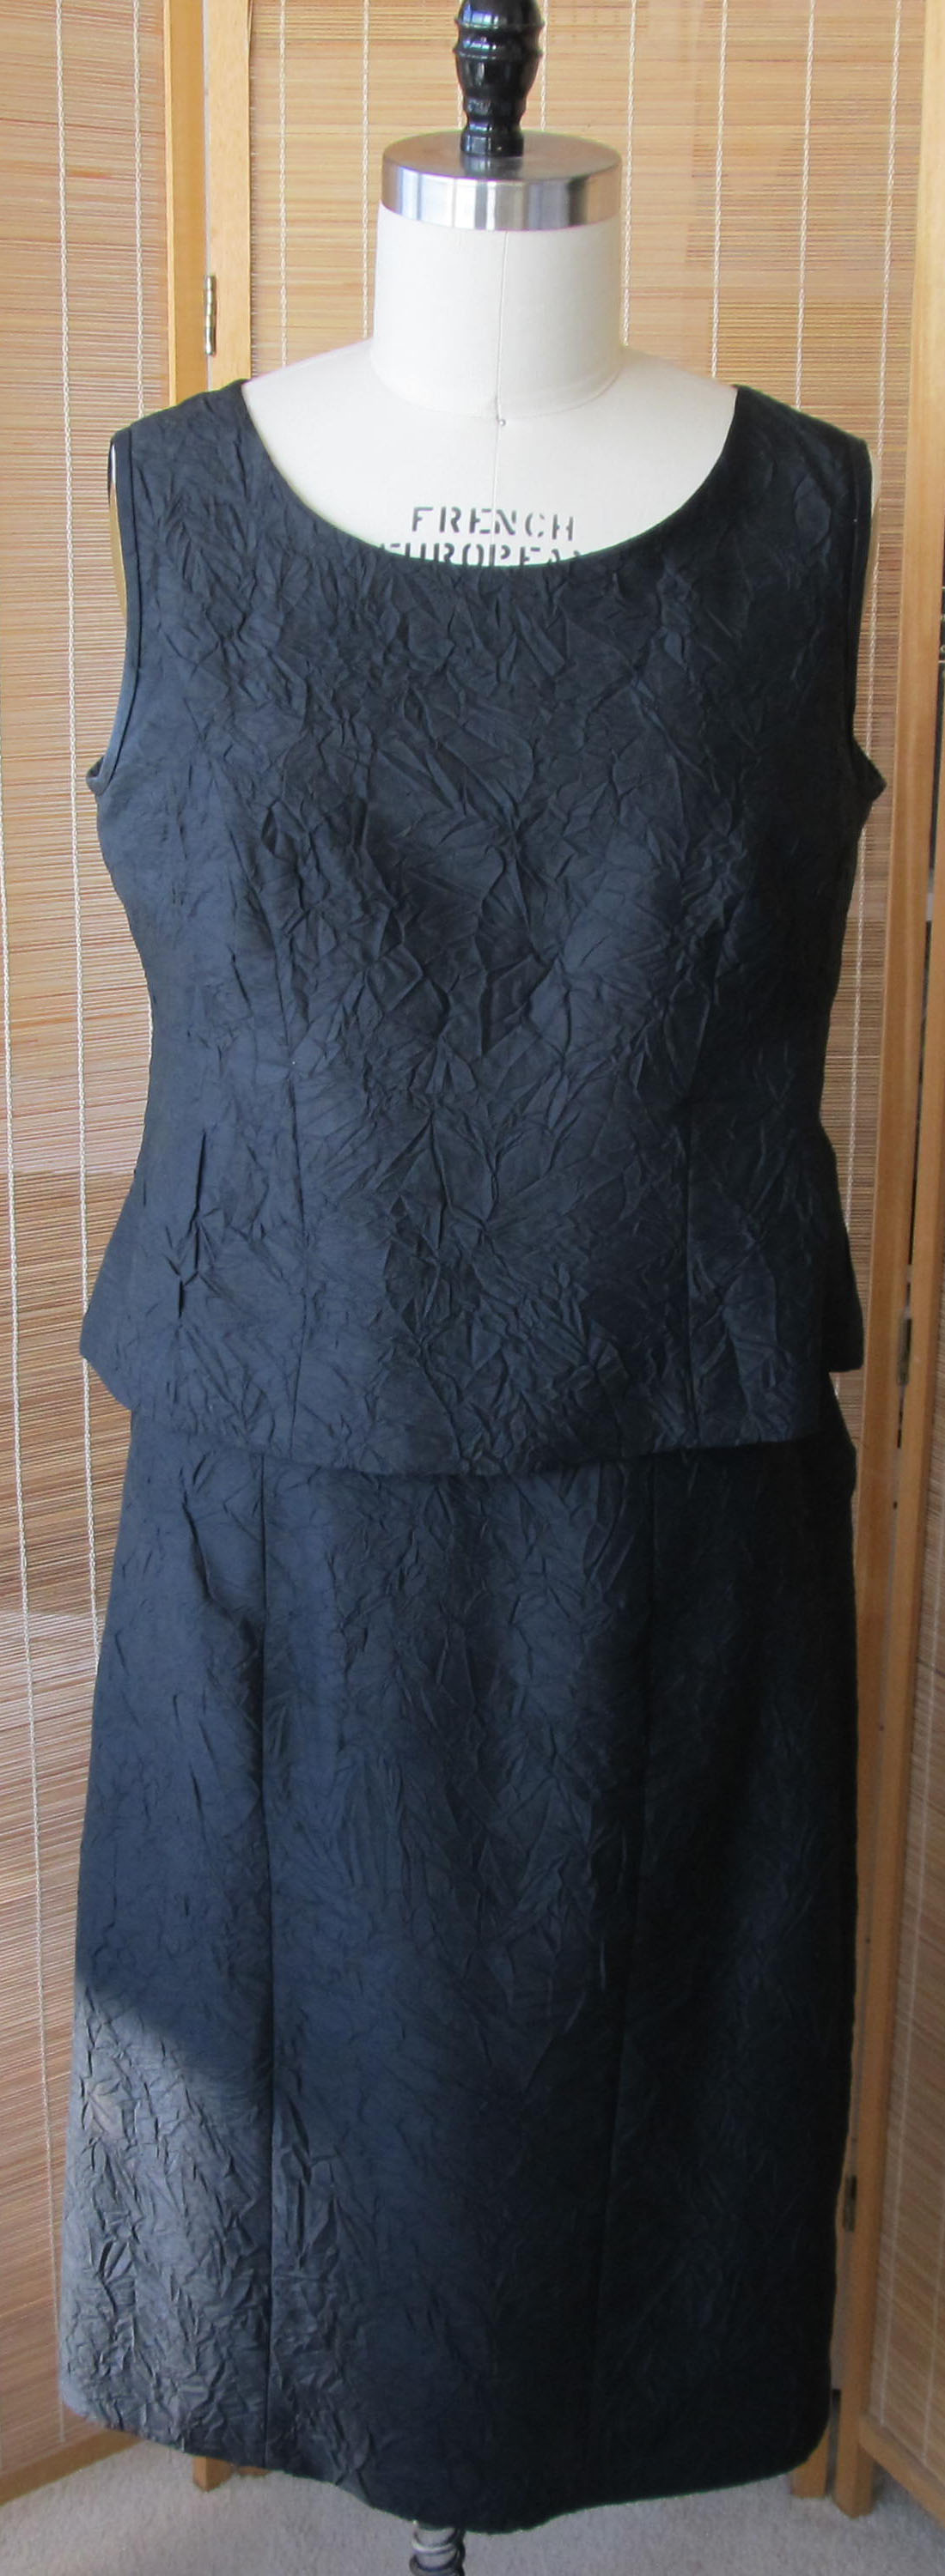
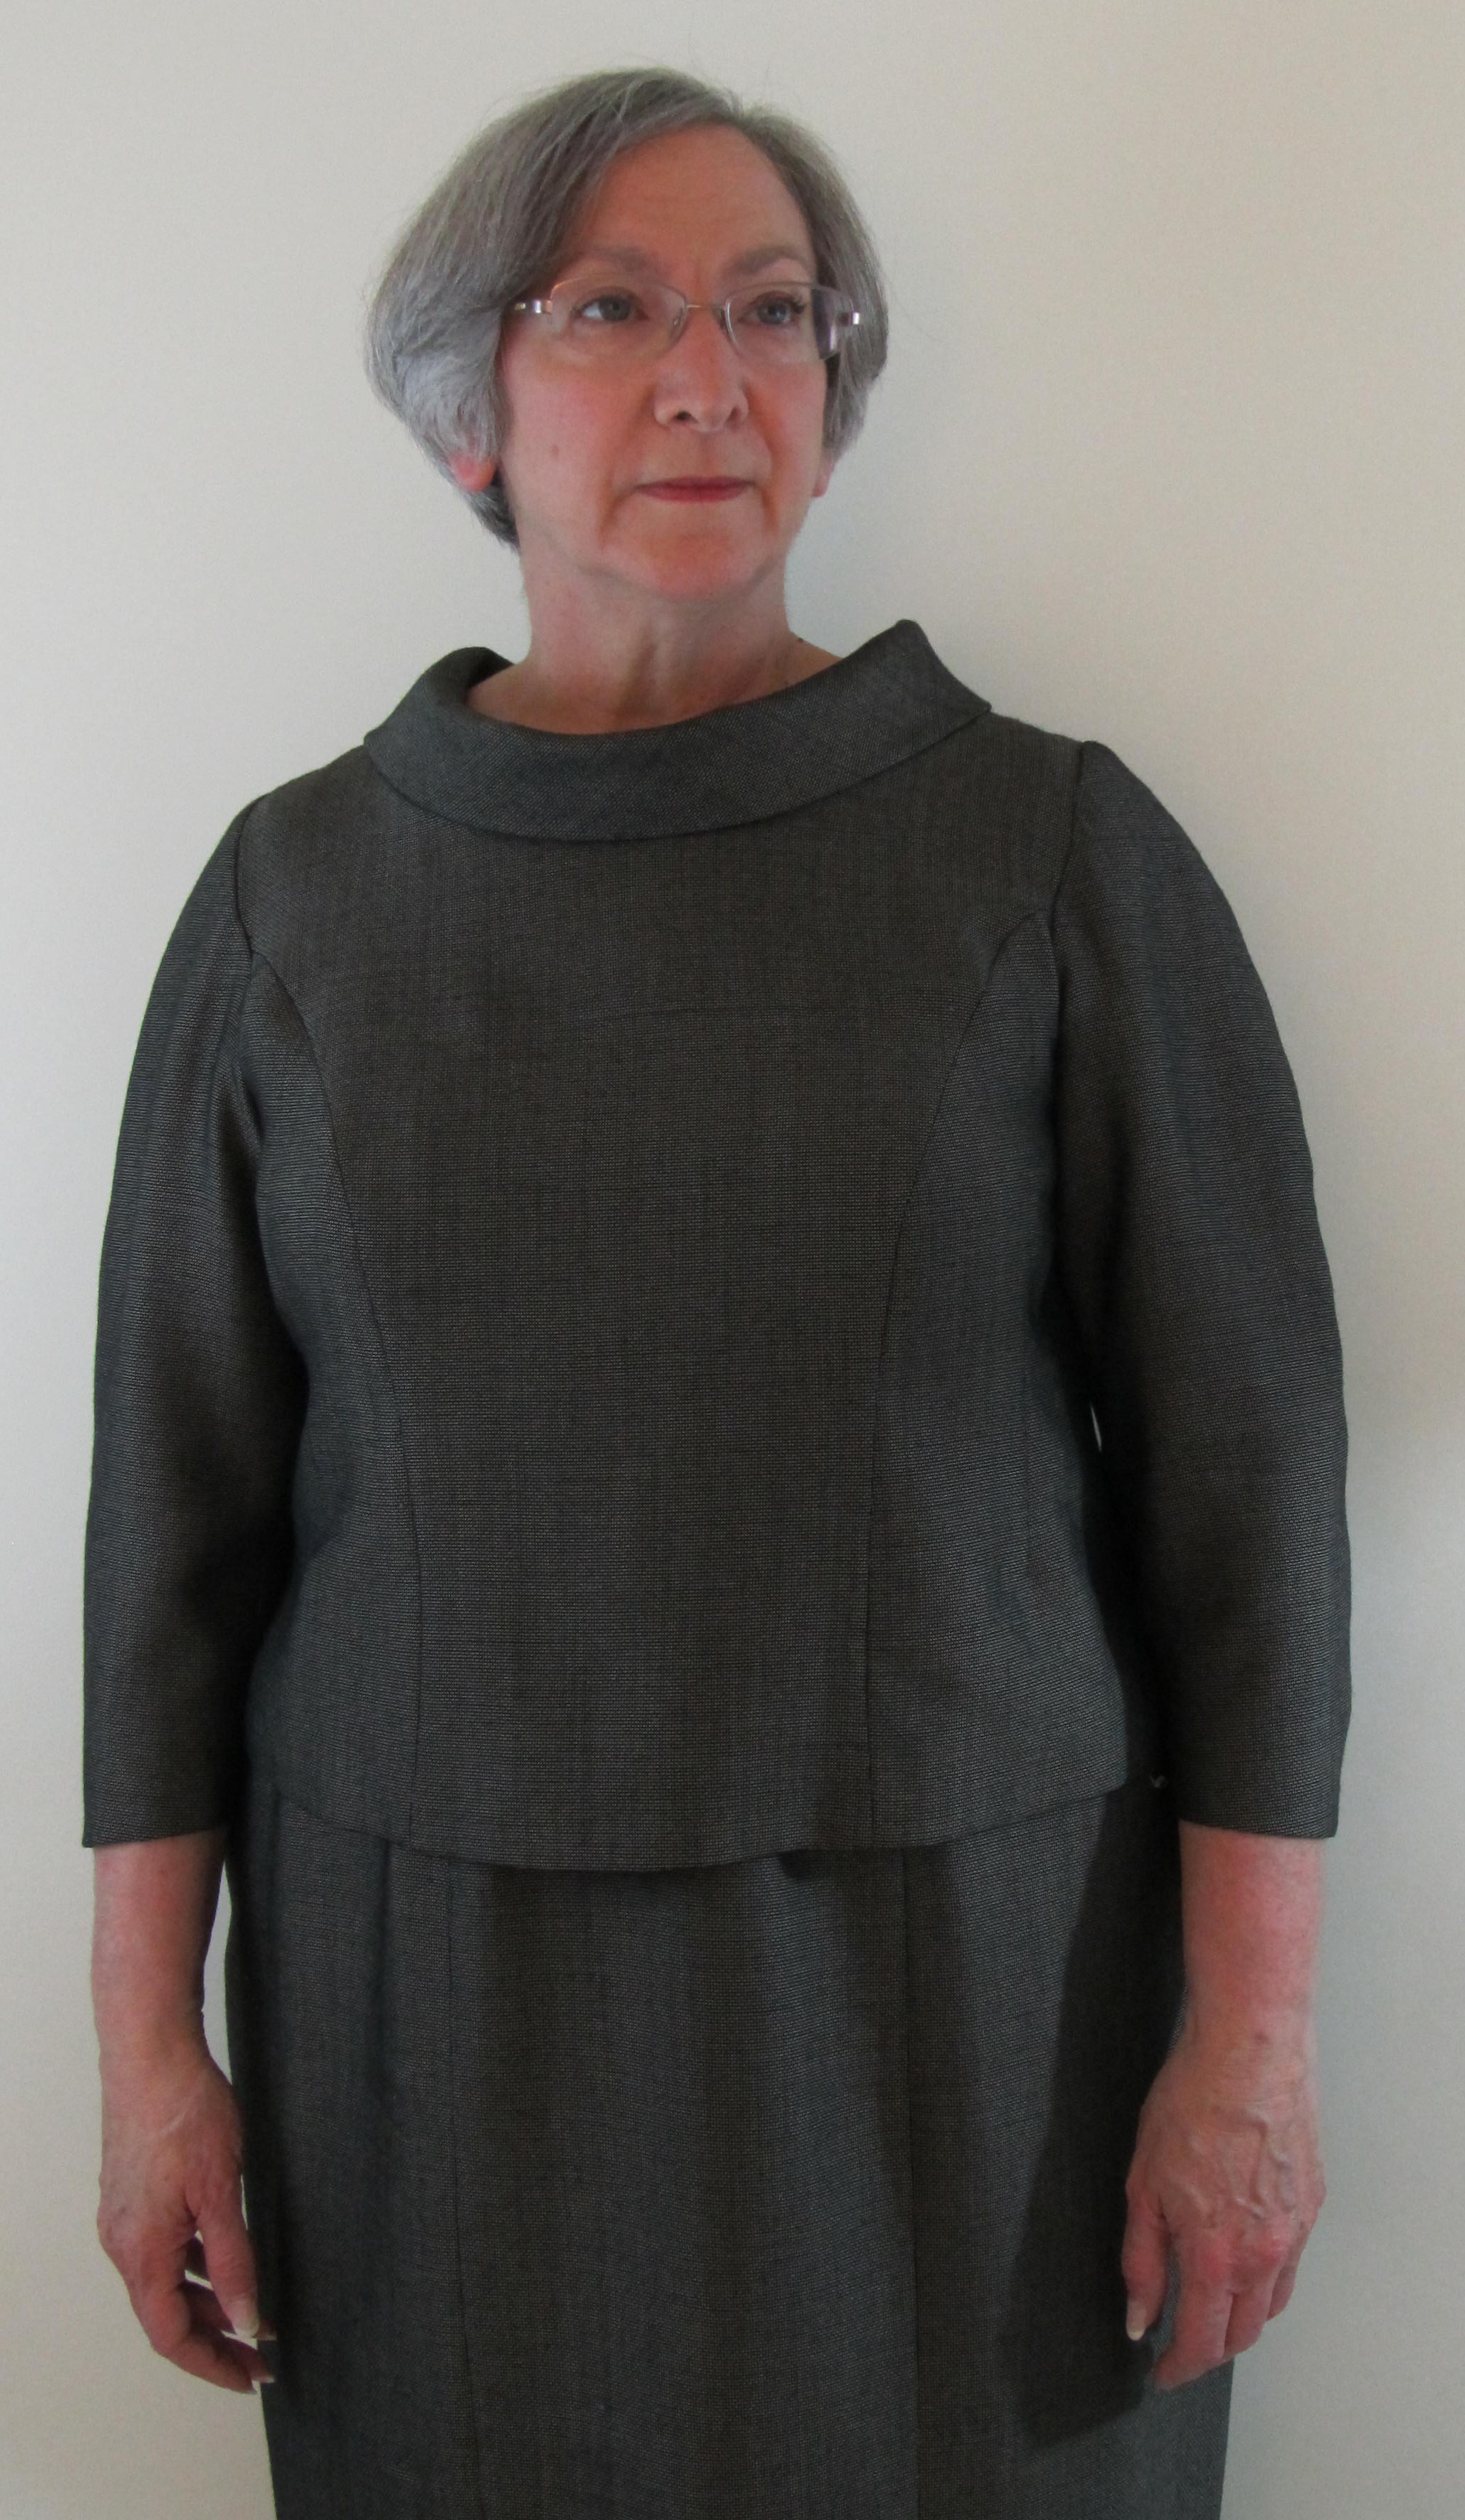
The other problem I have with Frankenpatterns is the name itself. When patterns are combined well, I don’t think the results are monstrous at all. As an example, here is the first jacket I made from my sloper.

Asymmetric JacketThe pattern I used is out of print, Butterick B5292.

untitled This was my first attempt to apply my sloper to a pattern in a way that required more than just a bit of tweaking. I have to say that when I first placed the sloper pieces on the main pattern pieces, I was intimidated.

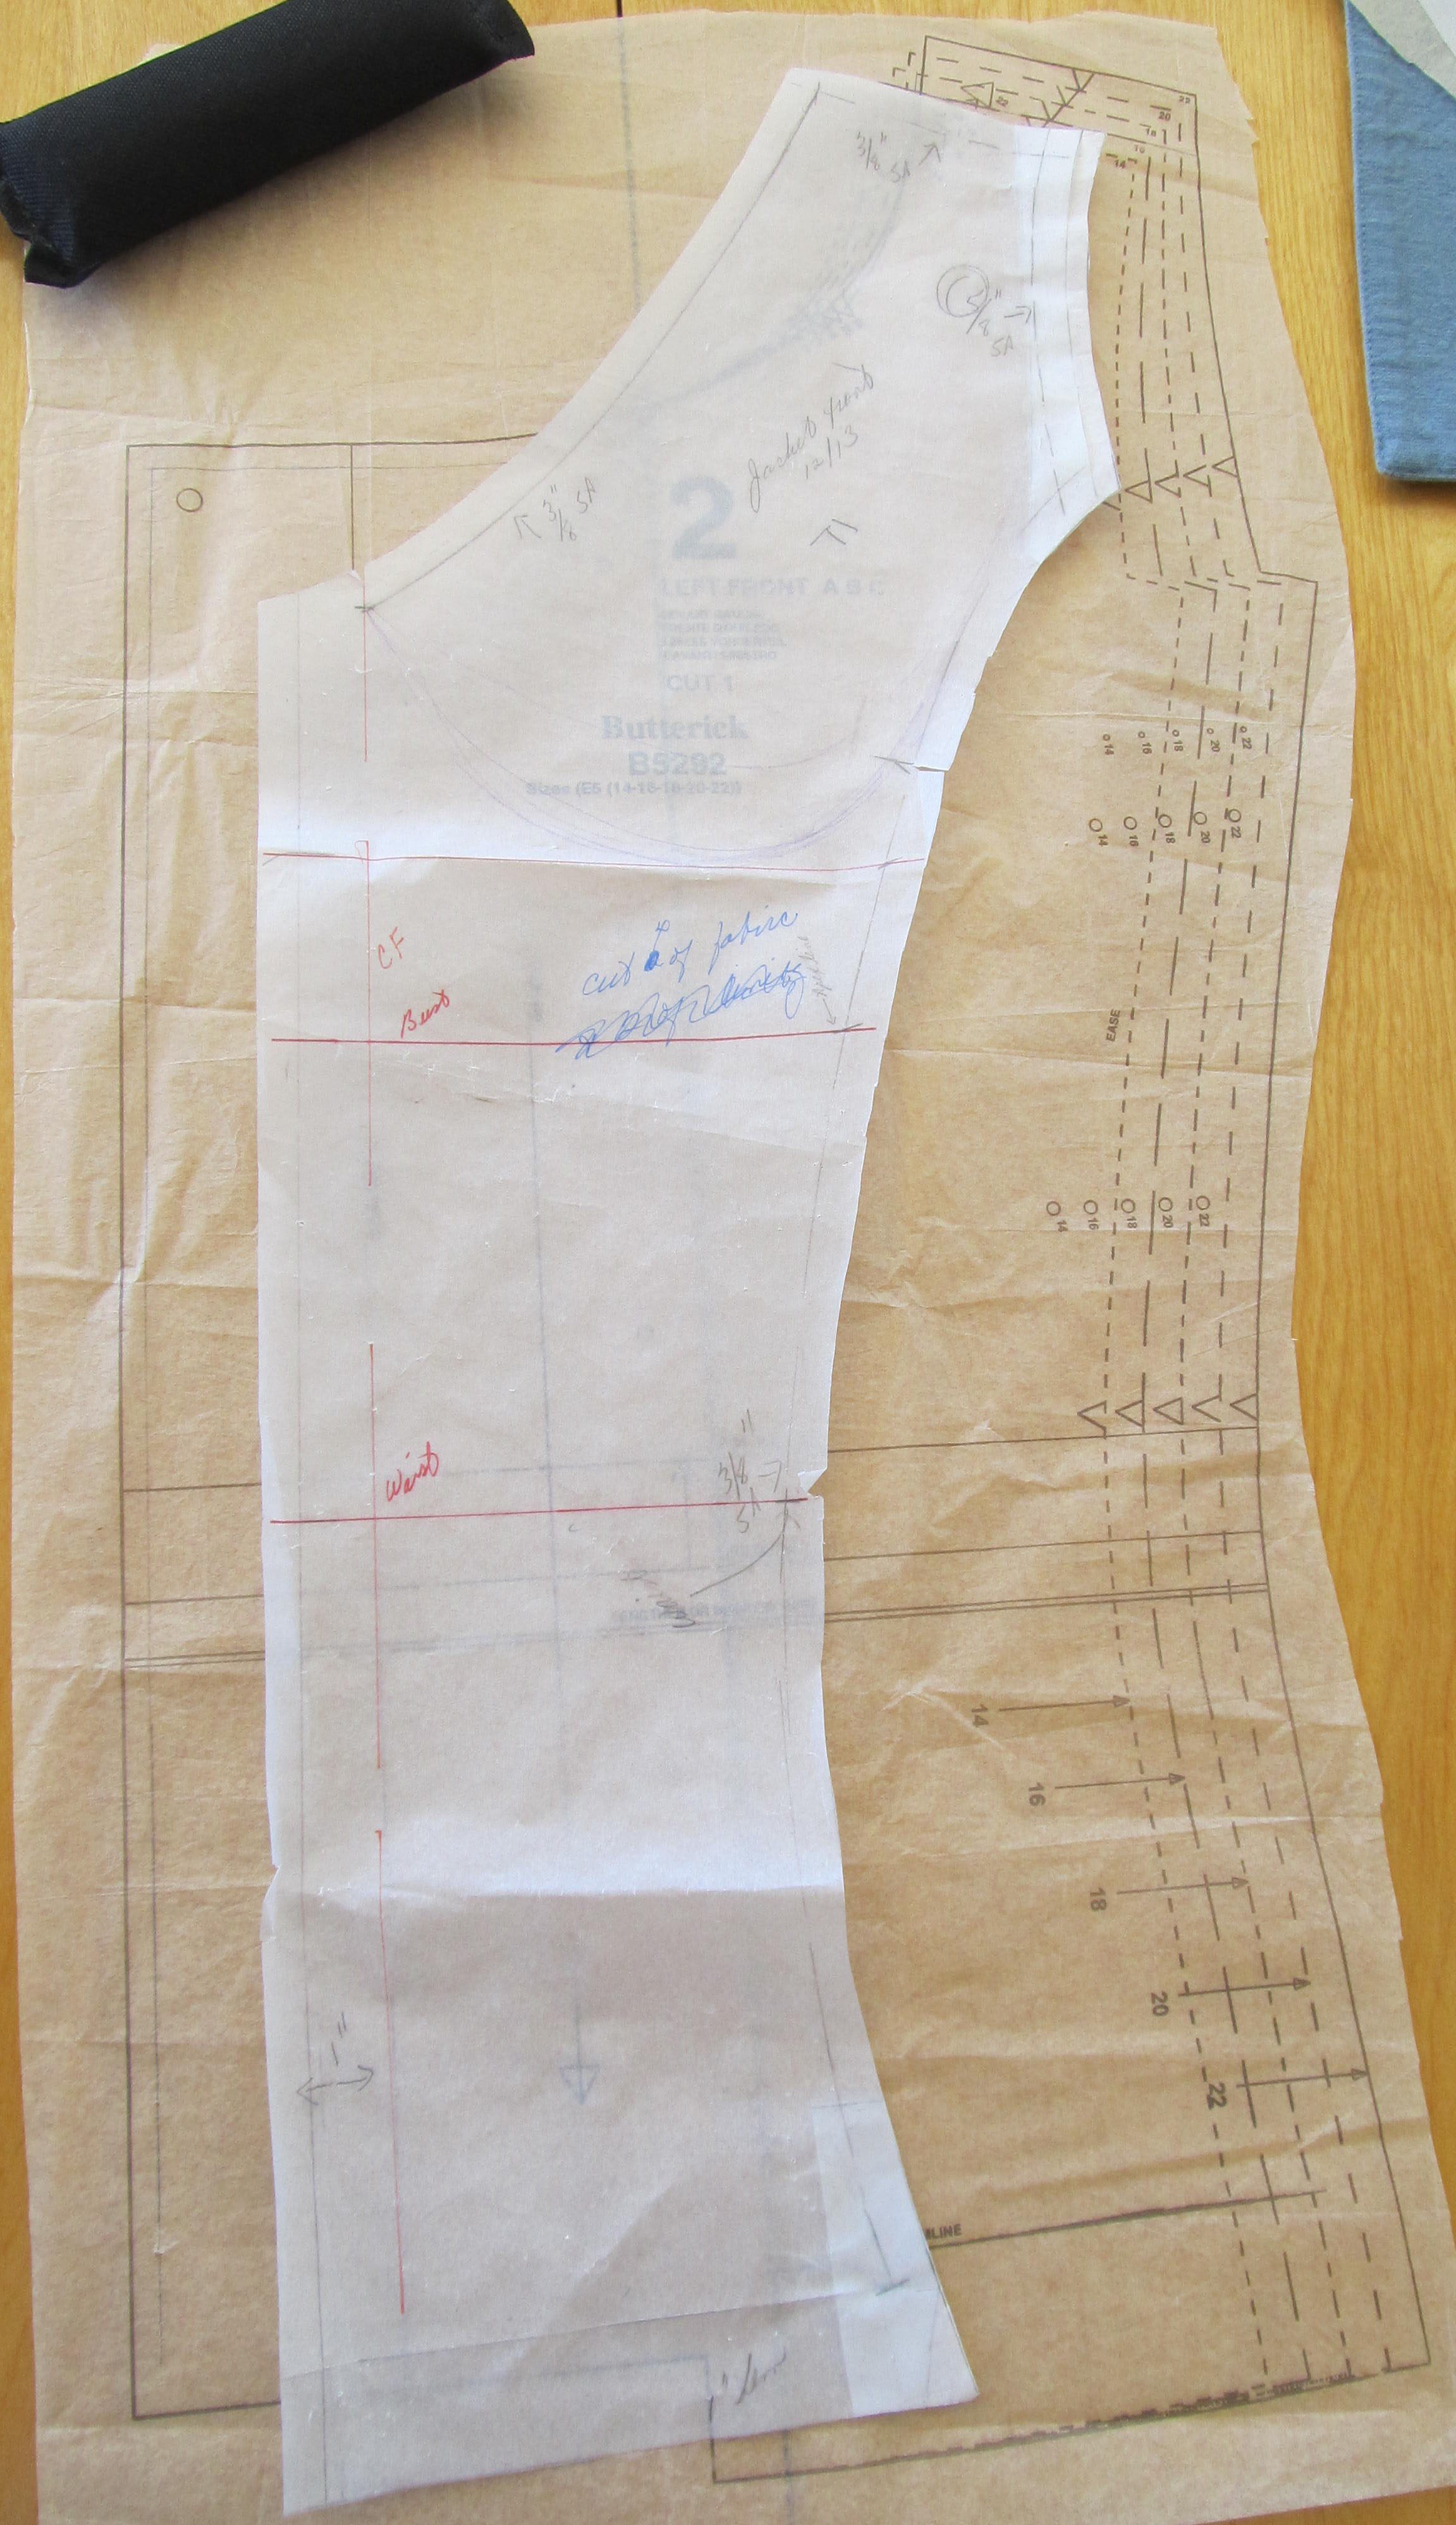
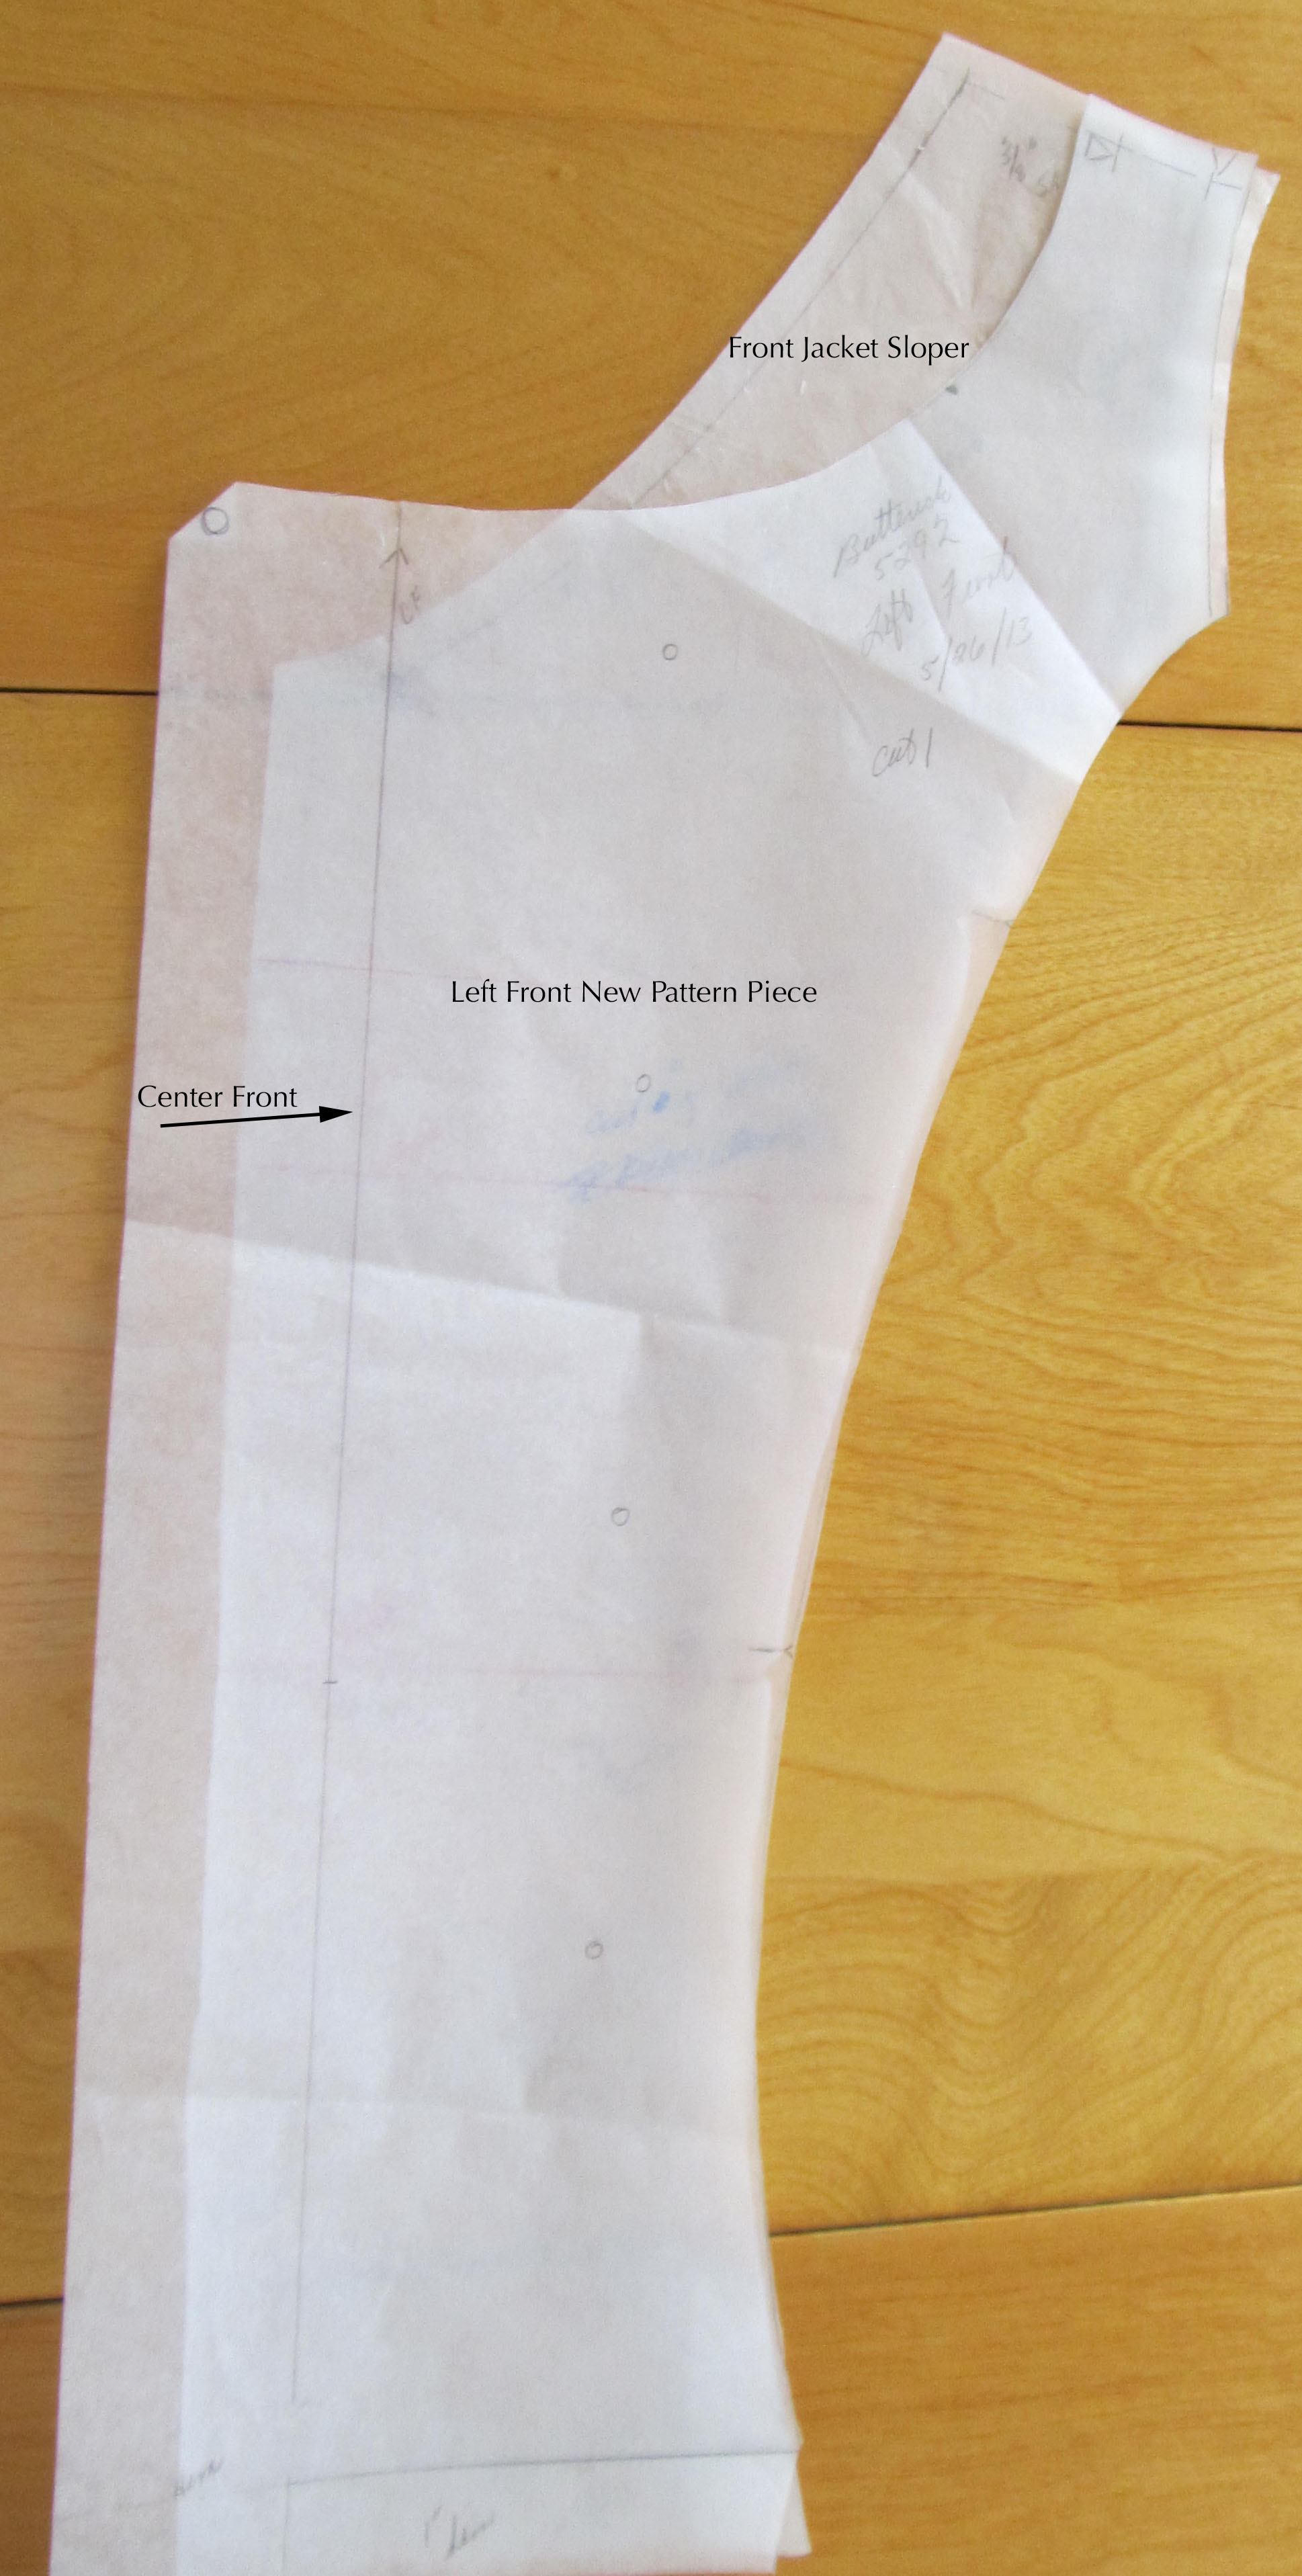
Here is what one of the front pattern pieces looks like with my jacket sloper on it.
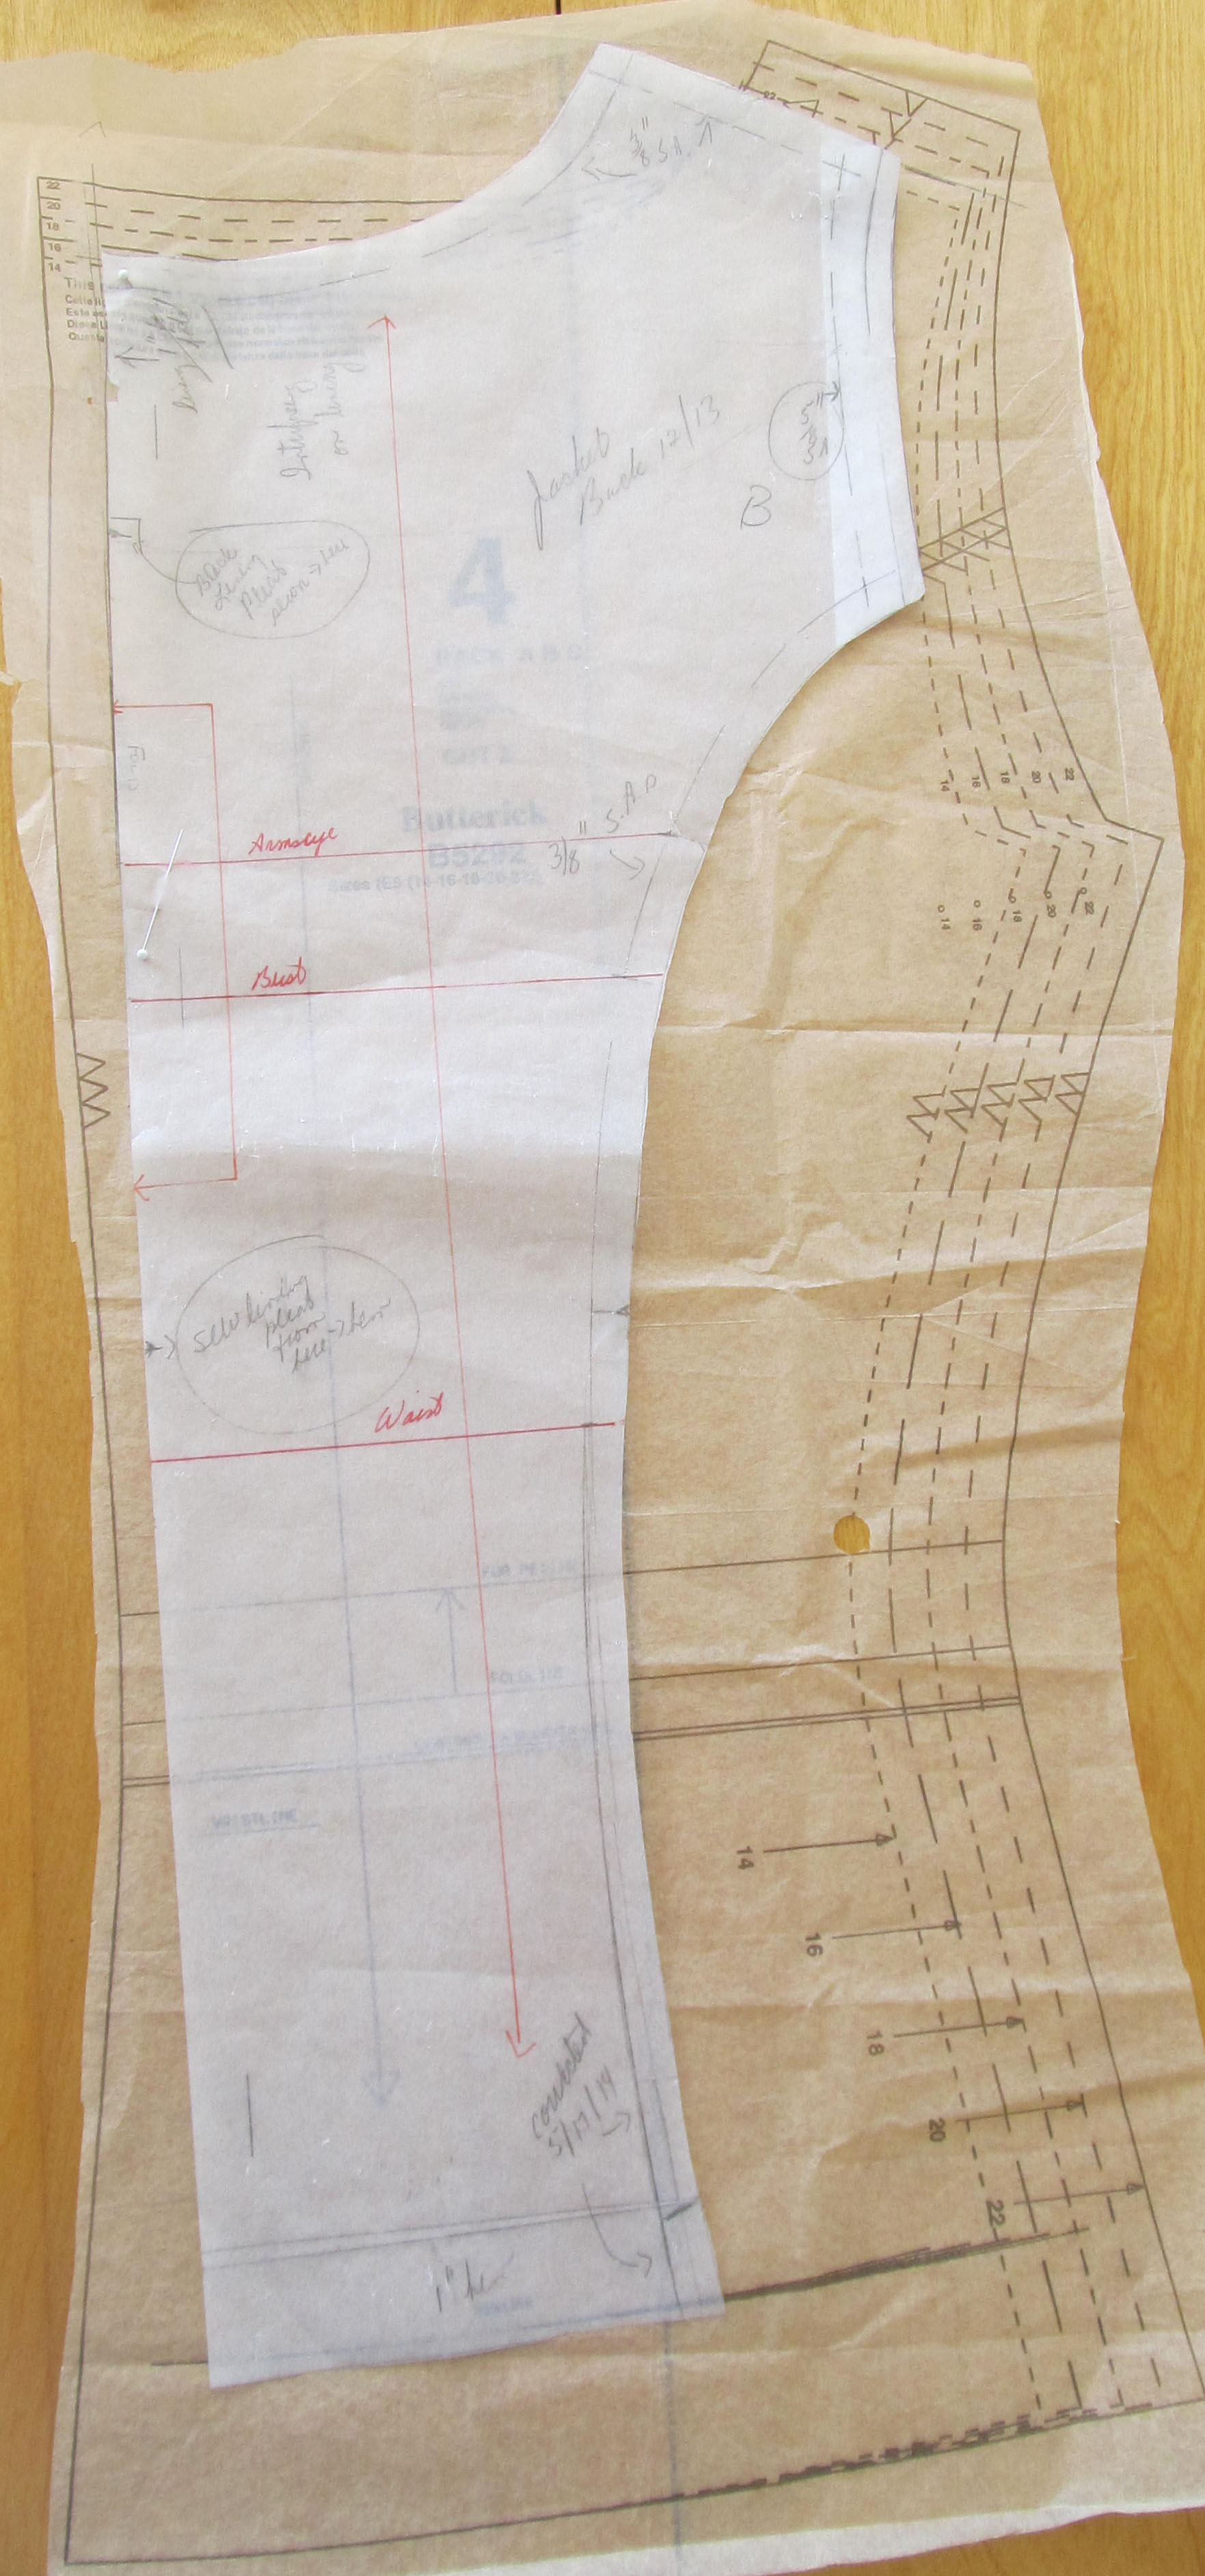
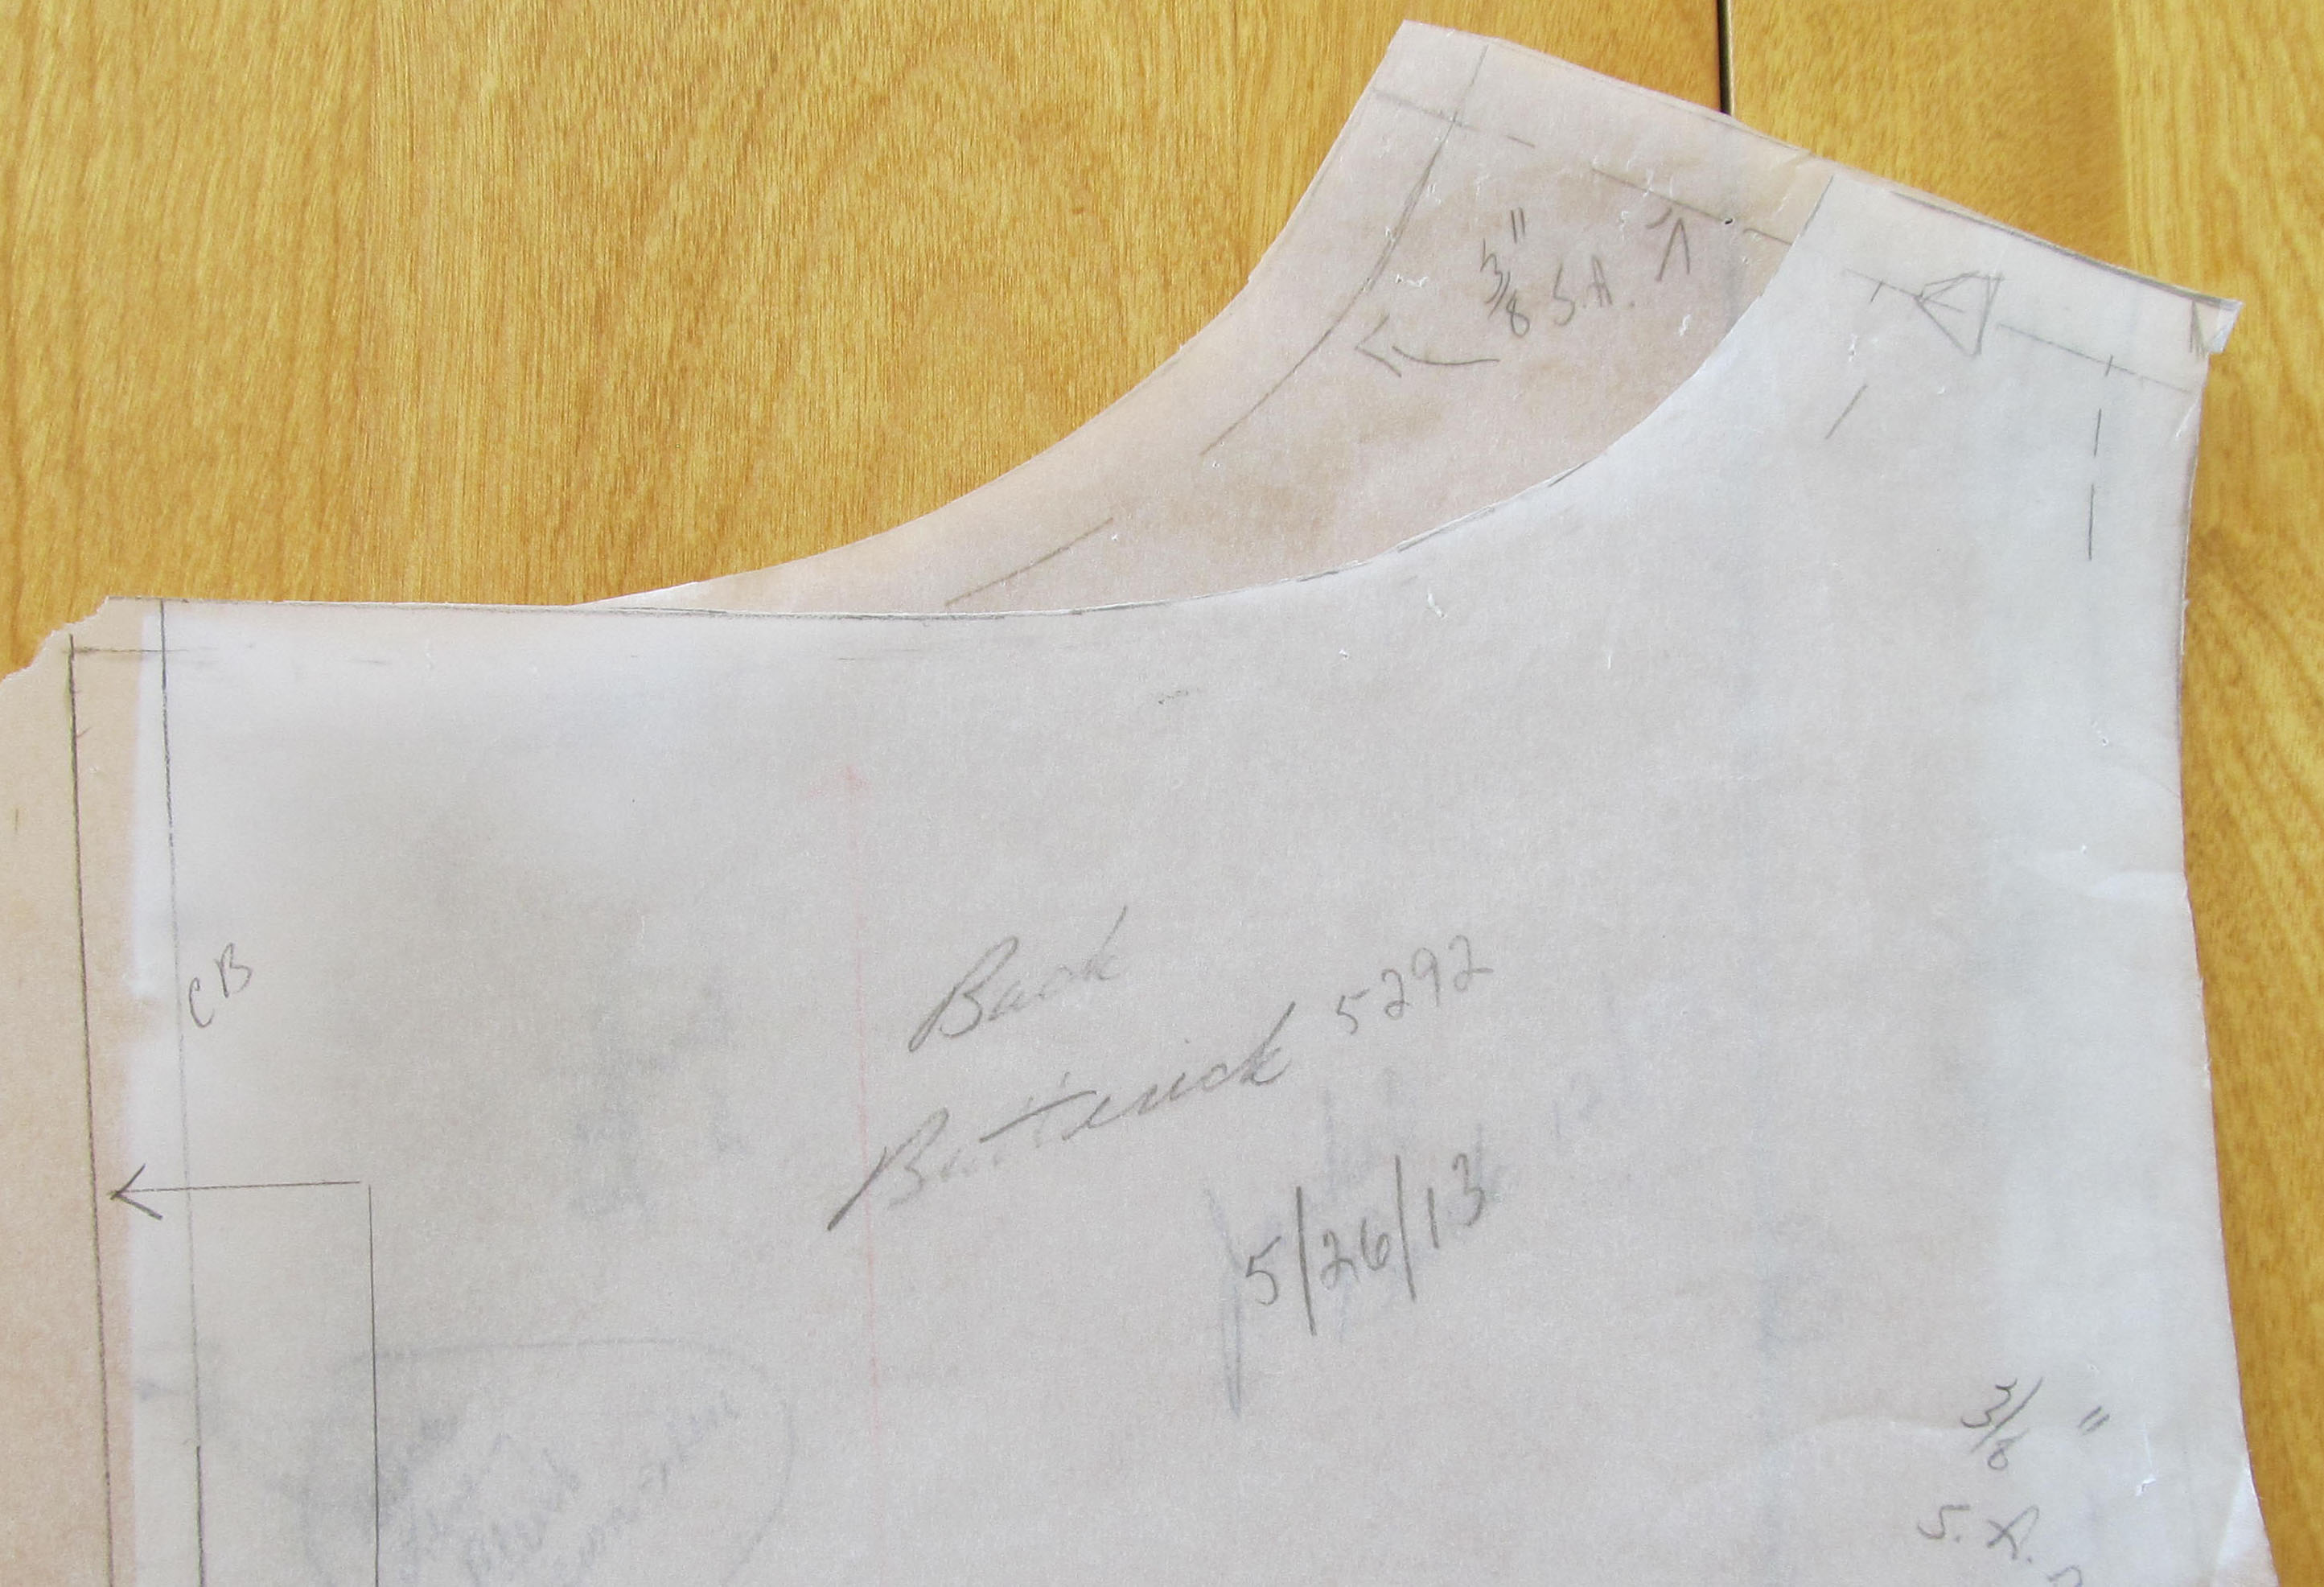
Sloper Front to Original 2Here is the back.

Back Sloper to Original
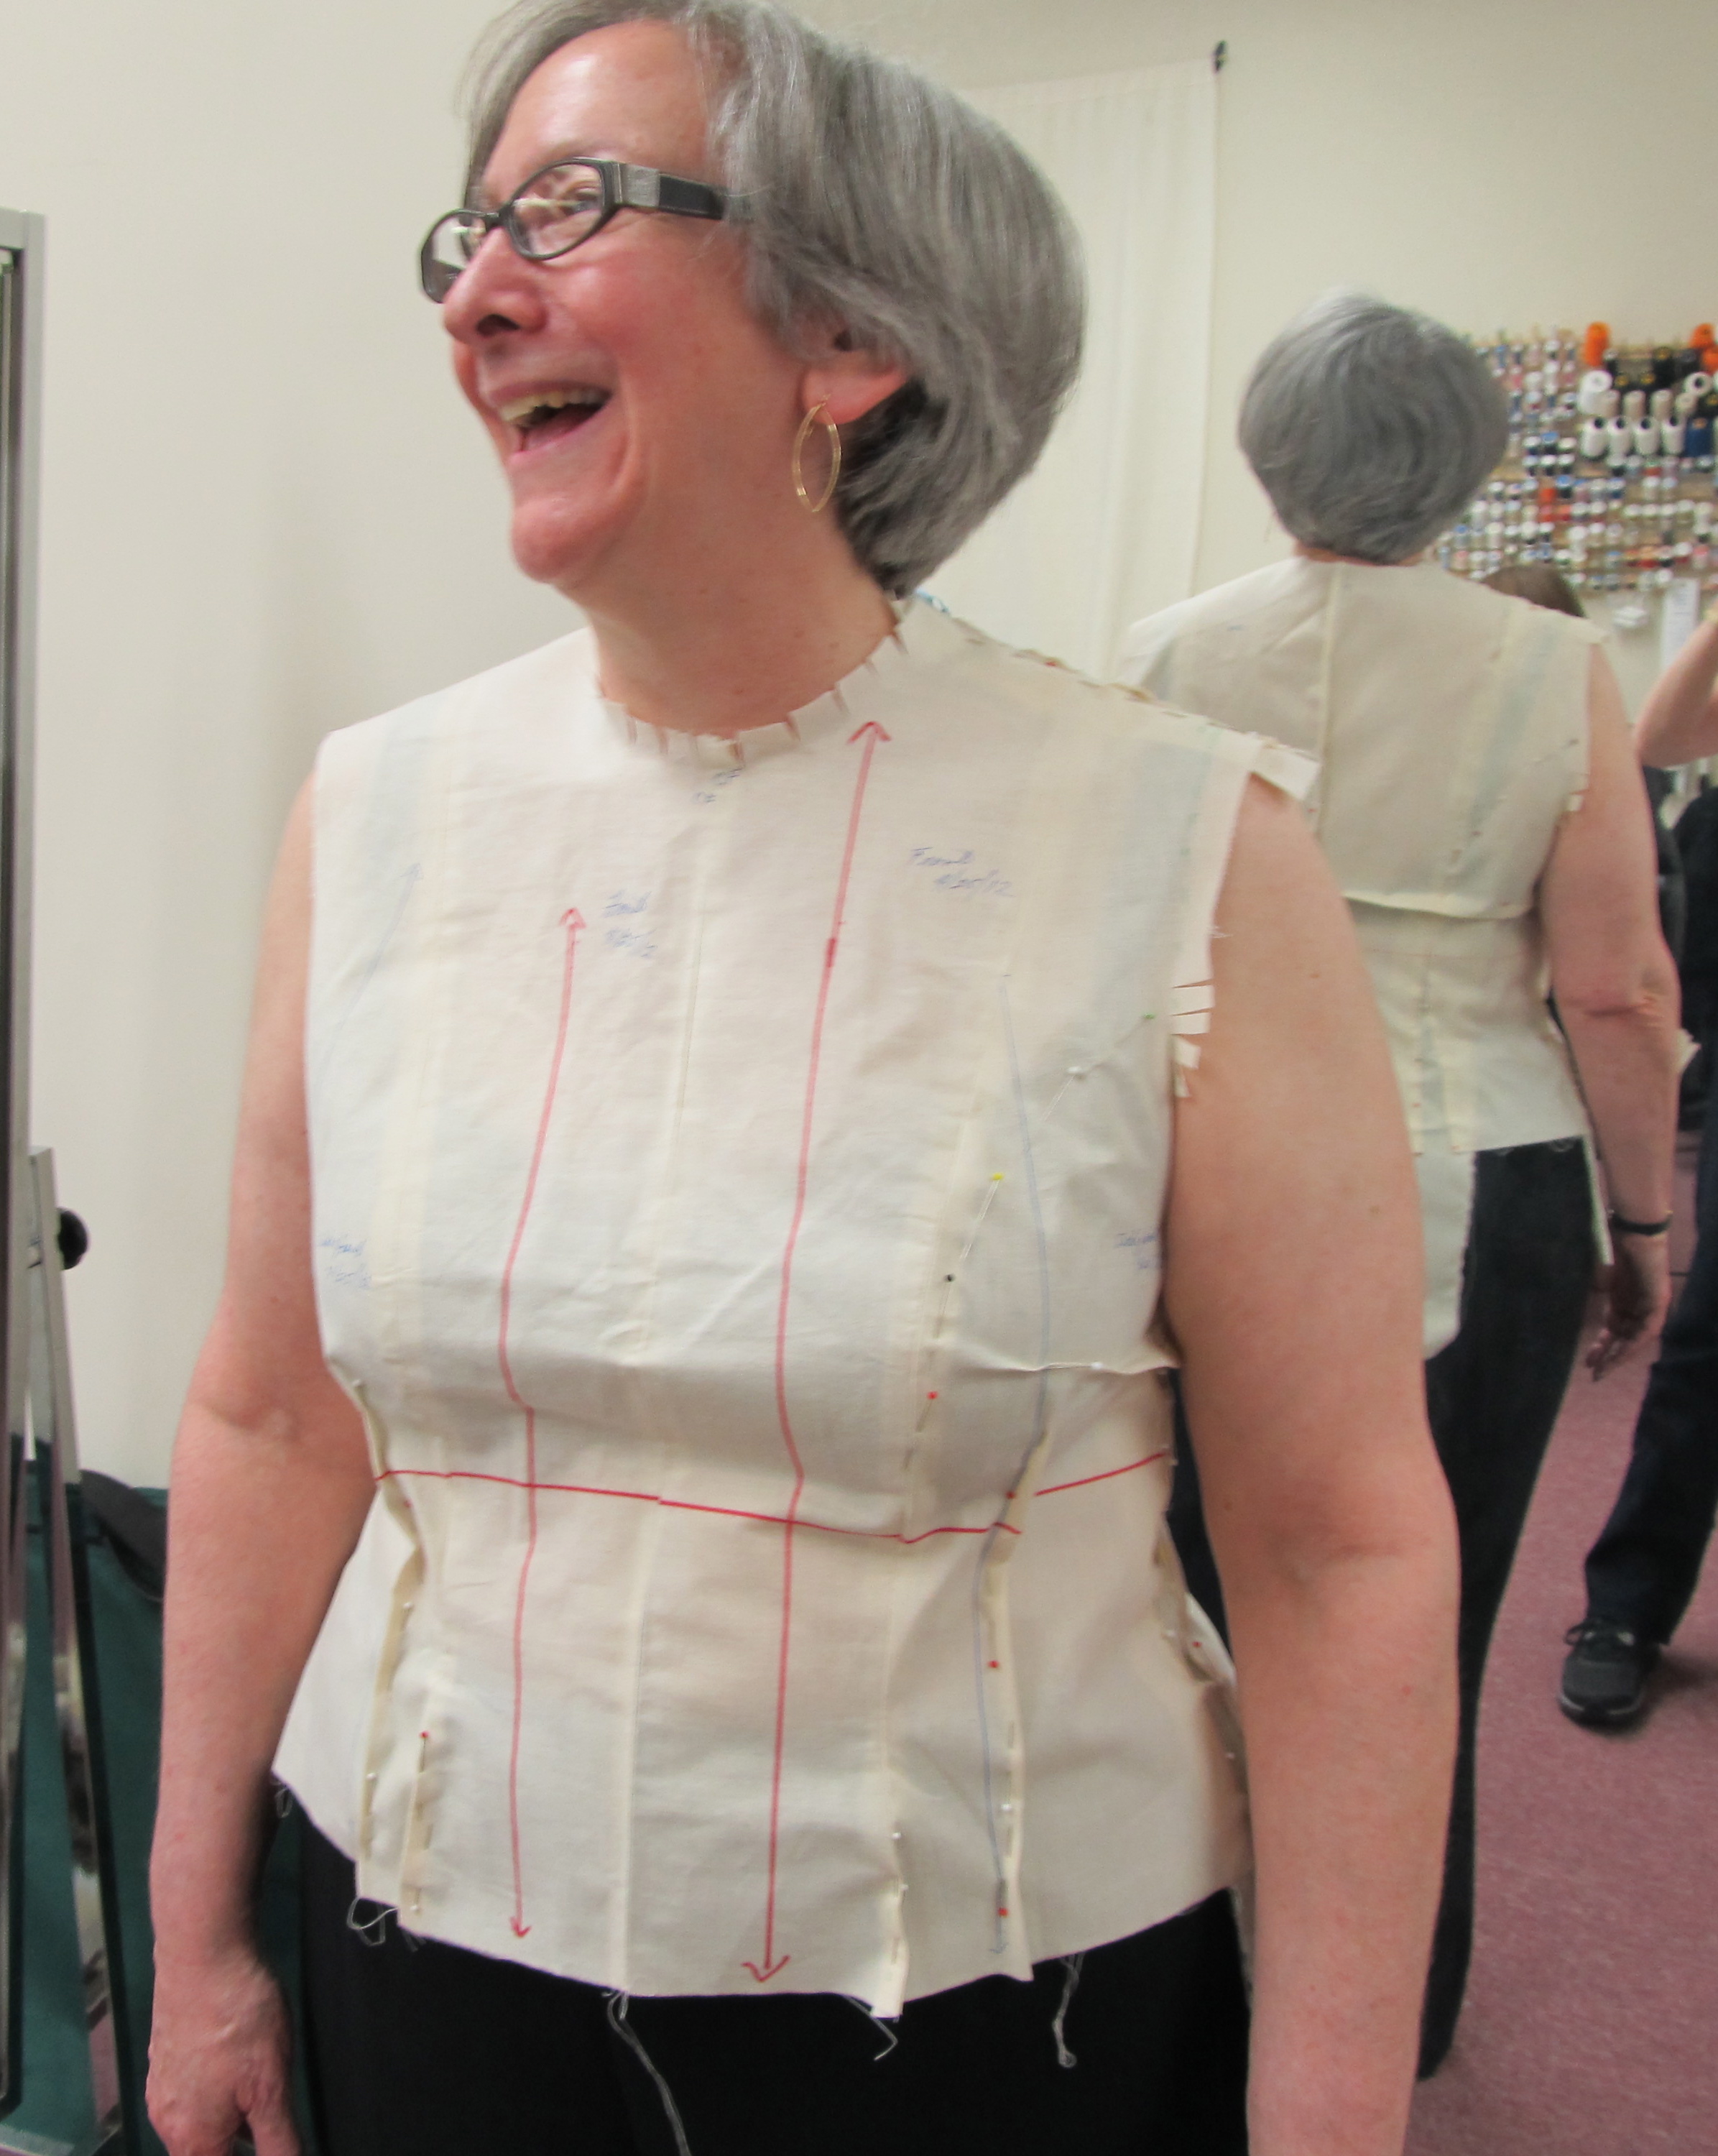
I made this jacket before I made the basic jacket pattern you see here so the contrast was even greater at the time. I also didn’t have a full set of helpful landmarks on my bodice sloper at the time. All I had marked was Center Front and Center Back, which I knew I had to line up with the corresponding landmarks on the commercial pattern. Since then, I’ve added a bustline and waistline on every piece by marking them on the front and then walking the adjoining seams to get them to connect at the same level all the way around. Had I done that to my sloper at the time and made corresponding markings on the commercial pattern, I might have felt more confident.

Because this is an asymmetric jacket, there was a lot to be added beyond Center Front. I used my own side front and side back pieces and my own sleeve pattern, so I didn’t have to worry about any of the differences on the other side of Center Front.

I don’t have a tapered back seam in my bodice or jacket patterns, but the commercial pattern does. I wanted to lay out the back piece on the fold, so I lined it up with the marked Center Back and ignored the tapering in the pattern. So, I was able to ignore everything that was going on on either side of Center Back. I just needed to use Center Back as a point of reference.

As you can see, my sloper is quite a bit shorter than the pattern. I’m average height (5’5″ and a bit). Pattern grading increases both horizontally and vertically. If only that were true with changes in people.

Basically, the only things I needed to figure out were the distance between the shoulder point and a line extending up from Center Front on the front piece and the corresponding distance from Center Back on the back piece. Then I needed to draw in my shoulder seams at my correct angle and stop where I needed to stop in order to come out with a neck seam that was the same length and shape as the neck seam on the commercial pattern. I also needed to make sure that the shoulder seam is the same length in the front as it is in the back.

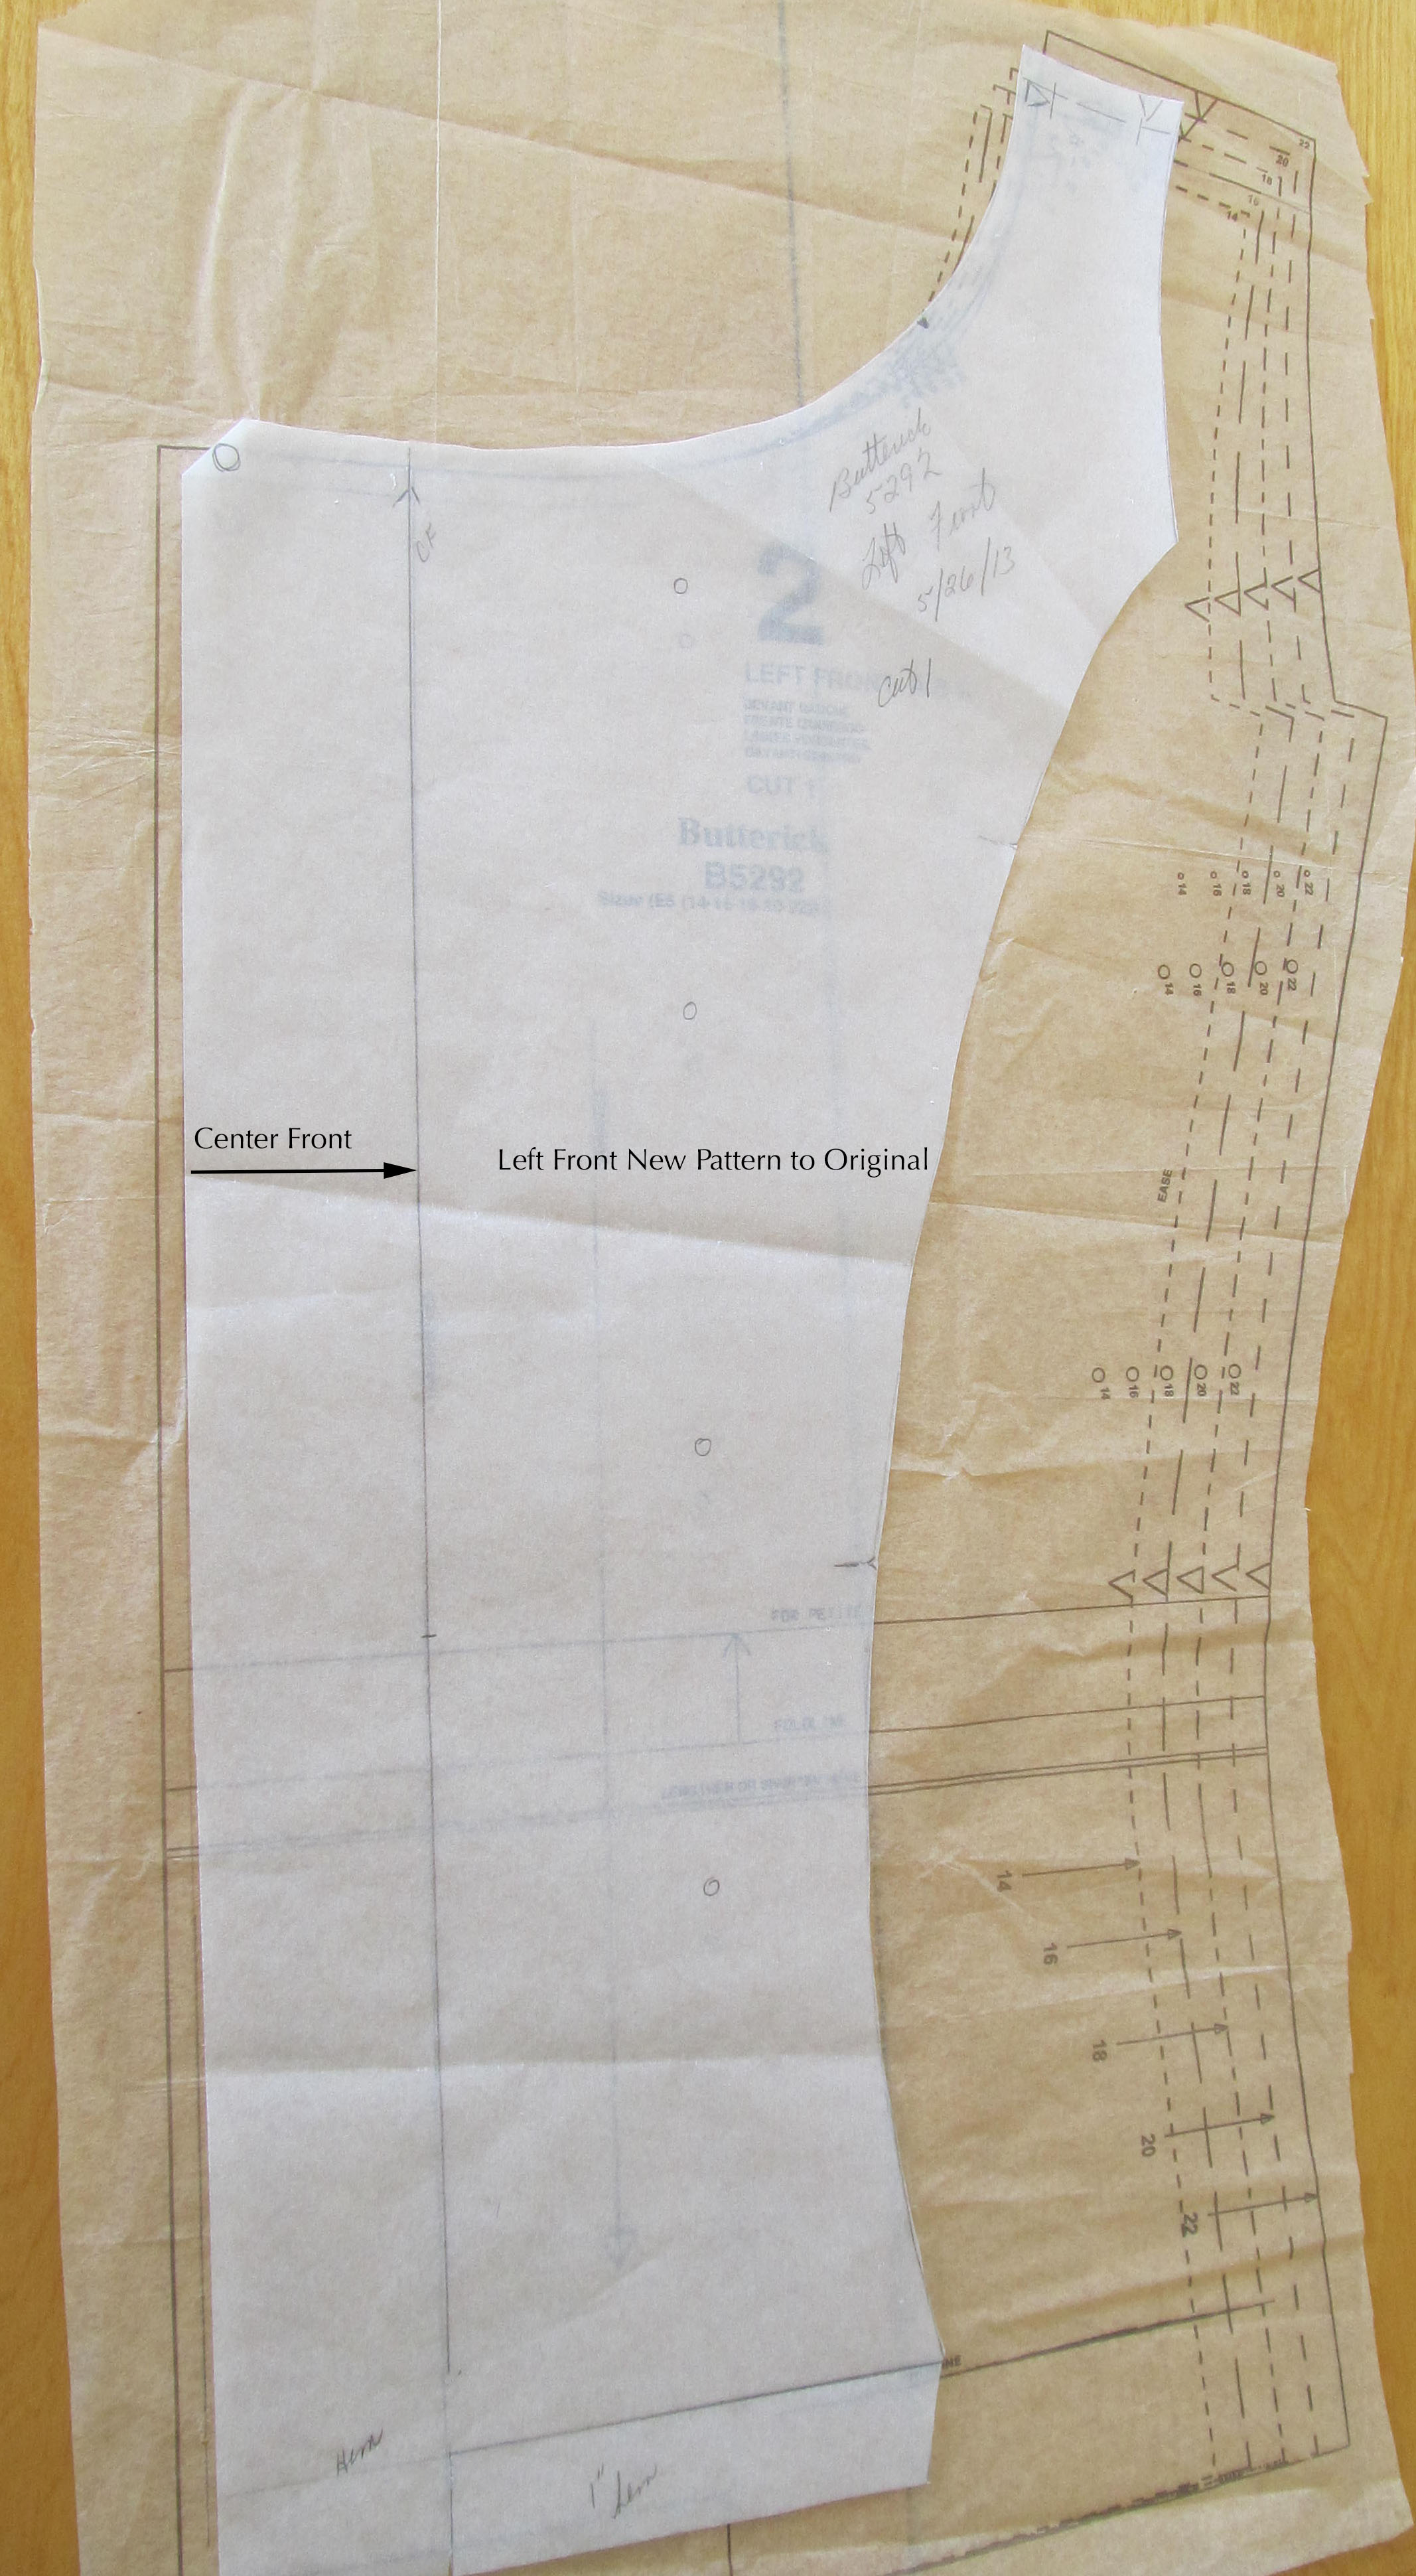
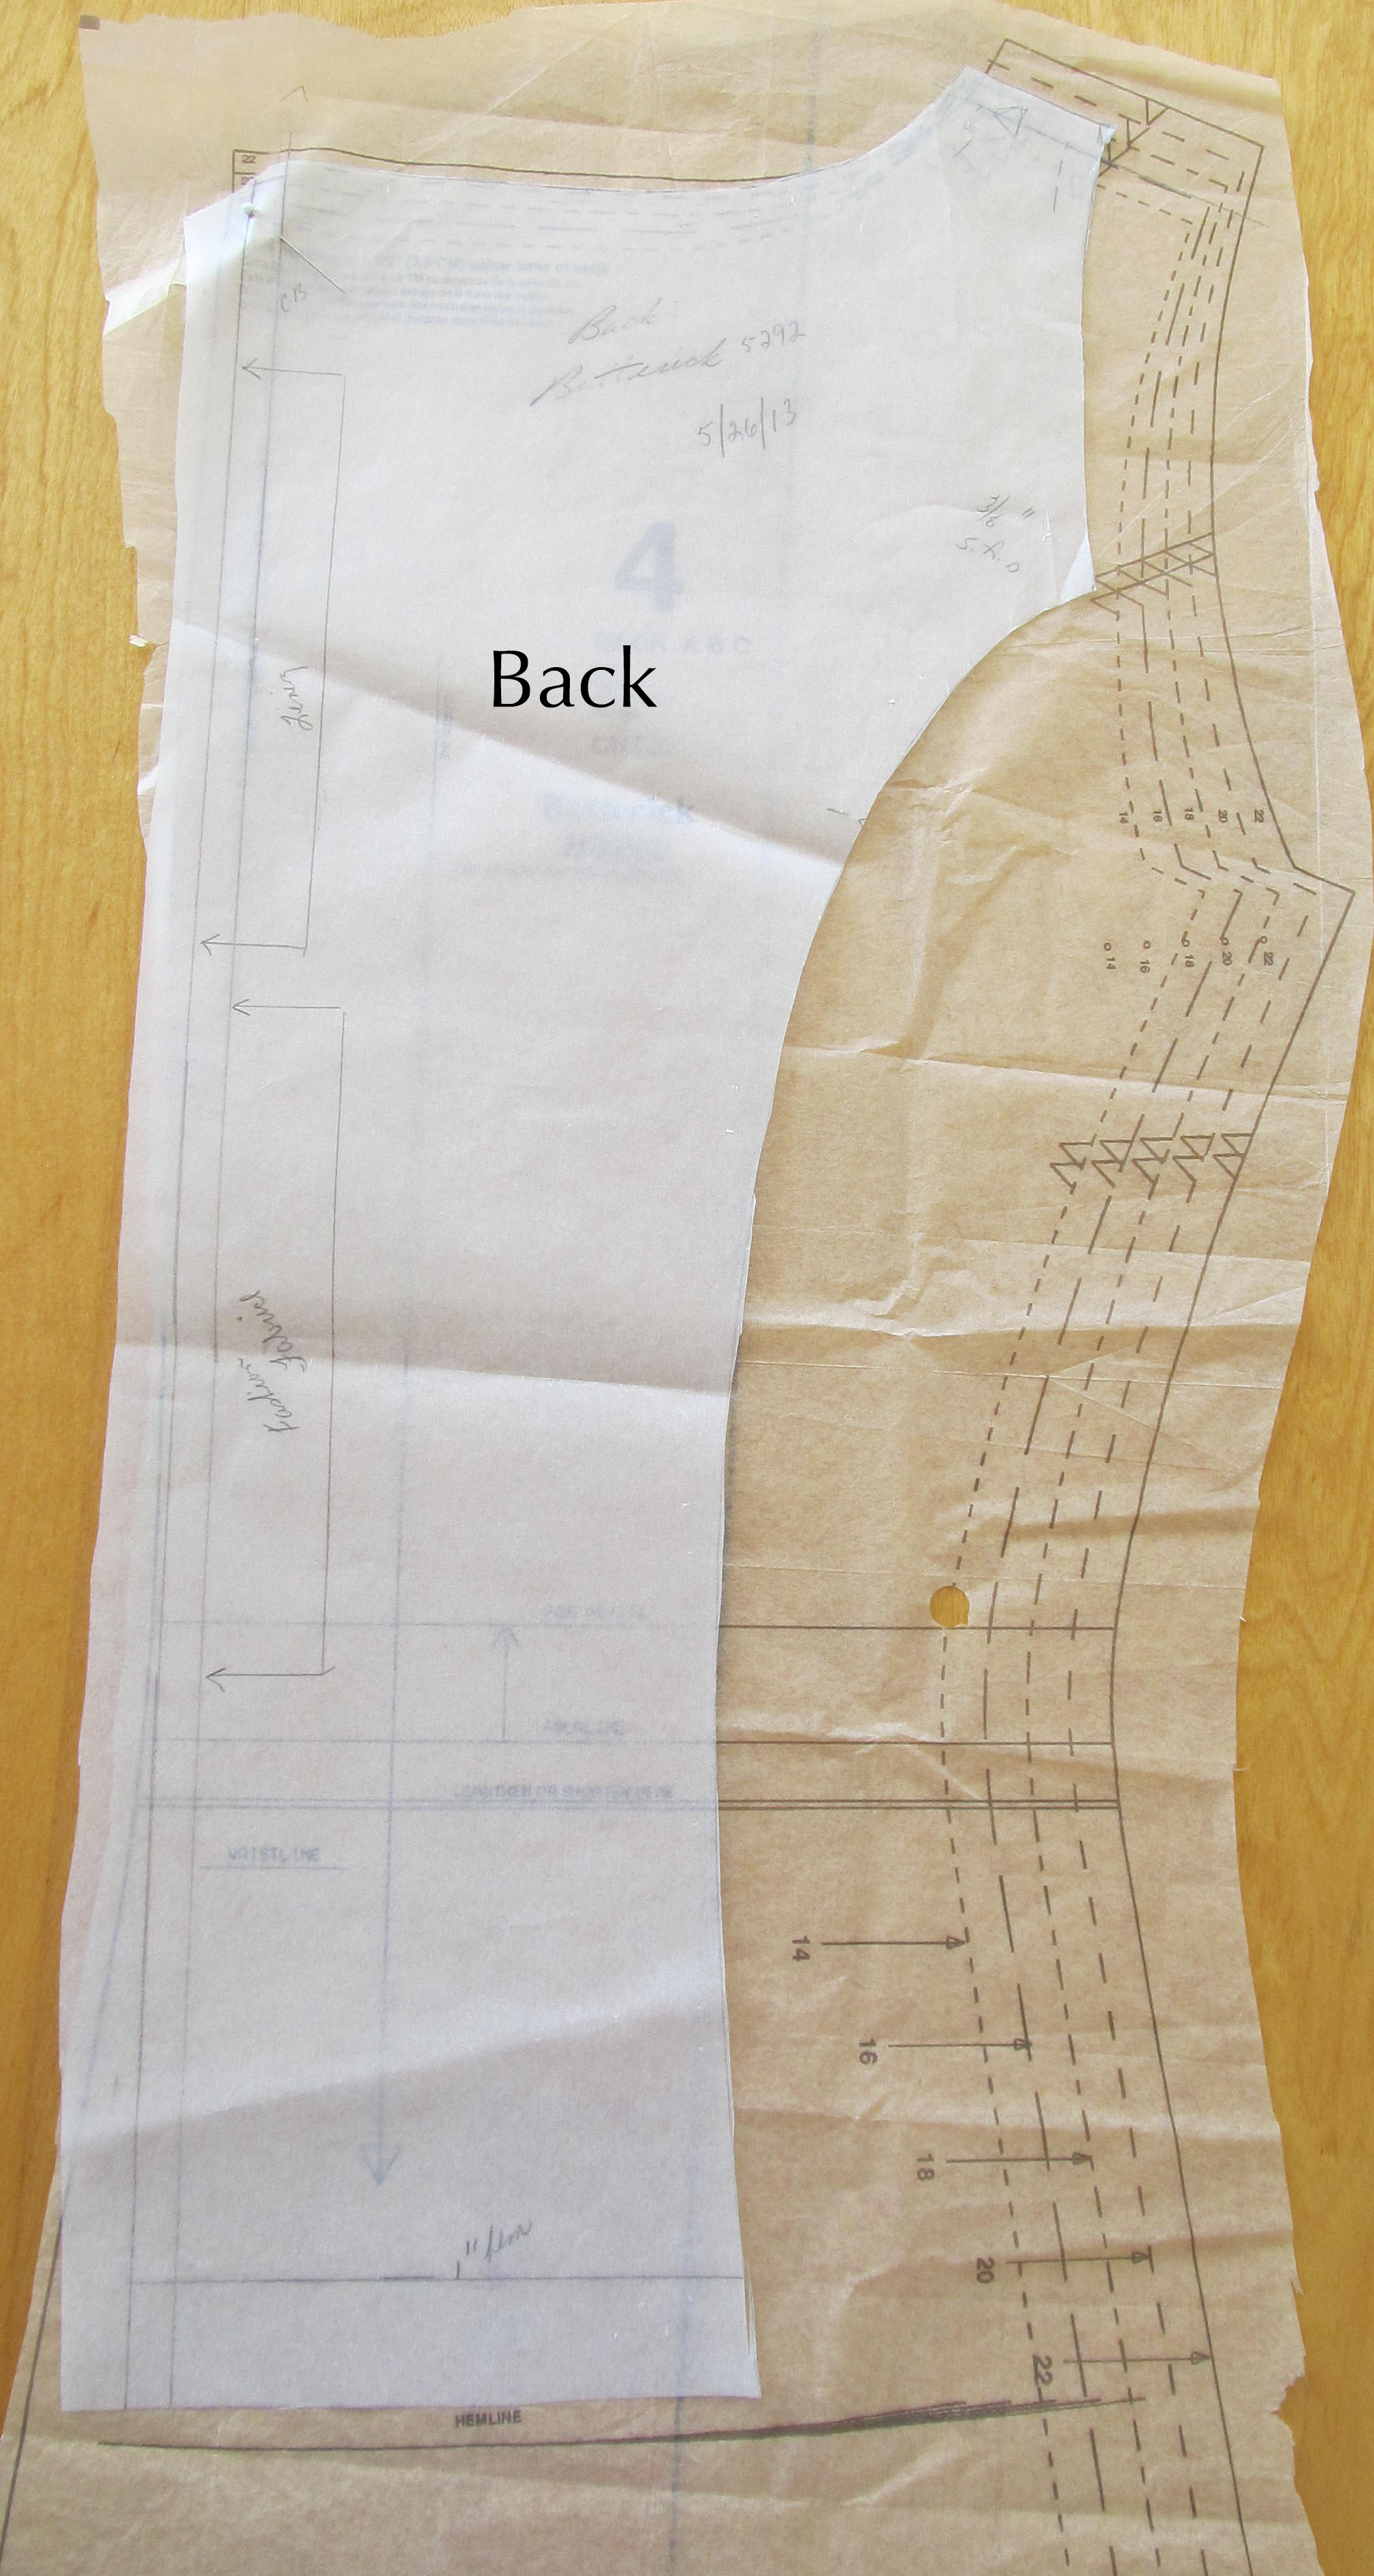
Here is how my drafted pattern looks overlaid on the commercial pattern.

Front New to originalBack new to Original2I was a little concerned about how short the shoulder seams are, but I wasn’t feeling confident enough to change the neckline and create accurate corresponding changes to the collar stand. When I was sewing the jacket I thought that was a dumb decision because my bra straps might make unscheduled appearances. The next time I make this jacket, I’ll bring in the neckline just a bit and make the corresponding change to the collar stand.

If the seamlines in these pictures look narrow to you, it’s because I like to use 3/8″ instead of 5/8″ seamlines. Only recently I’ve switched back to 5/8″ for sleeves and armscyes because of the method I use for setting sleeves. Yes, it does seem my sewing gets unnecessarily complicated sometimes, but I really do have reasons for these choices. The other odd marking you see on the back pattern piece is the extra Center Back foldline. This is actually a shortcut so that I can use one pattern piece for both the fashion fabric and the lining and still get that pleat in the center back of the lining.

Here is what my pattern for this jacket looks like when compared to the jacket sloper.

Left Front Sloper to NewBack New to Sloper Detail

And here is the finished product on my dress form.

Blue Asymmetric JacketThe fabric is a silk suiting that was lovely to work with and is a delight to wear. But, the jacket could have used more structure. I lined it to the edge in a silk charmeuse print, but with the hidden snaps leaving impressions on the fabric, a front facing would have been a better choice. Still, I love wearing it. And I don’t think it bears any resemblance to a monster.

Sarah Veblen, Fit Goddess

IMG_1082 I’m happy to take credit for introducing Chicago area sewists to Sarah Veblen, whom I like to call The Fit Goddess. I did that by organizing two back-to-back fit workshops that Sarah taught for the Chicago Chapter of ASG in April 2012.

Sarah began the workshop with a half-day session in which she lectured about her methods and gave us exercises to familiarize us with using a Design Ruler (some people call it a French curve, but that’s actually a different set of rulers). We need this skill to draw new seamlines with smooth curves once we transfer her pinned alterations to our paper patterns. After that first afternoon, there were two groups who had two full days of workshop each. A few of us were there for the entire time.

IMG_1069Before the workshop, Sarah sent all participants detailed instructions about how to prepare their muslins. Sarah had a list of suggested patterns to use and was happy to consult with participants about their pattern choices. I wanted to make a basic fitting pattern in two separate pieces. I had in my head an image of two-piece dresses from the Sixties that I thought might work well on me. But, I wanted it to have princess lines because I thought that would be more flattering. From an online skirt class with Sarah, I had learned that I need princess seams in both the bodice and the skirt so that there is plenty of three-dimensional space in all the critical areas.

IMG_1063There was time for everyone to get four fittings in the course of two days. Once Sarah pinned changes to the muslin, the participant marked where the pins were, took the muslin apart and transferred the changes to the paper pattern. The next step was to walk the adjoining seams to make sure that they were all the same length and adjust as needed. We also learned how to true our darts. These steps make a huge difference when sewing the final garment and they are essential to making the next muslin that is an accurate reflection of the new pattern.

Things were going very smoothly for everyone else. I got bogged down. Part of the problem was that I was the organizer of the workshop as well as a participant. There’s also my talkative nature that doesn’t serve me well when I should be concentrating on tasks that my brain isn’t naturally wired to perform.

As if that weren’t enough, inspiration struck mid-way through the process. I had prepared a shoulder princess muslin. It occurred to me that if an advantage of princess lines is that they divide the body visually, it stands to reason that a shoulder princess would emphasize the difference between my narrow shoulders and wide hips. I asked whether an armscye princess would be a better choice for me and Sarah agreed. That gave both of us additional work to do.

IMG_1071So, there I was, the world’s slowest sewist taking on additional work and trying to take care of other people at the same time. There were several times during the workshop when my brain refused to process the visual information in front of me. That’s when I learned just how patient and understanding Sarah is. It also was one of many times I was reminded that I’ve made some pretty fabulous friends in the sewing community here in Chicago.

Wendy Two Piece 60sWith a lot of help, I came out of the workshop with basic sloper patterns for a two-piece dress or blouse or jacket and skirt. More importantly, I emerged feeling confident I could make clothes that don’t look frumpy.

There was some fine-tuning that followed in online consultations and follow-up fitting sessions with Sarah. And I did more work with Sarah to get a dress pattern and – the ultimate challenge – pants. But that first workshop was the turning point for me. I had been through enough trial and error to know that other methods don’t work for me. This one does.

In the next post, we’ll start looking at garments I’ve made using the slopers as a starting point and how they are constructed.


Fit Odyssey

canstockphoto4015708At first, it sounded straightforward. Not difficult at all. All I had to do was measure my body at prescribed points, compare those measurements to a pattern for a basic sloper, do the math and adjust the pattern to reflect my own measurements. Simple, right? Hardly.

The first problem, of course, is where to measure. Where is the shoulder point, anyway? Is that exactly at the waist? Should the hip measurement be here, or a little lower? Is the tape measure straight?

Okay. So I got a set of measurements. Several sets of measurements. At different times. In different classes. Using different books.

Starting with vertical adjustments, I lowered the bust point (is anyone other than a 14 year-old as “perky” as a commercial pattern?), shortened the waist and raised the hemline. I followed the advice to use a pattern size based on high bust so the shoulder length would be right (more or less). But the shoulder length wasn’t correct. Later I found out that the shoulder angle wasn’t correct either.

Moving on to circumferences was when things got really dicey. Teachers and books instruct us to slash the pattern open and spread it to fit, then fill in the gap with paper. The problem with doing that when you are shaped like a pear is that the side seams become so distorted that the original shape of the design is lost. So I tried to create a curve that allowed the side seams to follow their original direction using the seam-only method and ended up with ugly “wings” or flaps of fabric.

What about making the transition at the armscye? Tried that, which meant spending hours trying to make corresponding changes in the sleeve. Just about every time I corrected a problem with a pattern adjustment, two or three other problems seemed to crop up. I was going in circles.

To make matters worse, this process brought all my body issues front and center. Comparing my measurements to the “ideal” I saw in the patterns made me berate myself for every pound I had gained since I was in my twenties. I even had an instructor point to me in a workshop as an example of an “irregular figure”.

At one point I thought draping might be the answer and I made a dress form that was supposed to be an exact duplicate of my body. It turned out that the dress form and I were not really twins. I still don’t know what went wrong there. What about tissue fitting, you might ask. Tried that, too.

There were many times that I asked myself why I was spending so much time and money on something that was making me so miserable, but I was too stubborn to admit defeat. So, I persevered and joked that I was an artist who worked exclusively in muslin. The only garments I finished were knits and the occasional loose-fitting woven. I even managed to make some pleated trousers that looked pretty good until you got up close and saw that the side seams weren’t straight. I was sure there was an answer out there. I just had to find it.

Yes, there is a happy ending to this story. In 2009, I signed up for a class on PatternReview.com called “All About Set-In Sleeves and Armholes” taught by Sarah Veblen. Once I started reading Sarah’s class materials, I knew I had found a teacher I wanted to work with. I went to her web site, read about her workshops, learned that she is an expert in fit and decided I had to not only take more of her classes but share her with my ASG group.

The first time we talked on the phone I learned that Sarah was working on her book, The Complete Photo Guide to Perfect Fitting. Using the words “complete” and “perfect” means this book makes some pretty big promises, but Sarah delivers on those promises.

The foundation of Sarah’s method is draping. She has her students make up a muslin with regular seam allowances. Like other teachers, Sarah will “read the wrinkles” in the muslin, but where she differs is that she also uses a grid to help identify areas that require changes and to indicate when the problems have been resolved. The grid is formed by marking the center front and center back as well as one or more perpendicular lines called horizontal balance lines, or HBLs.

After Sarah pins the changes, she has you transfer the markings back to the paper pattern, following the rules of flat patternmaking so that the pattern is accurate and reusable. There is a learning curve, which she patiently guides you through.

Not only does working with Sarah give me the result I had been striving to achieve, but Sarah’s approach frees me from comparing the contours of my body with the dimensions of a pattern. Once I’ve made all the changes, I make a fresh pattern and that becomes the standard, not some set of measurements that represent an average of some unknown number of women who look nothing like me.

IMG_1081

In the next post, I’ll tell you about my first workshop with Sarah and how working with her has transformed me from the disappointed would-be garment sewist stuck working exclusively in muslin to the happy camper who is cranking out garments that flatter my curves.

Fear of Beginning, Fear of Finishing

Have you ever Googled “paralyzing perfectionism”? I did it this morning (not for the first time) and got 18,600 hits. You have no idea how comforting it is to know that I’m far from the only one suffering from that affliction. On second thought, you might know exactly how comforting that is, in which case you and I have something in common other than a passion for sewing. This syndrome is why The Couture Counsellor has been incubating for months. It’s why all-nighters are still part of my work life. And it’s one of the reasons why closets brimming with fabulous clothes exist only in my head. The good news is that I’ve been chipping away at those fears. The closet I do have in my compact city apartment is filling up with clothes I made and love and I’ve started this blog without waiting to get the perfect logo designed, find the perfect blog theme/platform, become a better photographer, learn more about Photoshop, learn HTML, lose 50 pounds, blah, blah, blah.
I approach learning about sewing the same way I approach any research project, which is to say I like to be thorough. Okay, I’m a research junkie. It sometimes serves as my primary avoidance activity.
In classes, when everyone is writing down the technique being demonstrated, my brain is comparing and contrasting what this instructor is saying with what other instructors say about the same subject while my hand is scribbling down the information being given. For a long time, the contradictions threatened to drive me the rest of the way to crazy. Then I realized it just means there is more than one way to do just about anything and our job as sewists is to find the one that works for us, or maybe have a couple of different options available for different situations. Take sewing corners for example. Sew to the end? Pivot 90° at the corner? Pivot 45° and stitch across one stitch? Or is it two stitches? Or three, even? The answer is: It depends. That answer will cause normal people to grind their teeth, but it’s an answer we lawyers use all the time, so I can live with that.
Remember when I said fear of starting is only one of the reasons I have so many more garments in my head than I have in my closet? The other reasons are other demands on my time—working for a living, volunteer work for sewing organizations—and the ridiculous amount of time I spent trying to develop a good set of basic fit patterns. I’ll tell you about that experience and the solution I found at the end of that long, twisty road in an upcoming post. If you are on that road now, I can show you a shortcut. Stay tuned.
The title of this post mentions another fear—fear of finishing. That’s a fear that has become much less of a problem now that my hand sewing skills have improved and I’ve learned how to tackle what I call The Fussy Bits. By that I mean hemming, hand tacking, getting hooks and eyes and snaps in the right place and  sewing all kinds of closures so they look neat and tidy instead of knotted and gnarled. We’ll get to advice about those Fussy Bits in a later post. What I can tell you now is that there is no substitute for getting your hands on fabric, needle and thread and sewing some samples and sometimes some less than stellar test garments. You can read about sewing techniques and watch other people demonstrate them and it will give you a better idea of what to do, but it won’t get you all the way there. It’s like the old joke my father loved to tell about the young person who stopped an old man on the street in New York and asked, “Sir, can you tell me the way to Carnegie Hall?” The man smiled and said, “Practice, practice….”