In the Sketchbook-December 2016

Welcome to In the Sketchbook, a monthly look at fashion design sketches that we are working on for ourselves. Sketching garments on a personal croquis is a great way for the individual couture enthusiast to move beyond the use of commercial patterns and into a world of personalized design! It can be intimidating at first, but with a little bit of practice it becomes something you look forward to. Join us for a look of what we have going on In the Sketchbook! Brought to you by Wendy Grossman of Couture Counsellor and Steph King from Siouxzeegirl Designs.

I thought it might be a nice change to take a look at some garments that are actually in development. I’ve been working on pattern adjustments for the Appleton Dress by Cashmerette Patterns. This is a classic wrap dress designed for curvy figures. I think ITY (interlock twist yarn) knit is perfect for this dress, but I had trouble finding what I was looking for. I knew all the ITY knits in my fiber archive are cut in quantities that are only sufficient for a top so I searched to see whether I had anything in rayon that isn’t too clingy. One of the “discoveries” I made was a charcoal gray knit that has been tucked away for a very long time. I thought it would be just right, so I set it aside to prewash. Then I was looking for lace for the project we’re going to talk about in a minute and I cam across this lace mesh from MarcyTilton.com and had one of those aha moments.

img_0010

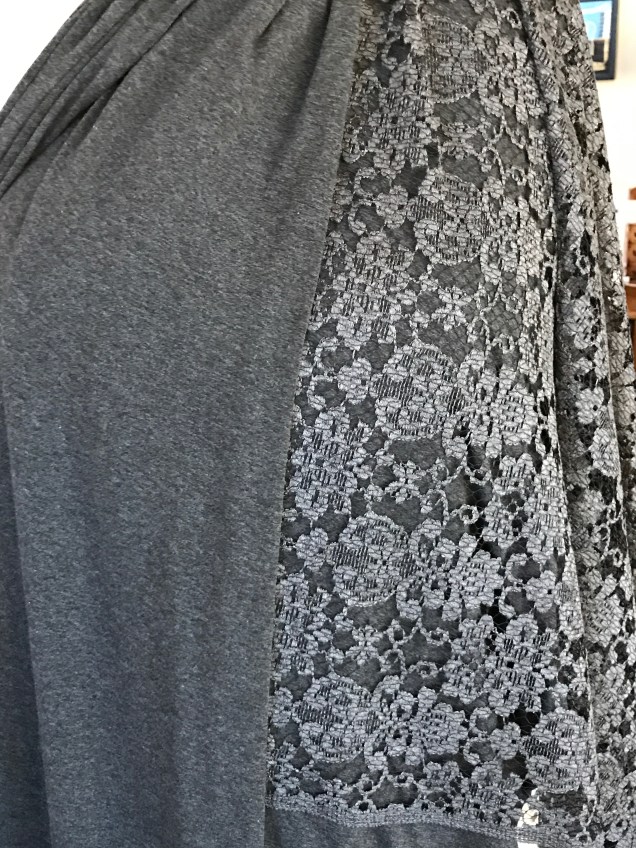
The lace looks a bit lighter in the picture than it does in person, but I think you get the idea. To me, knit and lace is an unexpected combination, especially a knit that’s not at all dressy like this one. I immediately thought it would look great on the neck bands and ties of the Appleton dress.

img_0005-1I’ll see if I can make it work on the sleeves, but I suspect I’ll need the stretch of the knit there. I thought about putting it on the edge of the overlap piece all the way to the hem, but I think it would be too much with the tie in that area. This is why sketching out ideas helps. You see issues you didn’t think of when the design is all in your head.

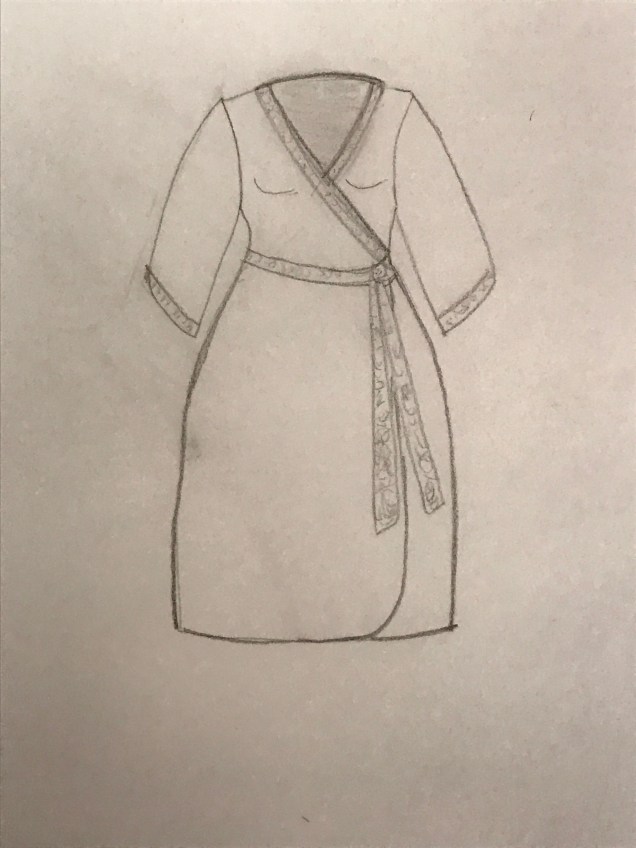
While I was noodling over the Appleton Dress, I wondered what it would look like with a collar.

img_0006

I like it. Maybe with contrasting fabric, maybe not.

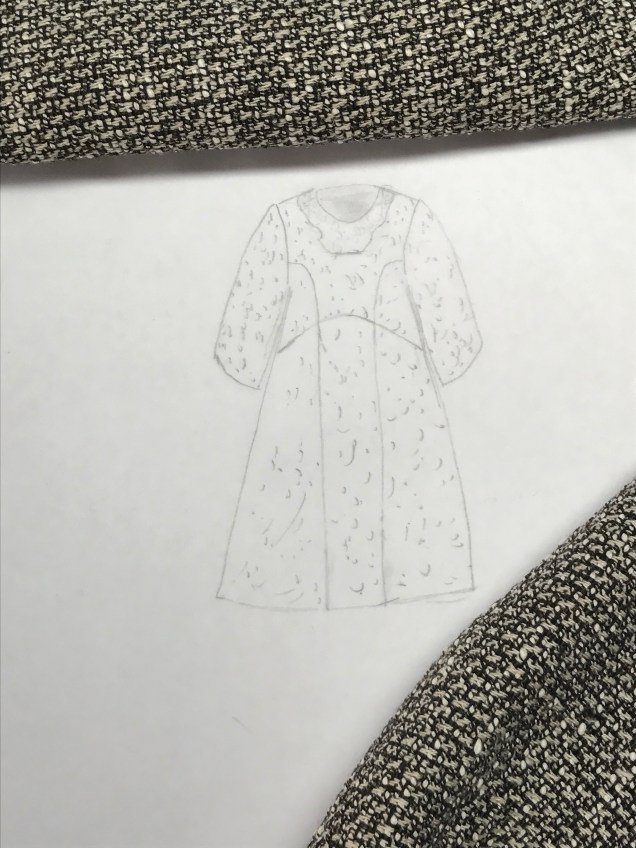
Another project that occupied a chunk of my time this month involves lace combined with tweed. I have this fabulous salt-and-pepper tweed made of cotton(!) that I ordered from SawyerBrook.com a couple of years ago. It’s very soft and should be in an unstructured garment, so I thought about using the design for my Spoonflower dress and adding ¾ length sleeves.

In contemplating collars, I wondered whether it might look nice with a collar made of lace. That started a whole quest that made me feel like Goldilocks. One lace was too much of a stark white, black did nothing for the fabric, various laces in ivory were too dense, and on and on. I kept coming back to a lace neck piece I acquired at an ASG fabric exchange several years ago. It’s the wrong shape and it doesn’t lend itself to sitting under a collar made from the fashion fabric (the sketches look like a dog with a beard), but the color and density are perfect.

 img_0008 
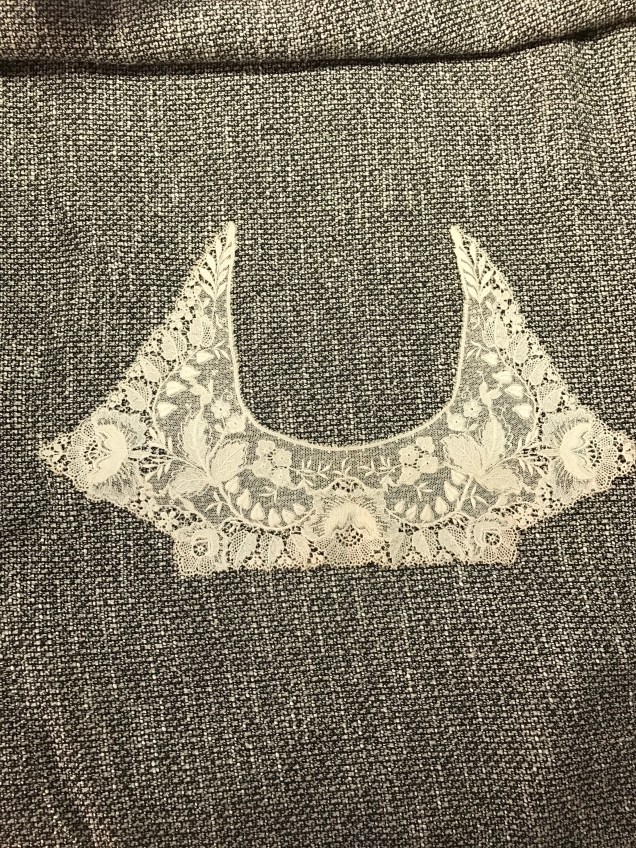
In a mentoring session, Sarah Veblen agreed that this is the lace I should use. She advised me to draft the neckline around it and forget about making a collar. I told her I was thinking about cutting out the flower at each of the points so the piece is not quite so wide and she agreed that’s a good idea. She suggested using the flowers somewhere else, maybe even at the top to balance out the width. I need to play around with them once I get them cut. I’m going to follow Pamela Legget’s advice for cutting out the motifs: sharp scissors, good lighting, no wine.

Here’s the sketch for the dress. I think it looks like it has measles and is wearing a bib. I definitely need to work on my sketching ability in the new year.

img_0007

Finally, I want to show you a sketch of a dress that I haven’t chosen fabric for yet. I sketched it using a cool new toy – um, tool – that I treated myself to. It’s the Apple Pencil, which I used with the iPad app, Paper 53. I want to use the silhouette of my Leaf Dress in a 3-season dress with sleeves. I think this will be a lot of fun to make and to wear.

img_0002

That’s it for now. Be sure to check out what fabulous designs my dear friend Steph King of Siouxzeegirl Designs is showing at 10 Sewing Machines & a Serger and wish her a happy birthday while you’re over there. And, we’d love to see and hear about what you’re sketching, too.

The Peplum Blouse

A while back a friend wore a peplum blouse she had made from Simplicity pattern 1666 and it looked fabulous on her. I remembered really liking the way peplums looked on a much younger me when I had the body I wish I had appreciated more. For reasons I can’t explain, no warning buzzers went off in my head telling me that maybe this wasn’t going to be the best option for my current body.

img_2259

As the pattern envelope clearly shows, peplum = flounce. Putting a flounce on my curves is not a good idea, as I discovered when I made my first mock-up. That mock-up was dated January 2015 and there are no pictures of me in it. That said, this project wasn’t a total waste of time. I learned some interesting things I want to share with you now and I developed a neckline and collar that I’m looking forward to tweaking and using again.

I made the pattern for the first mock-up by starting out with my master bodice pattern for the shoulders, armscyes and princess seams and I tapered the pattern pieces at the bottom to conform with the corresponding area in the commercial pattern. Then I adjusted the peplum from the commercial pattern to fit to the top pieces. The peplum doesn’t go all the way around the body in this pattern. The center front panel extends to the hem and the peplum is attached at the front princess seams. I used the neckline from the Simplicity pattern and I think it’s a keeper, but I eliminated the cap sleeves.

When I showed the mock-up to Sarah Veblen, she suggested we try using inverted box pleats extending down from each of the vertical seams (princess seams, side seams and center back).  The second mock-up seemed like an improvement so I made a wearable mockup in a cotton print. I wasn’t happy with it. Sarah admitted it wasn’t a great look for me.

Peplum Wearable Mockup

One thing she suggested was eliminating the box pleats at the front princess seams. I was only too happy to do that, because getting those puppies attached with the pleats intact was nerve-racking. That was an improvement, and I’ve worn the wearable mockup with that change. I asked Sarah whether things might improve if I added a collar and she thought that might balance it out better. So, I mocked up a rolled collar, tweaked it in consultation with Sarah and set out to make a final version of the blouse.

The first thing I did was make a clean copy of the peplum pattern with the pleats clearly marked. I used color-coding and arrows to make sure I understood how they got folded.

The straight of grain is at the front princess seams and so center back is the area with the most bias. Pleats and bias don’t necessarily play well together, but I had chosen a stable cotton shirting, which helped.

img_2126

I’m pretty sure the side on the right is the “right” side of the fabric, but I like the side on the left better and so that’s what I used as the right side.

When making a pattern with pleats, it’s important to true the seamlines and then add the seam allowance. To do this, you pin or use temporary tape to hold the pleats closed, then cut away any ragged places on the line or curve at the hemline and the top seamline. If you don’t do this, you can end up with the hidden part of the pleat hanging below the rest of the hem or some other unevenness.

I thread-traced all the pleat markings so they would be exact and visible from both sides.

Another thing I learned is that pleats tend to behave better if you hem before pressing in the pleats, so I did that. I used the method Janet Pray of Islander Sewing Systems teaches in her shirtmaking class for the narrow machine hem. This consists of pressing the hem up at the hemline (this one was ⅝” from the edge) with the tip of the iron, then crimping by machine at ¼” and using the stitching line and the pressed fold line as the guides for double-folding the hem.

img_2220-1
Pressing Peplum at ⅝”

I then used Wonder Clips (Janet Pray does not use pins or anything else) to keep it all in place and sewed from the right side. I find it helpful to use the blind hem foot on my machine helped me to keep the stitching at the same distance from the edge.

img_2223

I finished all seam allowances with a three-thread serge finish and made an all-in-one facing for the neck and the armholes.

The part of construction that I thought would be tricky was attaching the peplum to the front at the princess seams. This is similar to an inset corner, so I pulled out all my sewing reference books and articles I’ve collected on inset corners and cut some scrap fabric to make samples. Almost all the techniques I’ve read about involve snipping into the inside corner and opening it up to almost a straight line, a method that’s given me mixed results. Louis Cutting’s method uses double-sided fusible web and topstitching, which works very well, but this garment wasn’t one I wanted to topstitch.  The technique I was most interested in using is one I’ve made samples of before that I learned from a class taught by Susan Khaljie.  It’s her technique for sewing a basque waist. After reviewing all my other resources, I decided this method is the hands-down winner. (Yes, I did use an Islander industrial shortcut and a couture technique in the same garment.)

You can find the technique on page 95 of Susan’s book, Bridal Couture. Even if you don’t think you’ll ever sew a wedding gown, if you have any interest in sewing with lace and making beautiful evening wear, this book should be in your library. (Hard copy is out of print, but the e-book version is excellent.) Essentially, what you do is sew two straight seams perpendicular to one another. Here are the front and back of the sample I made for this garment.

The couture method has you reinforce the inside corner with a patch of organza and for less elaborate garments you can use fusible interfacing. I had trouble getting such a small amount of fusible interfacing to stay put on this textured fabric so I ended up skipping this step. The next step in preparing the corners is to stay stitch along the stitching lines of both pieces, shortening the stitch length so that you have tiny stitches right at the corner. I used a 1.1 stitch length at the corners. That allows you to clip the inside corner, getting right up to the stitching. It also provides a guide for final stitching.

img_2234
Stay stitching the corner

The next step is to pin so that the corners match on both pieces.

img_2236

Then finish pinning one of the seams. When you stitch, part of the time you will only have one piece under the machine. That’s where my finger is in the picture below.

img_2237

After sewing both seams, this is what it looks like.

And this is what it looks like when completed. Whew!

img_2241
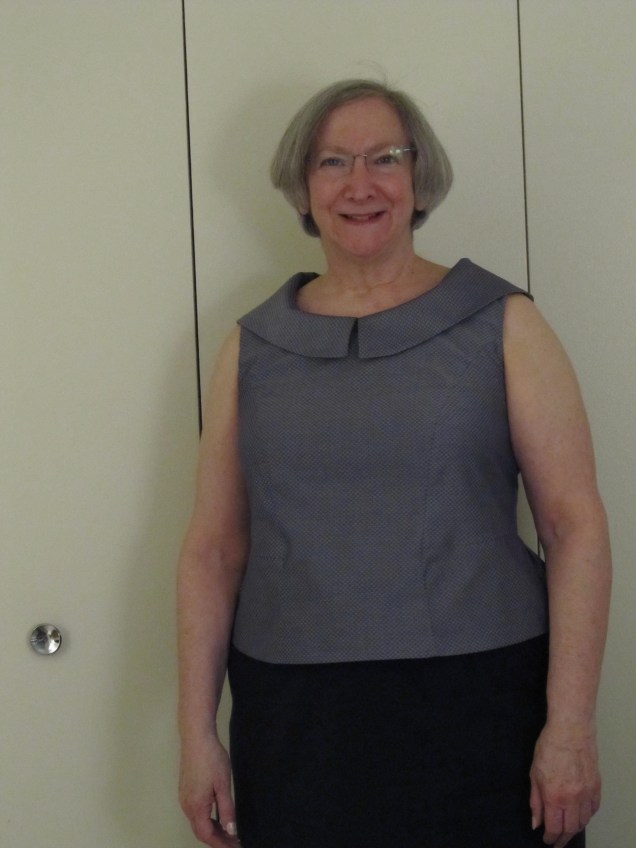
So, here’s the finished blouse.

img_0003