
One of the great hands-on workshops I attended at last summer’s ASG Conference was Jennifer Stern-Hasemann’s half-day class called “Beyond the Boatneck.” Jen is a great teacher as well as an excellent designer and patternmaker. She sets a low-key, no-stress tone in her classes and is a joy to learn from.
The class description talked about pattern variations for her Tee pattern, but it actually was a pattern drafting class. I look at her approach as akin to a mom with young children sneaking veggies into a casserole. So many sewists – even experienced ones – are intimidated by the thought of patternmaking, but routinely make pattern adjustments. Whatever works, right?

The class materials included a booklet that has color photos and step-by-step instructions for drafting six new necklines and converting the tee into a tank top. Jen sells the book on her website, which is almost as good as having her patient guidance in class.
Most of the neckline changes can be achieved by swapping out a single pattern piece. As I explained in an earlier post, the Tee achieves its flattering shape with seams that form upper and lower parts of the front and back and an upper side front panel that acts as a dart.

The neckline variations are made by making a new upper front pattern piece. If the neckline is narrower than the original boatneck, the back piece needs to be widened at the shoulder to correspond to the combination of the upper front and side front pieces.
I was excited to make patterns for the variations in the book. Here are my patterns for the scoop neck (yellow in the upper left), v-neck (lower left) and crossover (right).


At the same time, I was struck with an idea that wasn’t in the book – a draped neck. I attended the workshop with my dear friend and Partner in Crime, Steph King. As soon as I had the words “drape neck” out of my mouth, Steph started tracing her center front piece and cutting strips for slashing and spreading it into a draped neckline. I waited until I got home to do mine.
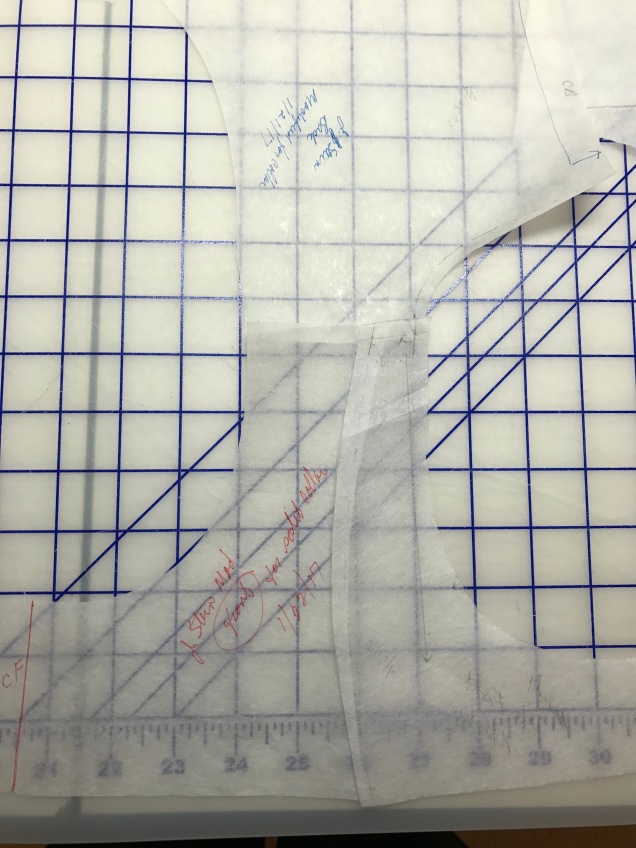
My first draped pattern piece looks like this. The shoulder is at the upper right of the picture and the horizontal seam that connects the upper front to the lower front is now curved.

I cut two of these on the fold so I could use one as a facing, which is what I do most of the time with this pattern. The result was a seam at the neckline, which is okay but not fabulous.

I love this drapey rayon knit from Marcy Tilton’s web site. It has all my colors in it and feels like a warm weather print, so I made this top with short sleeves. it looks great on the dress form, especially after I’ve futzed with it so the seam doesn’t show. When I’m wearing it, I’m not static like my dress form and movement will make the neck seam visible from time to time.
After seeing that eliminating the seam in the front neckline would have given me more of the effect I was going for, I decided to set aside my fears about dealing with what I think is a very strange-looking pattern piece when a drape neck forms its own facing by folding over. In thinking it through, I realized that drafting this type of pattern piece doesn’t require mastery of any mysterious geometrical gymnastics. It’s just a matter of tracing the pattern piece I’d drafted by slashing and spreading and flipping that over to make a mirror image, then overlapping them so that the two halves of the new piece meet in a straight line that the fabric can be folded over there and sewn in place. It ends up looking like this:
 It’s not marked in this picture, but the straight line on the left is Center Front, which is cut on the fold of the fabric. That “V” at the shoulder was the bit I had found intimidating. From a patternmaking point of view. it’s really no big deal. It’s what forms naturally when melding the two pieces together. Construction – especially on a serger – can be a little tricky.

I didn’t take any pictures of construction, but as you can see from the labeled picture above, the tricky bit is sewing that V-shaped front shoulder seam onto a straight back shoulder seam and making sure none of the fabric scooches away when under the presser foot and leaves a hole. This is especially tricky with slippery and drapey fabric like the rayon-Lycra knits I want to use for this type of garment. Add to that the fact that it’s a knit and I want to serge it together and I start to wonder whether this was such a great idea after all.
After clipping into the V as far as humanly possible, I tried serging the pieces together and got a hole the first time. Unstitching a serged seam is such an unpleasant experience, I decided to do whatever it takes to avoid doing that a second time. My solution was to baste the shoulder seams by hand. Before you groan and say “hand basting a knit, are you crazy?” remember that (1) these are very, very short seams. We’re talking just a few inches. And, (2) I did a lot of hand stitching on my Miss Fisher top, which is a knit. Besides, hand basting takes a lot less time and is way less frustrating that unstitching a serged seam over and over again.
The basting did the trick and I was able to complete construction with no problem.


This approach is definitely a keeper.
Next, I got it into my head that I wanted to try adding a collar. It’s been a few years since I’ve been wanting to try this particular collar. My lovely friend Marie wore a top made of McCall’s 6796 to a sewing group meeting once and I immediately bought the pattern.

The neckline on the pattern is pretty high and for that reason I took the pattern out and put it away several times. But last month I decided to try this collar with the J. Stern Tee and the scoop neck variation. After walking the neck seam on the tee and the collar, I did a bunch of slashing and spreading that gave me the little extra I needed in the back and the lots of extra I needed in the front.
 After trying a mock-up with the scoop variation from the workshop, I decided the neckline had to be a little bit less scoopy. So I made a modified scoop neck pattern piece and adjusted the collar accordingly. I tried it out in this great rayon-Lycra knit from Sawyer Brook in a color they called Bluebonnet, but didn’t think it worked well. So, I made the top with the modified scoop neck but no collar.

It’s okay, but I had this picture in my head and this wasn’t it.
The thing is, I had bought enough of this fabric to make a twinset and so I had plenty left over to try the top with the collar again. In a mentoring session with Sarah Veblen, she said she thought the neckline needed to be higher for the collar and I said i thought it needed to be a bit narrower. She agreed and, with her help, we came up with the modifications I needed to make a slightly higher, slightly narrower semi-scoop pattern piece. With the somewhat narrower neckline, I had to make a new back piece as well. Instead of making the collar smaller, I decided to see what it would look like with some overlap. I then draped the collar onto the assembled front, side and back panels on the dress form and liked what I saw.

With this sewn, I then added the facing assembly and finished construction. Unfortunately, I got confused about which was the fashion fabric and which was the facing in the top panels and the finished product has the collar opening on the left instead of the right with the front overlapping the back. Sigh. The next time I do this I won’t take off my painter’s tape labels until after the whole thing is assembled. Another live and learn moment. Still, I’m pretty happy with the result.


Great post! I love how you added the collar, it adds a nice touch of drama to a simple and great fitting tee. Nicely done!
LikeLike
Love the post. The McCall’s is one of my favorite patterns. Attractive neckline.
LikeLike