
There’s no getting around the fact that princess seams are the key to garments that flatter a curvy figure. Darts and tucks and gathers are fine, but they have their limitations. Even in combination, the silhouette they produce is boxy in comparison to the silhouette that princess seams can achieve.


Okay, so there are shaping darts in addition to princess seams in the bodice on the right, but you get the idea.
The reason for these differences is easy to see in the patterns. Here is a standard darted bodice. The one on the right has the dart intakes cut out and the one on the left has the dart legs meeting the way they would in fabric.

As you can see, there is only one place the darts can create three-dimensional shaping. Darts point to the fullness they allow the fabric to make room for, and that one place in most bodices is the bust. That’s fine if your body only curves in that one place and everything else is pretty straight, but how many women are built like that? I never was.
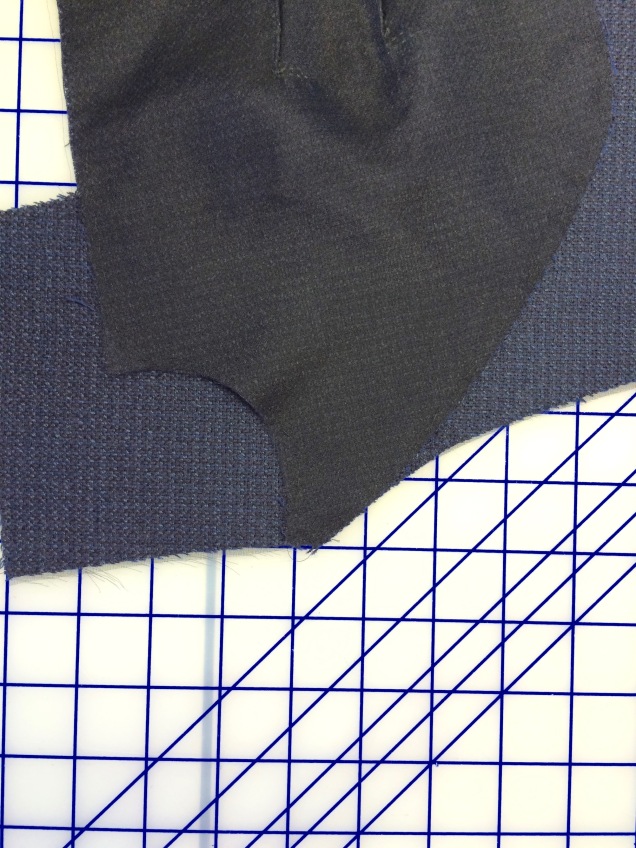
Here is what the front and side front pieces of the jacket I’m working on look like when they’re flat.

The negative space between the two pieces runs from the armscye almost all the way to the hem and the side front piece makes quite a number of turns as it is joined to the front. That allows for a fair amount of contouring in very specific areas.
Here is an edge view of what the pieces look like when pinned together. It’s impossible for them to lay flat on the table for almost the entire length of the seam.

Now that you’re convinced that princess seams are the best option for a flattering fit (I hope), let’s talk about construction. I know a lot of sewists shy away from princess seams because they seem intimidating. But now that I’ve had a lot of practice sewing them, I don’t think they’re difficult to deal with.
There are a lot of methods out there for sewing princess seams and there really is no wrong way to do it. If it works and it feels comfortable, then it’s the “right” way to go about it.
First, a word about patterns. My patterns were developed under the guidance of Sarah Veblen, who doesn’t build ease into her princess seams. Commercial patterns almost always have ease and so if you are using one that does, you need to allow for that. The part of the seam that has ease is usually marked with dots and so it’s easy to figure out where the seamline is supposed to match up.
I don’t usually use many pins in my sewing, but I’ve discovered that having a fair number of pins in a princess seam is very helpful. How does it help? It helps me avoid spending quality time with my seam ripper. Whatever adjustments need to be made can be made by moving pins, not unstitching. I think of it as sort of a dress rehearsal. By the time I get to the machine, it’s smooth sailing.
I start the pinning at both ends. At the cut edge of the hem, the cut edges go together just like a front and back go together at a side seam. No big deal.

At the top of an armscye princess seam, things are more interesting.
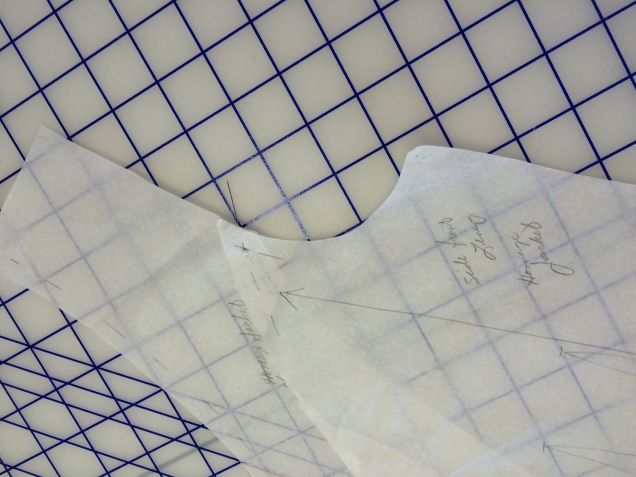
The picture above shows how the front and side front fit together at the top when the side front has been trued. You know exactly where to place the pieces at this end. Below are two side front pattern pieces, one for the fashion fabric (on the right) and one for the lining. Notice that I had forgotten to true the lining piece.
 Commercial patterns leave that point on the pattern piece, so when you pin your fabric together a little tail of the side panel sticks out and you never know how much of a tail is supposed to be left hanging. There are two ways to deal with this issue.
My preferred fix is to correct the pattern. Sarah taught me that to do this, you simply pin the pieces together as sewn and cut off the tail.
The first step is to mark the seamlines if that hasn’t been done already.

Here are the pieces laid out on top of one another. Notice that the pin goes into the intersection of the princess seam and the armscye seam. This is the end result we’re going for.
Here are the pieces pinned as they will be sewn. Notice the tail where the point of the side front is folded at the seamline.

When the tail is cut off, the pieces go together as they should. No guesswork needed.


If you’d rather not change your pattern, there is another solution. It’s one that has to be used every time you use the pattern, but it works fine.
Mark the intersection of the princess seam and armscye seam on both adjoining pieces. I’ve used a Chalkoner to do that here.


Insert a pin at that intersecting point on both pieces. Now the pieces are positioned correctly at the top.

Once I’ve established the proper placement of the top and bottom of the seam and have pinned the pieces together there, I work my way into the middle.


If I’m left with places that are going to pucker, I take out one or two pins and pat the fabric into place to see where it needs to go. The curvy areas are on the bias and so the fabric has a tendency to shift. A little extra handling is usually all that’s needed to find how the two pieces fit together. I know they will fit together because I walked the seams in the pattern and I cut as accurately as possible.
If the fabric still doesn’t settle into the right spots, I check the edges to make sure they are aligned exactly. Small corrections in alignment will often help the fabric find its place. If nothing is working and it looks like I have a ton of extra fabric in one piece, I double check to make sure I’m not trying to attach a side front to a back piece or a side back to a front. That would explain the problem.
Once the pins are in and I’m satisfied that the pieces are where they need to be, it’s off to the sewing machine. I like sewing with a 3/8″ seam allowance most of the time and I find it especially helpful when I’m sewing curvy princess seams. I can tell you that sewing princess seams in stiff muslin with 1″ seam allowances is no fun at all, but after a little practice, sewing natural fiber fashion fabric that has some drape in it with 3/8″ seam allowances is a piece of cake. I just sew slowly and keep my eye on the guideline directly across from the needle, not ahead of it. I sew with the machine set to stop with the needle down so if I need to stop to readjust, the needle is anchoring the fabric.
I also like to sew from the hem up. That means on one side the curvy side panel will be against the feed dogs and on the other side they will be on top. That doesn’t matter as long as I have the pins in place and I’m using my hands to guide the fabric.
After pressing the princess seams as sewn (but only with the tip of the iron not going much beyond the stitching line), my favorite way of setting in the shaping is to use a June Tailor Board along with an iron that gives plenty of steam.


The seam allowances on this wool fashion fabric, which I’ve underlined with silk organza, pressed open and stayed that way without requiring any clipping. When the seam is on the curved part of the tailor board, if I see ruffles in the seam allowance after pressing, I use that as a guide for clipping.
After the seam allowances are pressed open, I press on the right side over a ham and use a silk organza press cloth.

With the princess seams done, my project is transformed from flat fabric to a three-dimensional object that holds the promise of becoming a garment I will love wearing.


Wendy, this is a great post! It is amazing how much shaping a princess seam can give.
LikeLike
This is a great post on princess seams. Also, your top is so pretty.
LikeLike
yes!! Thank you Wendy for explaining one of the abiding mysteries of construction so clearly and for the excellent photos. What happens at the beginning and end on these seams has always been a problem for me and you just solved it –This is great!
LikeLike
Thanks for the tutorial! I am one of those “intimidated” sewers, but I am going to give princess seams a shot!
LikeLiked by 1 person
I’m so glad you found this helpful. Please let me know how it turns out.
LikeLike